Step 1: Anticipation

|
See the full description here
Summary:
Collaborate and form a team with your child. When you invest the time to form a strong team, children feel more comfortable and less anxious – this will help you complete the care with less stress – for you and your child.
Use these tips, from the start, to set the stage for a positive care procedure:
- Create the right moment: integrate the care in a routine.
- Alert your child to the needed care and communicate together.
- Form a team with your child: Encourage autonomy by offering realistic choices such as the method of distraction. Stay tuned to your child. Manage pain and anxiety, using distraction and positioning for comfort.
|
|
Step 2: Preparation

|
See the full description here
Summary:
- Prepare the environment: Identify a routine place for care. Close windows, doors and fans. Wash and dry the work surface and gather the needed materials for the care and to distract your child.
- Prepare your child: Get help if needed. Position your child for comfort to receive the care and start to use the selected distraction method.
- Prepare yourself: Find the right time when you are ready to provide the care safely. Review the list of care steps. Wash your hands.
Now that you are ready to start the care procedure, take the opportunity to encourage and praise your child.
|
|
Step 3: Procedure

|
See the full description here
Summary 3 key concepts:
- Safety: Carefully follow the care practice steps as you have been taught.
- Flexibility: Be ready to adjust according to your child’s reactions during the procedure. As needed, reposition or select an alternative distraction strategy. Follow your child’s pace and rhythm.
- Collaboration: Reassure your child, verbally and non-verbally. Acknowledge your child’s emotions and reactions. Help your child differentiate between the different sensations during a procedure.
|
|
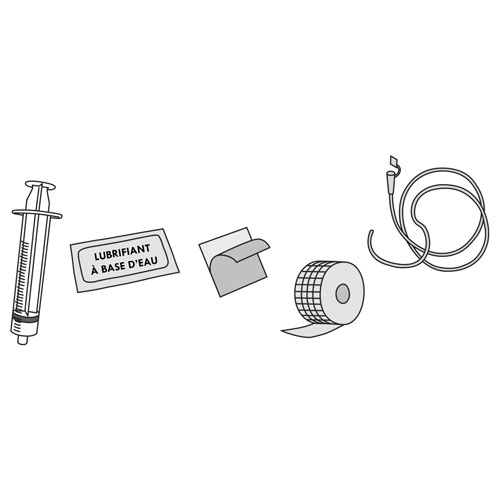
Step 4: Prepare the material
|
- Set up on a flat surface or a well-cleaned table.
- Gather the necessary equipment.
- Remove the tube from its packaging or container.
- Inspect the tube to ensure that it is not damaged or soiled.
- Cut the appropriate size of the protective dressing, if applied.
- Cut the appropriate size of the adhesive bandage that will secure the tube to the cheek.
- Open the lubricant packet; place a small amount of lubricant on the open tube package.
Why ? This step ensures that the required materials are on hand in order to start the procedure.
|
|
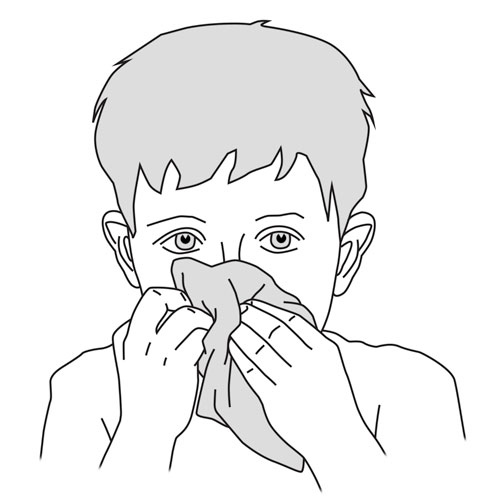
Step 5: Prepare your child
|
- Ask your child to blow his or her nose, if possible.
- If he or she is unable to do so, remove secretions from your child’s nose with a tissue or suction nasal secretions, as instructed by your healthcare team.
- Choose which side the tube will be inserted.
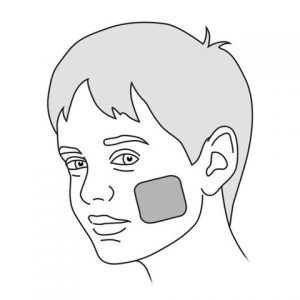
- Make sure the skin on the cheek on the same side as that nostril is clean and dry.
- If the tube will be left in place for a long period of time, attach the protective dressing to the cheek where the adhesive bandage will be placed.
Why ? Clean nostrils make it easier to insert the tube.
The protective dressing minimizes irritation to the cheek.
|
|
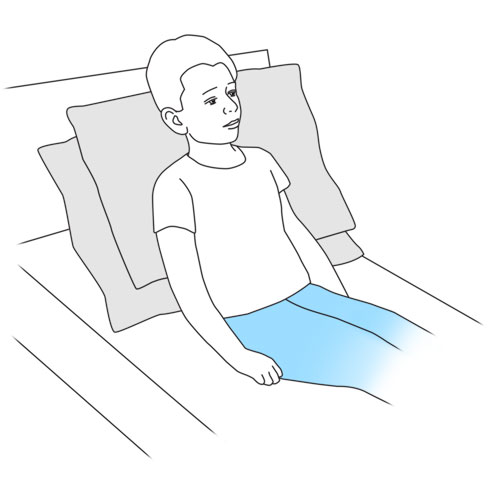
Step 6: Position your child
|
- Place your child in a lying down position.
- Swaddle the baby in a blanket if necessary, depending on the baby’s age and degree of collaboration.
- If your child is older, position your child in a seated or semi-seated position and tilt your child’s head slightly forward.
Why ? This position facilitates swallowing as well as the progression of the tube through the nose into the stomach and reduces the risk of aspiration into the lungs.
Swaddling the baby increases the safety of the procedure.
|
|
Step 7: Determine the tube insertion length

|
- Take the end of the tube and put it on the tip of your child’s nose.
- Holding the end of the tube in place, measure the distance from the tip of the nose (1) ⇒ to the base of the earlobe (2) ⇒ to the base of the sternum breastbone) (3) ⇒ to halfway between the base of the sternum and the navel (belly button) (4).
- Make a mark at this point on the tube with a permanent marker pen or note the number on the tube if it is graduated (numbers pre-marked).
Why ? Measuring the insertion length of the tube helps ensure that, once fully inserted, the tube will be correctly positioned for use.
|
|
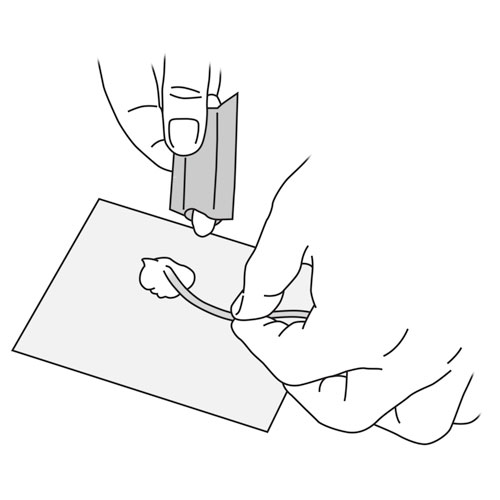
Step 8: Lubricate the tube
|
If you use a water-soluble lubricant:
- Spread the lubricant (size of a pea) on the first 3 cm of the tube.
- Roll the end of the tube on in the lubricant.
If you use water:
- Dip the end of the tube into the glass or water container.
- Shake slightly to remove excess water drops.
Why ? Lubrication of the tube makes it easier to insert and more comfortable for your child.
|
|
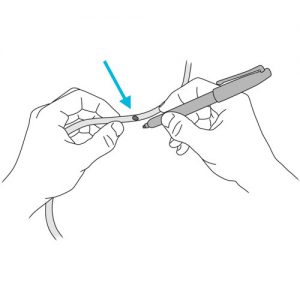
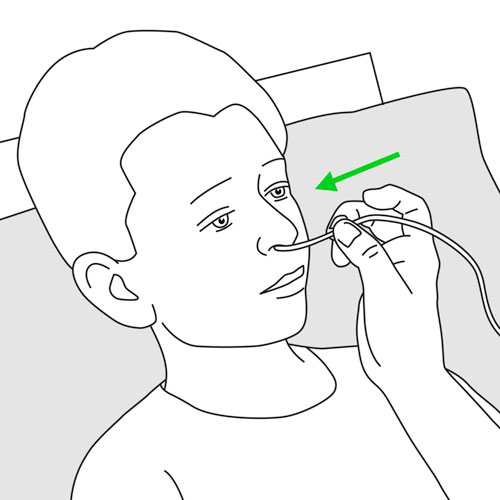
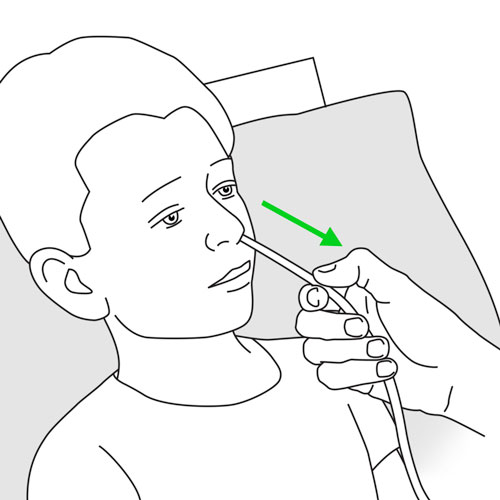
Step 9: Insert the tube
|
- Give your baby a pacifier to suck on or if your child is older, ask your child to swallow or sip water from a glass with a straw.
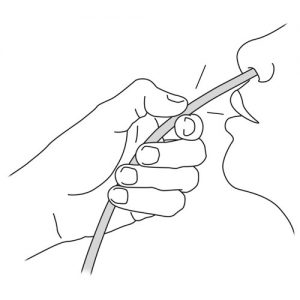
- Hold the pre-measured, lubricated tube like a pencil about 3-4 cm from the tip.
- Slowly insert the tube into one nostril while your child swallows; gently but quickly push the tube backwards and down. Do not force.
- Continue to insert the tube until the mark reaches the edge of the nostril.
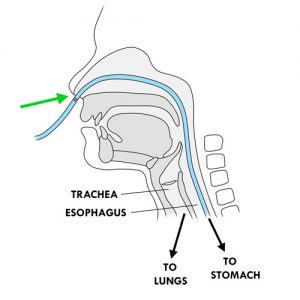
Why ? This method of insertion follows the natural curves inside the nose and the back of the throat and avoids injury.
Swallowing, drinking or sucking while inserting the tube helps advance it into the back of the throat.
Inserting the tube quickly will minimize gagging and discomfort.
Inserting the tube up to the mark allows placement in the stomach.
|
|
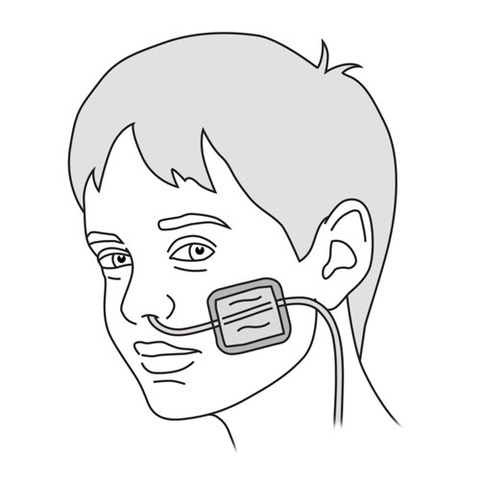
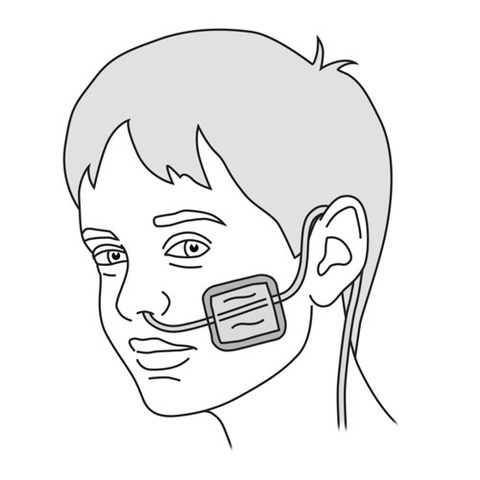
Step 10: Tape the tube
|
- If the tube is going to be removed after the feeding session: attach the tube to your child’s cheek with the adhesive bandage.
- If the tube will be left in place for a longer period of time: place the tube over the protective dressing already stuck on the cheek and secure it by placing the adhesive dressing over it.
- Make sure that the pen mark on the tube is clearly visible on the edge of the nostril.
- Make sure that the position of the tube does not compress the edge of the nostril.
Why ? This step reduces the risk of accidental removal of the tube.
Do not put too much pressure on the nostril to avoid injury from the tube.
|
|
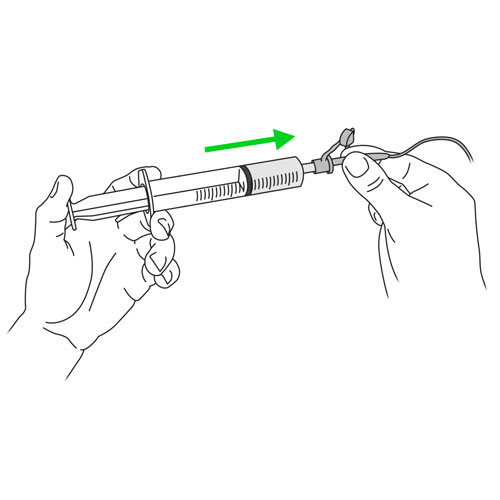
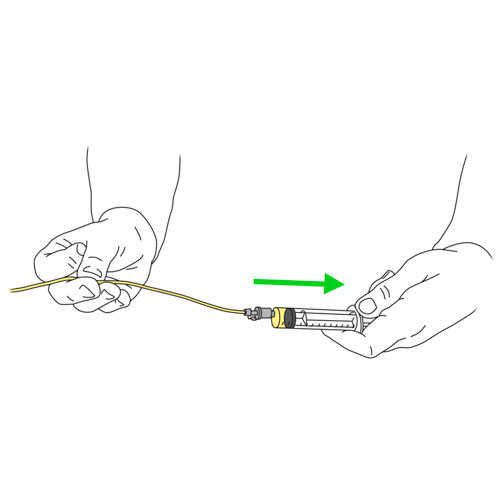
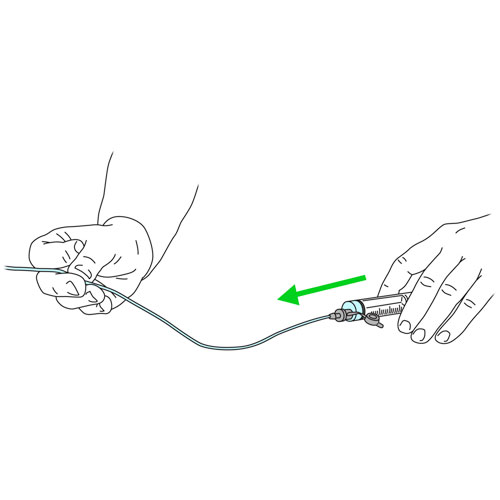
Step 11: Check the tube location
|
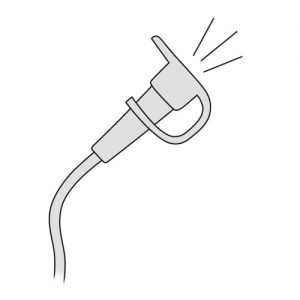
- With one hand, bend the tube near the outside end of it.
- With your other hand, remove the cap from the end of the tube, if in place.
- Connect the syringe.
- Stop bending the tube.
- Gently pull on the plunger to withdraw some gastric secretions (liquid from the stomach, usually clear or light yellow in colour) into the syringe.
- Bend the tube again.
- Disconnect the syringe.
- Replace the cap at the end of the tube.
- Stop bending the tube.
- Check the pH of the gastric secretions: soak the pH indicator paper with a few drops of the liquid collected in the syringe.
- If the result is 5.5 or less, the tube is in the correct position.
- If the result is 6 or higher, the tube may not be in the correct place; remove the tube and reinsert it.
- Discard any gastric fluid remaining in the syringe.
Why ? This step is used to check if the tube is in the stomach. If so, the pH indicator paper will confirm the acidity of the gastric liquid.
Bending the tube prevents the gastric secretions from leaking out if there is no cap at the end of the tube.
|
|
Step 12: Irrigate the tube
|
- Put the tip of the syringe into the water container.
- Withdraw the plunger and fill the syringe with the amount of water recommended by your healthcare team to irrigate the tube.
- With one hand, bend the tube.
- With the other hand, remove the cap in place from the end of the tube.
- Connect the syringe.
- Stop bending the tube.
- Slowly depress the plunger of the syringe to push the water into the tube.
- Bend the tube again.
- Disconnect the syringe.
- Replace the cap at the end of the tube.
Why ? This step clears the tube and prevents blockage.
|
|
Step 13: Secure the tube
|
- Put the tube behind your child’s ear, if this is what your healthcare team recommends.
- The tube should be positioned so that it does not put pressure on your child’s nostril and allows your child to move his or her head.
- Attach the tube according to your healthcare team’s instructions: slide it under clothing or roll it up and tape it to your child’s back with adhesive tape.
Why ? This step prevents unintentional removal of the tube, minimizes the risk of strangulation and promotes your child’s comfort.
|
|
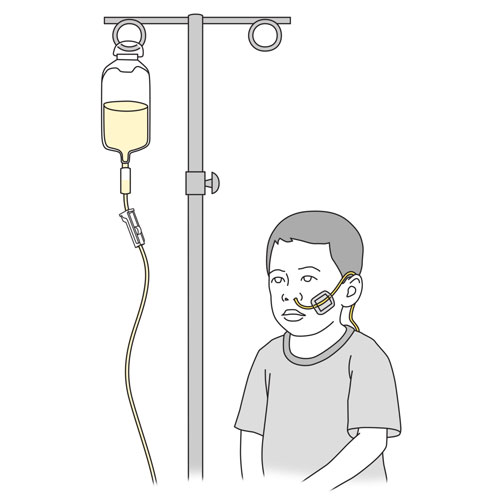
Step 14: Administer the formula, if applicable
|
Go to the next step if you want to give your child medication instead.
- Proceed with the administration of the nutritional formula as planned for your child.
- Observe your child for any signs of discomfort when the feeding session is started (eg, nausea, vomiting, difficulty breathing, abdominal pain, sweating, etc.).
|
|
Step 15: Administer medication, if appropriate
|
Step 16: Remove the tube, if agreed
|
- Wash your hands again.
- Make sure the cap is securely in place at the end of the tube.
- Carefully peel off the adhesive dressing that holds the tube in place on the cheek.
- Place your child’s head slightly tilted back.
- Firmly pinch the tube a few inches near the nose.
- Pull on the tube with a quick and continuous movement, without forcing.
- Peel off the protective bandage if present on the cheek.
Why ? Pinching the tube prevents fluid (contained in the tube) from entering the lungs when removing it.
|
|
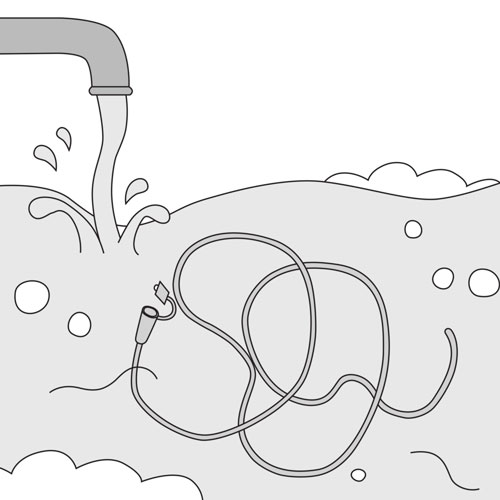
Step 17: Clean and store equipment
|
Clean, maintain and store equipment as recommended.
Why ? This step is necessary to ensure cleanliness and proper functioning of the equipment for the next use.
|
|
Step 18: Recovery

|
See the full description here
Summary:
The treatment is finished. Wash your hands again.
Be prepared to recognize the challenges faced and to provide positive feedback. Help your child recognize his/her strengths. Acknowledge the collaborative teamwork.
- Listen to what your child says about the parts of the procedure that were difficult or painful.
- Comfort your child and recognize your child’s collaboration with positive feedback.
- Highlight your child’s specific strengths that helped make the procedure positive.
- Discuss with your child what might be done the same or differently the next time the care is needed.
- Keep your promises if you have promised a reward, follow through.
- Reward yourself too.
|
|