Good nutrition helps promote children’s health and growth.
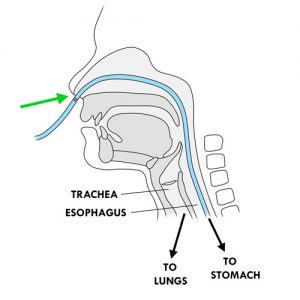
Food is normally introduced by the mouth, travels down the esophagus to the stomach and then passes through the small intestine (or small bowel) before continuing on to the large intestine (or colon).
The small intestine is composed of three sections: 1. the duodenum, 2. the jejunum and 3. the ileum. Most of the digestion and absorption of food takes place in the small intestine, especially in the duodenum and jejunum.
Certain problems or situations can prevent children from feeding themselves adequately:
difficulty sucking, chewing and swallowing (eg, surgery in the mouth),
need extra calories (eg, to treat wounds, heal burns, gain more weight),
poor absorption of food (eg, inflammatory bowel disease),
need to give the intestines a rest period (eg, after gastrointestinal surgery),
increased energy needs because of other medical conditions (eg, heart or lung conditions),
loss of appetite,
aspiration (accidental entry of food or reflux from the stomach into the lungs),
malfunctioning of the digestive system (eg, congenital malformations, genetic conditions),
etc.
Enteral nutrition (or enteral feeding or gavage) is used to feed children who cannot take any food or fluids by mouth or who need supplemental feeding to meet their nutritional and water needs to ensure their hydration and growth.
Enteral nutrition is a way to deliver different types of nutrition directly into the stomach or small intestine through a tube. The types of nutrition may include: water, breast milk, fortified breast milk, infant formula, nutritional formula (or enteral formula or feeding or gavage solution) or liquefied food.
When enteral nutrition is prescribed at home, it may be needed for several weeks, months or longer, depending on the child’s condition. The duration of treatment is determined by the healthcare team.
Your healthcare team has determined that enteral nutrition is the most appropriate way to adequately feed and hydrate your child, given his or her condition. With proper monitoring and good daily care, enteral nutrition at home is effective and safe. It allows your child to continue to grow and develop well.
How does it work?
Enteral nutrition is administered through a feeding tube that is introduced in either of these ways:
through the nose to the stomach or small intestine (nasal tube),
through the mouth to the stomach or small intestine (oral tube),
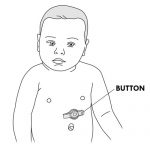
through an ostomy or a stoma, a small opening in the skin that connects the stomach or small intestine to the belly wall. A tube or button is installed in the stoma to keep it open for feeding.
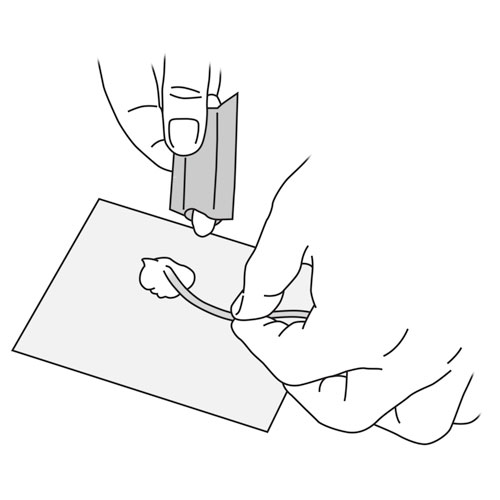
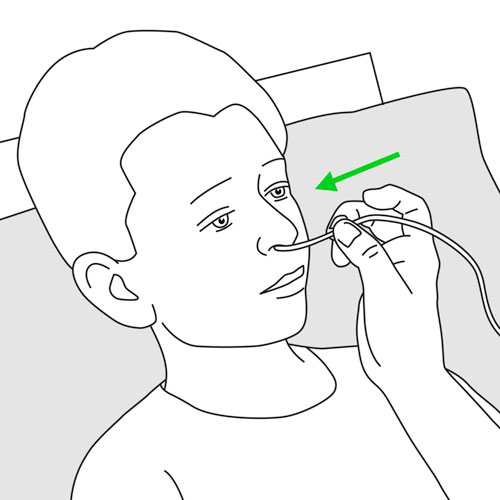
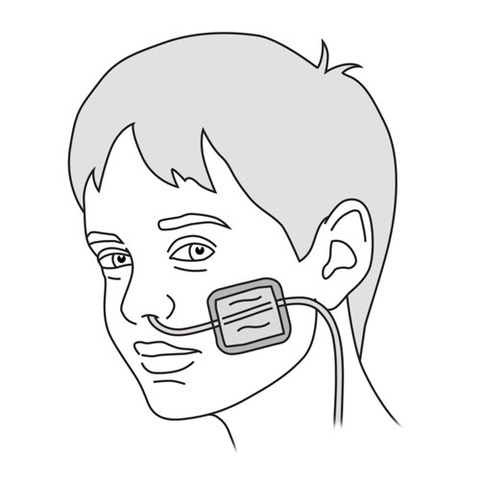
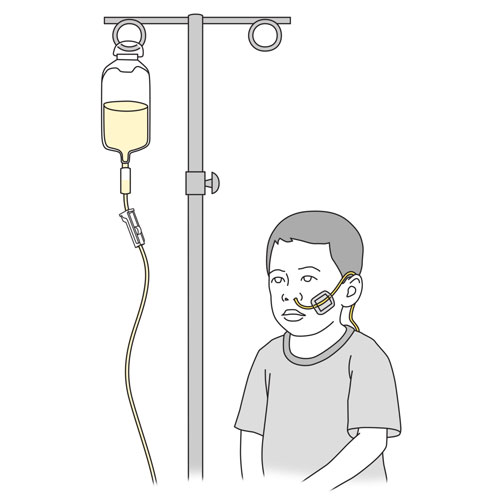
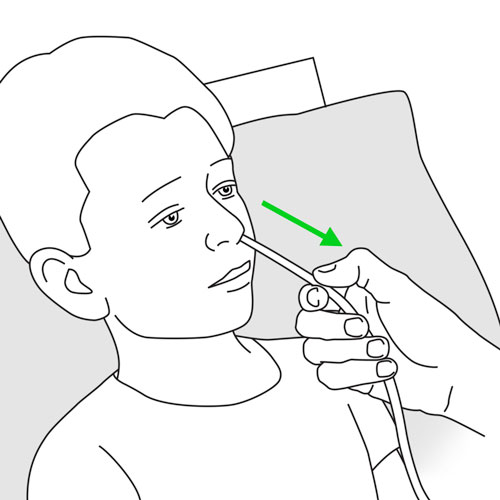
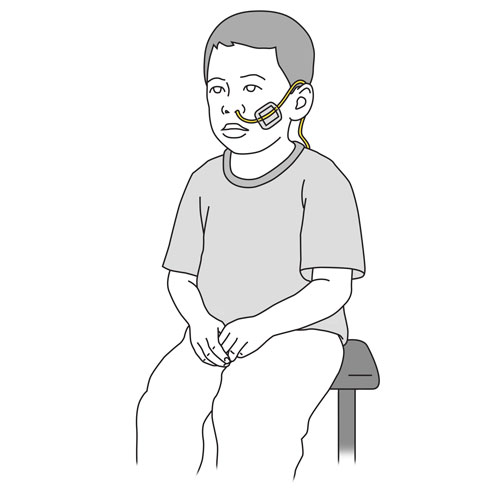
The nasal (or naso-enteric) tube is a long, thin, flexible tube inserted into a nostril, running down the back of the throat (into the pharynx) to the esophagus and then into the stomach and small intestine (if necessary). The nasal tube is usually used over a short period of time (a few days to several weeks) to try enteral nutrition, to supplement food taken by mouth or to administer medication. The nasal tube can be inserted and removed after each feeding session or left in place, depending on the child’s condition.
TYPES OF NASAL TUBES
Nasogastric tube
Tube inserted into a nostril and advanced down the throat to the esophagus and then the stomach.
Frequently used for home enteral nutrition.
Allows feeding and medication to be administered directly into the stomach.
Can be installed and replaced by the parent, depending on the child’s condition and if they have been taught by the healthcare team.
Nasoduodenal tube
Tube inserted into a nostril and advanced down the throat to the esophagus, the stomach and then to the first part of the small intenstine (duodenum).
Allows feeding directly into the duodenum (bypassing the stomach).
Allows the administration of medication directly into the duodenum, as needed.
Can only be installed and replaced by the healthcare team.
Nasojejunal tube
Tube inserted through a nostril and advanced down the throat to the esophagus, the stomach and then to the second part of the small intestine (jejunum).
Allows feeding directly into the jejunum.
Allows medication to be administered directly into the jejunum, as needed.
Can only be installed and replaced by the healthcare team.
The oral tube is a long, thin, flexible tube inserted into the mouth, directed to the back of the throat (in the pharynx) and then advanced down the esophagus into the stomach(orogastric tube) or the second part of the small intestine (jejunum) (orojejunal tube). This type of tube is installed by the healthcare team for use exclusively in the hospital.
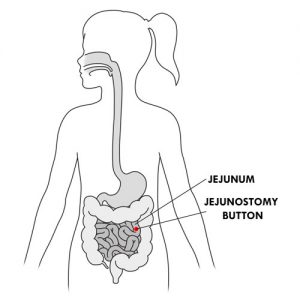
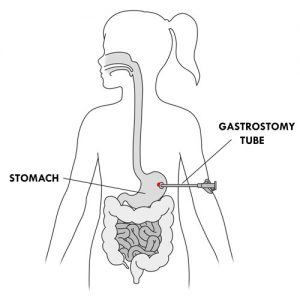
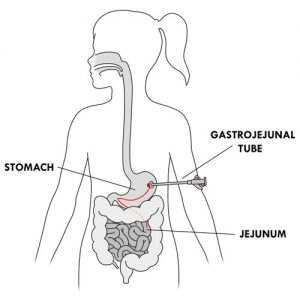
When food is to be administered directly into the stomach or small intestine, an opening must be made in the belly to install a tube. The opening is called a stoma. When the stoma is made in the stomach, it is called a gastrostomy. When the stoma is made in the small intestine, it is placed in the second part (jejunum); this is called a jejunostomy. In general, a stoma is used for comfort and safety reasons if:
enteral feeding must be administered over a long period of time (several months to several years), and/or
it is not possible to insert a tube through the child’s nose, mouth, throat or esophagus, and/or
the child vomits frequently, which may cause the nasal tube to move and require frequent reinsertion.
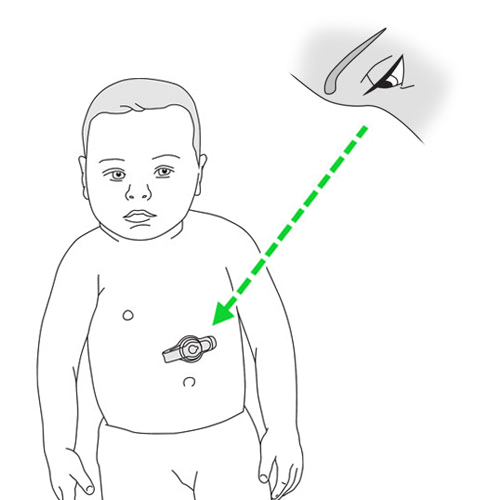
The gastrostomy and jejunostomy allow an enterostomy feeding tube to be placed through the stoma. It can be a button (or low-profile tube or skin-level device) or a long tube. This equipment is available in different models and sizes.
NEVER INSTALL OR REPLACE THE BUTTON OR LONG TUBE IF YOUR CHILD HAS A STOMAFOR LESS THAN 6 TO 8 WEEKS (or other length of time as recommended by your healthcare team)as the stoma is not fully healed; all re-insertions in this time period are the responsibility of your healthcare team.
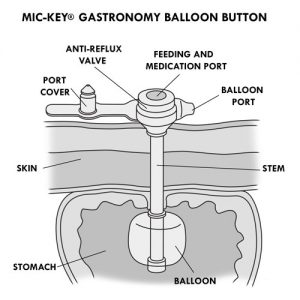
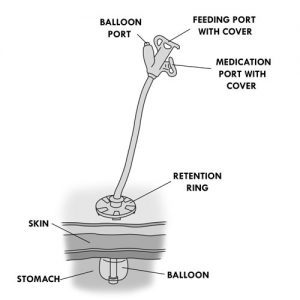
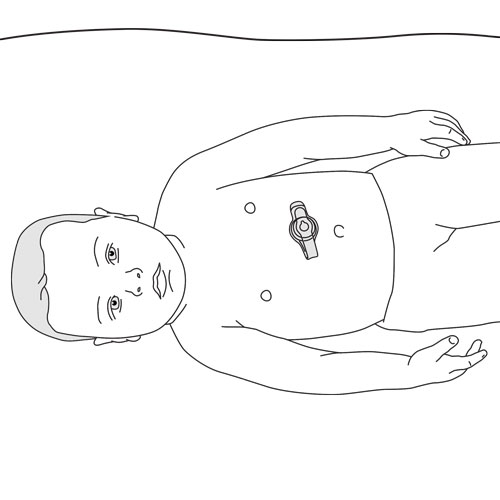
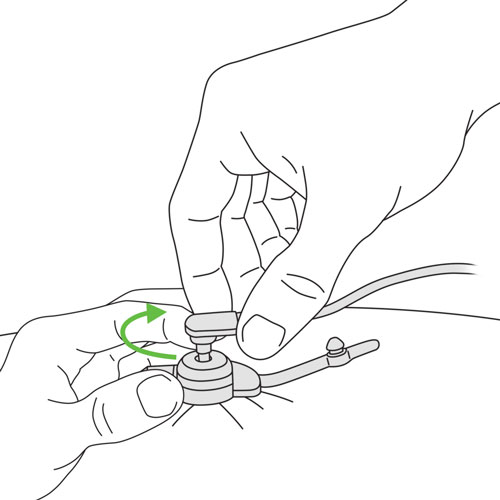
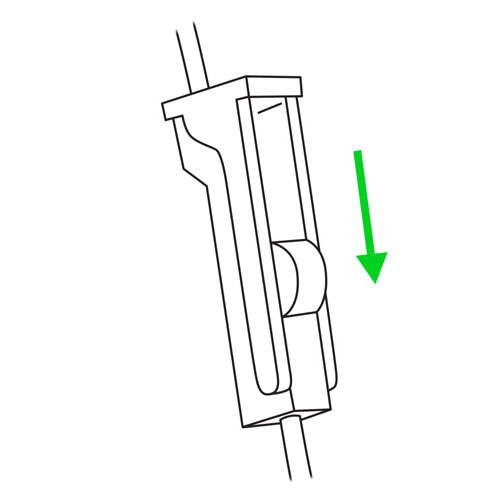
A feeding button is a specific device that is installed in a stoma and consists of two connected parts:
an external (outside) part, flattened in shape, visible at the level of the belly, composed of:
a balloon port with a fill valve (for balloon button models),
a feeding and medication port to fit an extension set,
a port cover to close the feeding and medication port when it is not being used,
an anti-reflux valve to prevent the stomach or intestinal contents from flowing back up through the button when connecting or disconnecting the extension set.
an internal (inside) part in the stomach or small intestine, composed of:
a stem that passes through the belly skin to the stomach or small intestine and is open at the end to allow the formula to pass through,
an internal bolster (or internal retention device) (eg, a balloon containing water, mushroom, dome) to hold the button to the wall of the stomach or intestine and prevent it from moving.
TYPES OF FEEDING BUTTONS
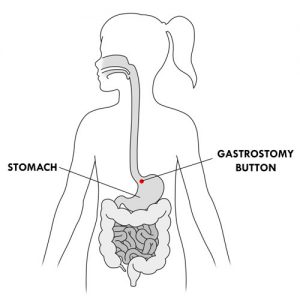
Gastrostomy button (eg, Mic-Key™, AMT MiniONE™, NutriPort™, Bard™, EntriStar™)
Device installed in a gastrostomy.
Allows feeding and medication administration directly into the stomach.
Can be installed and replaced by the parent only after 6 to 8 weeks after surgery (or other length of time as recommended by your healthcare team), if the model is balloon button and the parent has been taught this skill; non-balloon button models must be replaced by the healthcare team.
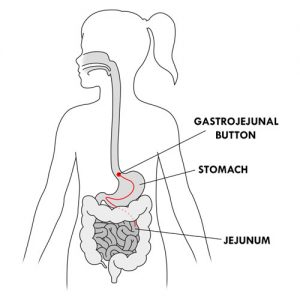
Gastrojejunal button (eg, Mic-Key™J, AMT G-JET™)
Device installed in a gastrostomy that extends through a tube from the stomach to the jejunum.
Has two entry ports: one into the stomach (usually used for medications) and the second into the jejunum (usually used for continuous feeding).
Mostly used in children who cannot be fed directly into the stomach.
Can only be replaced by the healthcare team.
Jejunostomy button
Device installed in a jejunostomy.
Allows feeding directly into the jejunum.
Allows medication administration directly into the jejunum, as recommended by the healthcare team.
Mostly used in children who cannot be fed directly into the stomach.
Can only be replaced by the healthcare team. If the healthcare team allows the parent to change the button, they provide the necessary training.
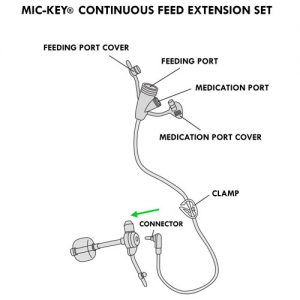
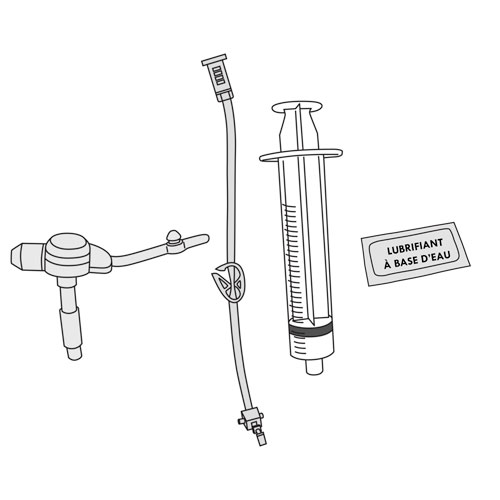
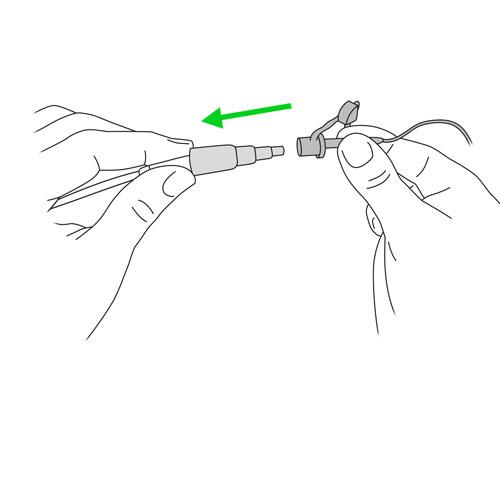
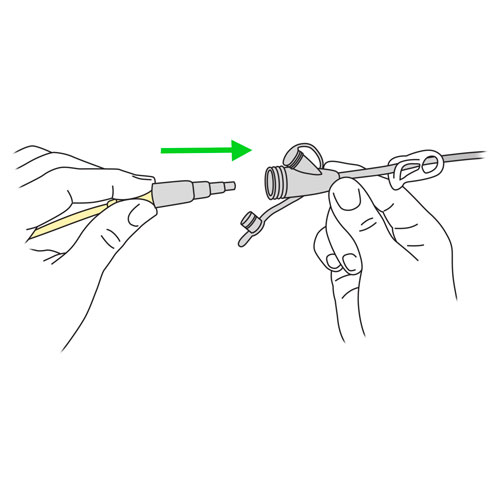
An extension set (or feed extension set) must be connected to the button through the feeding port to administer feeding or medication. It is a long tube, consisting of several pieces:
a large feeding port,
a junction with a small medication port (present in some models for continuous feeding),
a cover for each of these ports (to close them outside of administration periods),
a clamp,
a connector to connect the extension set to the button.
Each type of button has its own extension set.
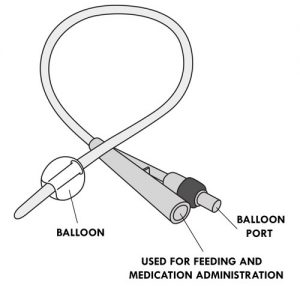
A long enterostomy feeding tube is a long flexible tube that is installed in a stoma and consists of two connected parts:
an external (outside) part visible at the level of the belly, composed of:
an external bolster (or external retention device) to stabilize the tube at skin level (eg, retention ring),
a balloon port with its fill valve (for balloon tube models),
a feeding port,
a medication port (in some models),
a port cover attached to each of these ports allowing them to be closed outside of administration periods.
an internal (inside) part in the stomach or small intestine, composed of:
an internal bolster (or internal retention device) (eg, a balloon containing water, mushroom, dome, etc.) to hold the tube to the wall of the stomach or intestine and prevent it from moving,
an opening at the end of the tube to allow the nutritional formula to pass through.
TYPES OF LONG ENTEROSTOMY FEEDING TUBES
Gastrostomy tube
Flexible tube inserted into the stomach through a gastrostomy.
Allows feeding and medication administration directly into the stomach.
Can be installed and replaced by the parent only after 6 to 8 weeks after surgery (or other length of time as recommended by your healthcare team), if the model has a balloon and the parent has been taught this skill; non-balloon tube models can only be replaced by the healthcare team.
Gastrojejunal tube
Flexible tube inserted into the stomach through a gastrostomy and which goes into the jejunum.
Has two entry ports: one into the stomach (usually used for medications) and the second into the jejunum (usually used for continuous feeding)
Mostly used in children who cannot be fed directly in the stomach.
Can only be replaced by the healthcare team.
Jejunostomy tube
Flexible tube inserted into the jejunum through a jejunostomy.
Allows feeding directly into the jejunum.
Allows medication to be administered directly into the jejunum, as recommended by the healthcare team.
Mostly used in children who cannot be fed directly into the stomach.
Can only be replaced by the healthcare team. If the healthcare team allows the parent to change the tube, they provide the necessary training.
The choice between a nasal tube, button or long enterostomy feeding tube and the location of that tube in the digestive system (stomach, duodenum, jejunum) depends on several factors that the healthcare team considers when making their decision; for example:
the duration of enteral feeding,
the condition of the child,
the child’s ability to tolerate food in the stomach,
the condition and functioning of its digestive system,
the presence or absence of significant problems with gastric reflux.
Buttons are often installed in children. They have the advantage of being comfortable and safe.
A urinary Foley™ catheter (which is a long, flexible tube) can be temporarily placed in the stoma only after 6 to 8 weeks after surgery (or other length of time as recommended by your healthcare team) to prevent it from closing if:
the gastrostomy balloon button or tube is accidentally removed and no other replacement button or tube is available to replace it,
the parent is unable to replace the gastrostomy balloon button or tube,
another type of button or long enterostomy feeding tube breaks or is accidentally removed.
The catheter must be secured after installation.
The child can be fed through the urinary catheter, if recommended by the healthcare team, while waiting to have the urinary catheter replaced with a button or an enterostomy long tube.
Discuss this possibility with the healthcare team depending on your child’s condition.
The urinary Foley™ catheter consists of different components:
an external part visible on the belly, composed of:
a port and a balloon fill valve,
a port that allows the administration of food and medication,
an internal part in the stomach or small intestine, composed of:
a balloon to hold the tube to the wall of the stomach or intestine and prevent it from moving,
the end of the catheter is open to allow the nutritional formula to pass through.
A plug should be placed over the catheter opening between feeding sessions to prevent leakage.
The child may receive water, hydration fluids, breast milk, fortified breast milk, infant formula, nutritional formula (or enteral formula or feeding or gavage solution) or liquefied food through the tube or button. Medications can also be given in liquid form this way.
The nutritional formula is specific to each child. The healthcare team chooses the formula that is best for the child, taking into account the child’s nutritional needs, age, diagnosis, health condition and parental preferences.
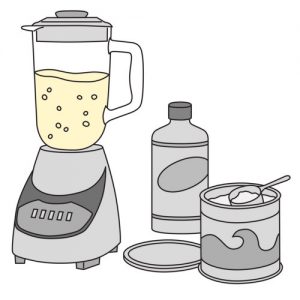
The formula contains mainly water, protein, sugars, fats, vitamins and minerals. The formula can be in liquid form or thicker (eg, purée), depending on the child’s needs.
The healthcare team also recommends the appropriate format for the preparation of the nutritional formula:
ready-to-serve: no need to add water or other ingredients, unless the healthcare team advises otherwise; the most convenient and easy-to-use format, but often the most expensive;
liquid concentrate: should be diluted with water as directed; can be used to prepare a higher calorie formula as directed by the healthcare team;
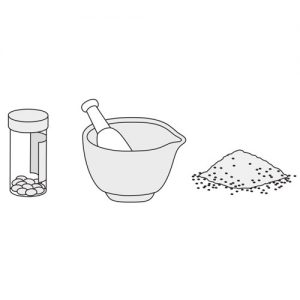
powder: more readily available but takes longer to prepare; can be used to prepare a higher calorie formula, as directed by the healthcare team; can be stored longer; more economical.
The healthcare team provides instructions for the preparation of the formula, if applicable. The team provides information about the amount to be fed daily and helps the parent establish the best feeding schedule.
As a child’s nutritional needs change over time, the healthcare team recommends the necessary adjustments to the type and amount of milk or formula to promote growth and good health.
Nutritional formula, milk or water is administered according to the method and modality required by the child’s condition. This varies (see table below) depending upon:
type of button or tube used,
reason why the child requires enteral feeding,
how often the child should be fed (schedule),
duration of each feeding session and how well the child tolerates enteral feeding.
The important thing is that the child receives the nutrients needed for energy and growth.
NOTE: For ease of reading the rest of the text, the word (nutritional) “formula” also includes “breast milk”, “fortified breast milk” or “infant formula”.
METHODS OF ADMINISTRATION OF THE NUTRITIONAL FORMULA
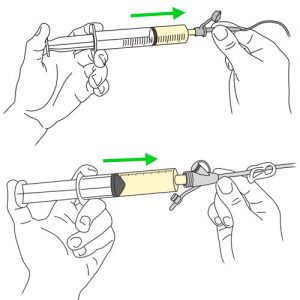
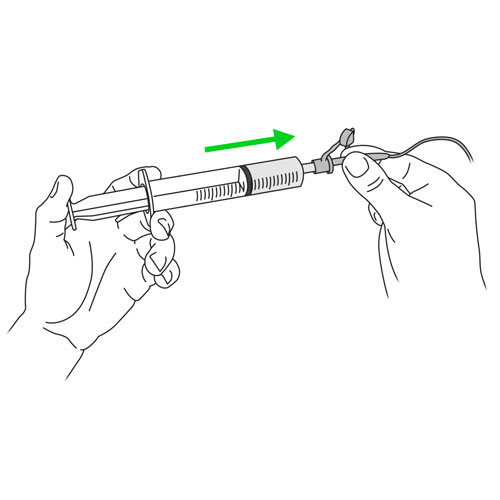
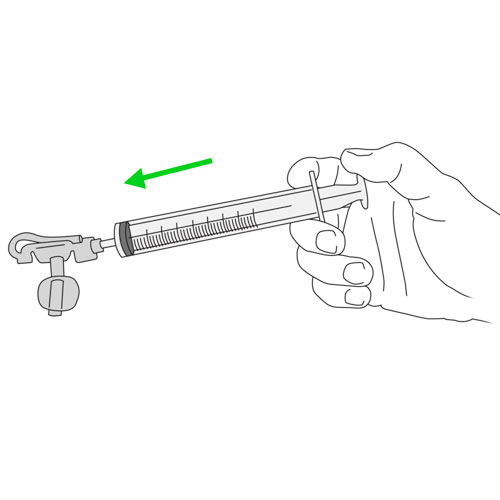
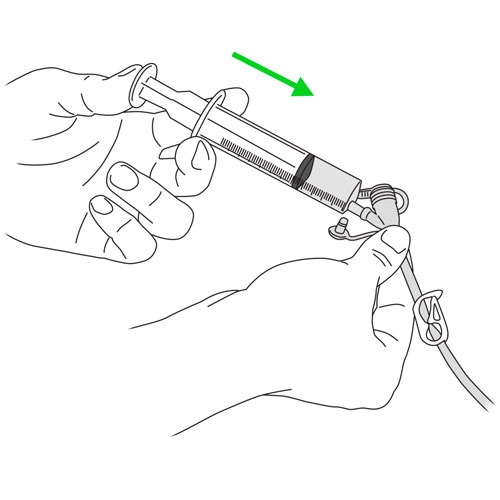
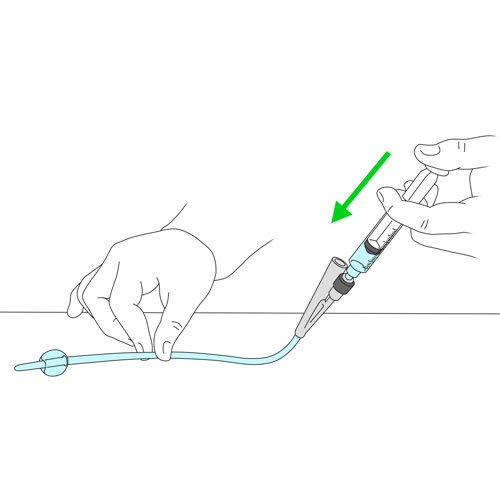
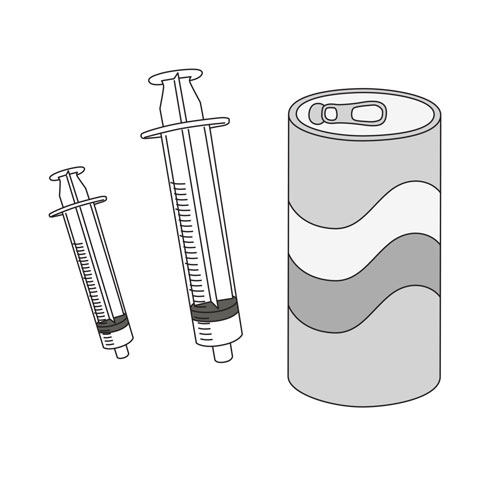
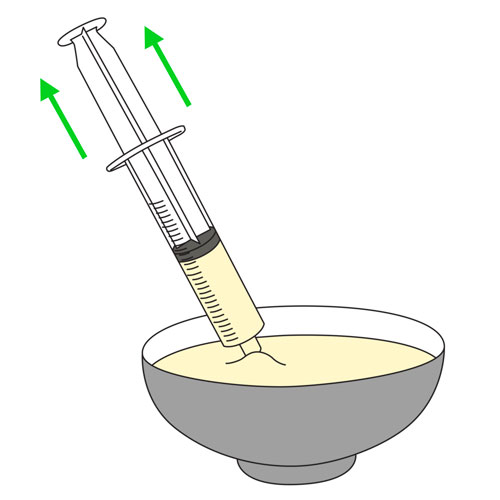
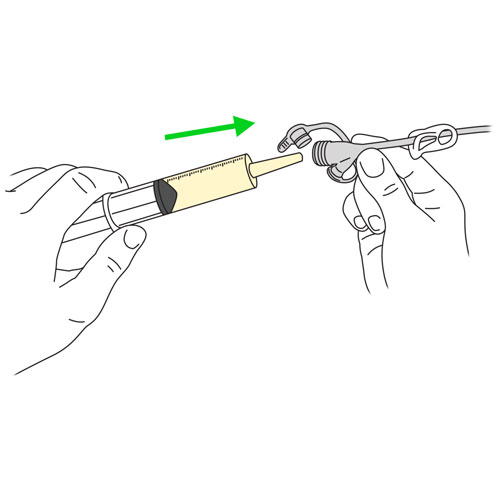
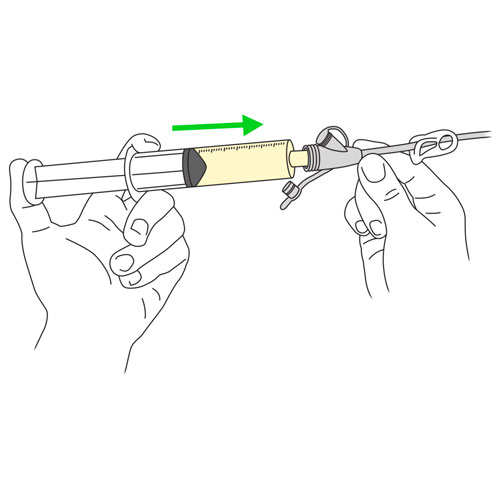
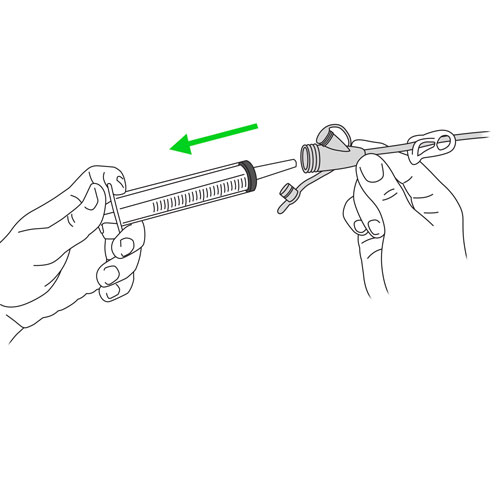
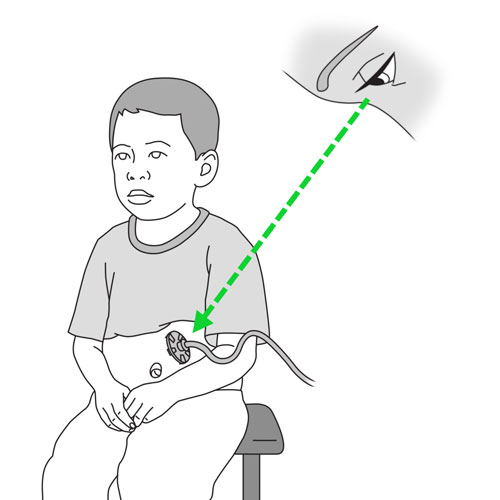
By push
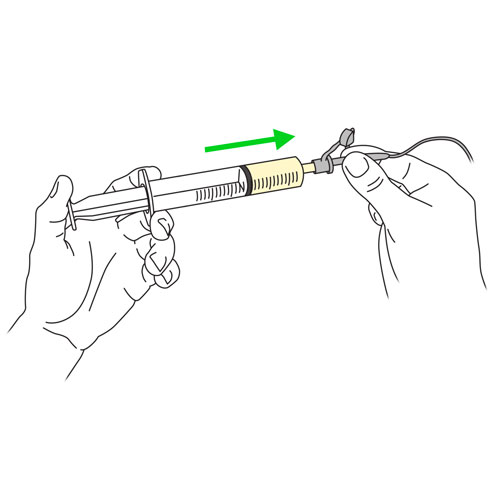
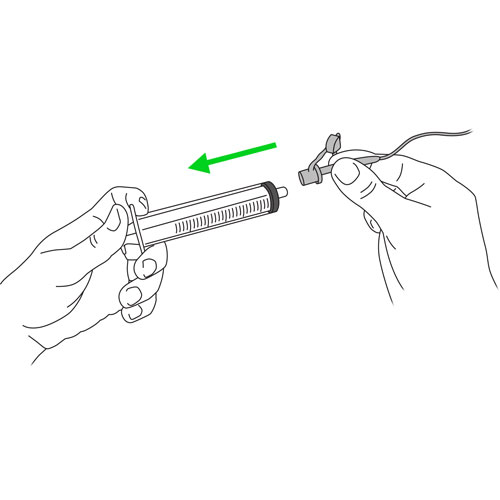
The formula is “pushed” slowly with a feeding syringe into the tube or into an extension set attached to the feeding button.
This method is used for bolus feeding and medication administration.
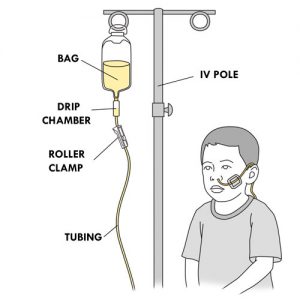
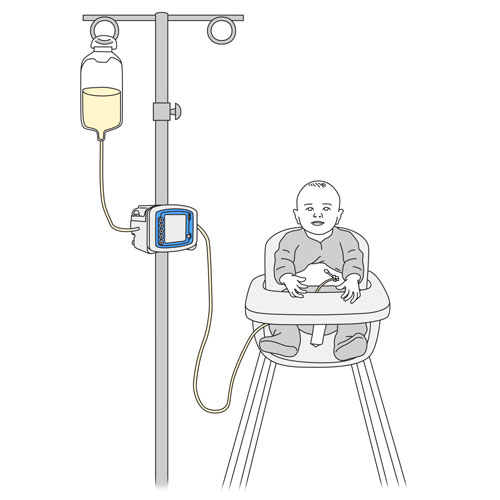
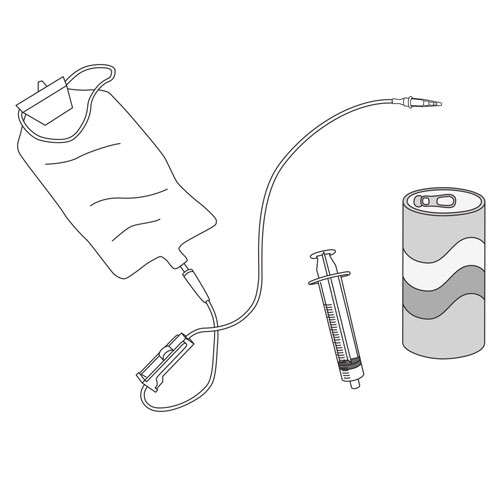
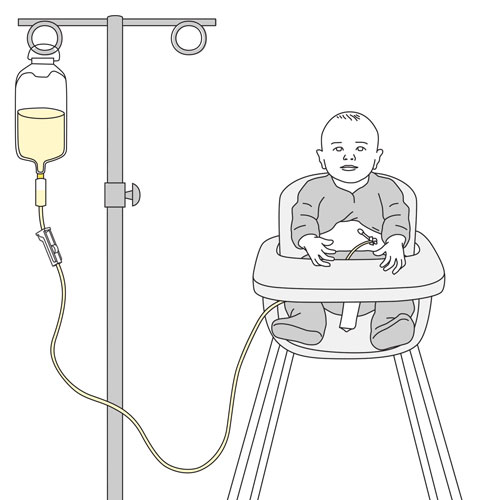
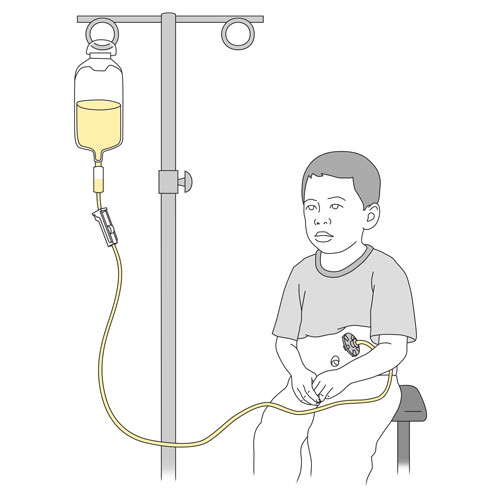
By gravity
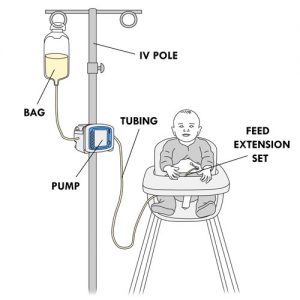
The formula is poured into a bag connected to a tubing.
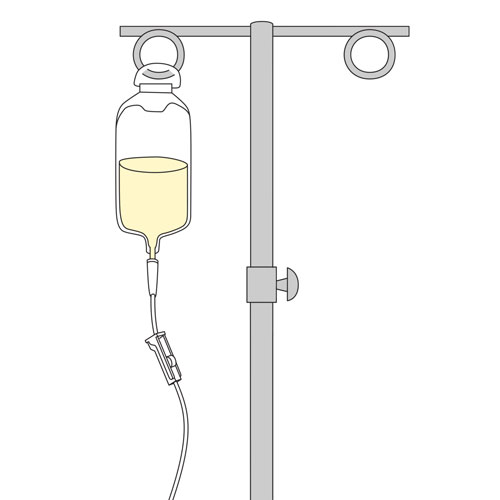
The bag must be suspended at a height above the child’s head (eg, on an IV pole).
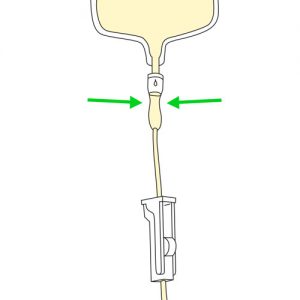
The formula flows by gravity down the tubing through a drip chamber.
The tubing from the bag is connected to the feeding tube or to an extension set attached to the feeding button.
A roller clamp on the tubing adjusts the flow rate (or administration rate) of the formula.
This method is used for bolus feeding.
This method can be used as an alternative if the pump is not functioning.
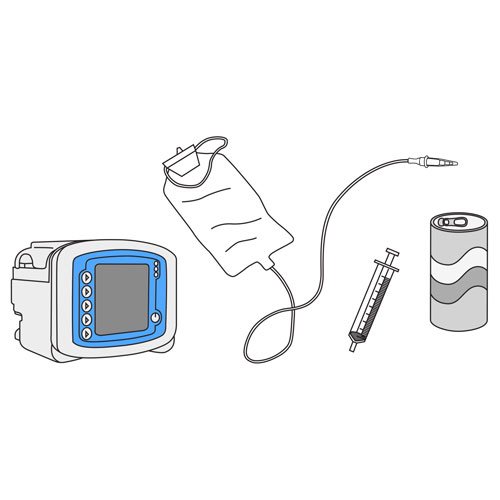
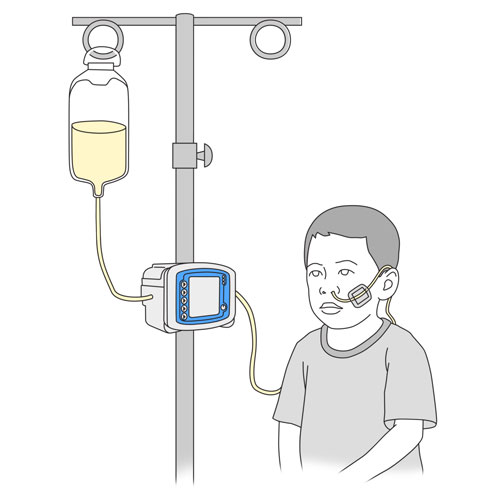
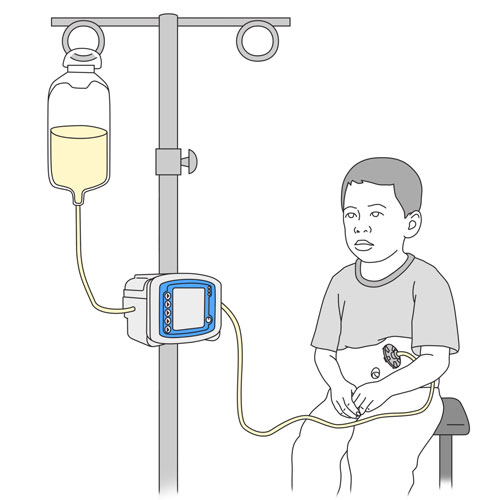
The formula is poured into a bag connected to tubing.
The tubing is inserted into an enteral feeding pump connected to an electrical outlet or powered by a rechargeable battery.
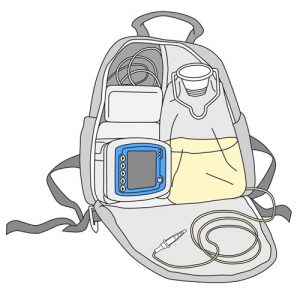
The bag and pump are suspended from an IV pole or placed in a special backpack.
The tubing from the bag is connected to the feeding tube or an extension set attached to the feeding button.
The pump controls the amount of formula dispensed and the flow rate.
Several models of electronic pumps are available for use in the home.
The pump method is used for bolus or continuous feeding.
MODALITIES OF ADMINISTRATION OF THE NUTRITIONAL FORMULA
Bolus (or intermittent)
Feeds are several times a day, over short periods of time, often during normal meal times.
Depending on the child’s specific needs, can be used as a meal replacement or as a supplement to a meal taken by mouth.
Each session lasts an average of 20 to 30 minutes (like the usual duration of a meal), depending on the amount to be given and the child’s tolerance. The child’s condition may require longer sessions (one hour or more).
Bolus feeding cannot be given in the jejunum.
Possible with the push, gravity or pump method of administration.
Continuous
Feeds run continuously at a regular pace for the prescribed number of hours/day.
Feeding may run throughout the day or night without interruption.
Mostly used with the pump delivery method.
Recommended for a child who:
has difficulty tolerating large amounts of formula at a time (does not tolerate bolus meals),
has slow stomach emptying,
needs a specific amount of formula in a given period of time,
is fed directly into the jejunum.
Bolus and continuous
Allows mixed administration of the formula (eg, bolus during the day and continuously during the night).
The material used for enteral nutrition (tube, button, adapter, connector, feeding bag with tubing, extension set, syringe, etc.) is reserved exclusively for this use.
Refer to your healthcare team for:
formula preparation instructions, if applicable,
the amount of formula to be administered,
the appropriate method of administration,
the relevant administration modality,
the flow rate of the formula, if applicable,
the best feeding schedule for your child,
the specificities related to the administration of medications.
Your healthcare team is available to supervise the care provided to your child, ensure the proper functioning of equipment and make recommendations to you as needed.
Refer to your healthcare team if the equipment used for your child at home is different from what is described in this section or in the methods of care.
FAQ – Enteral nutrition
When to consult your healthcare team
Nasal tube
Persistent recurrent nasal tube blockage.
Problem with a nasoduodenal or nasojejunal tube (eg, breakage, accidental removal or displacement).
Inability to insert the nasogastric tube, despite your interventions.
Persistent redness around the nostril.
Bleeding in the gastric aspirates.
Stoma
Skin near the stoma is red, sensitive, warm, swollen, has a bad odor, with the presence of discharge different from the usual yellowish or brownish secretions.
Presence of moist, thick, red crusts on the skin around the stoma.
Bloody discharge through or around the stoma.
Persistent fluid discharge around the stoma.
Inability to insert a urinary Foley™ catheter through the stoma.
Button and enterostomy long tube
Problem related to a stoma that has been in place for less than 6 to 8 weeks (or other length of time as recommended by your healthcare team).
Persistent blockage of the button or enterostomy long tube.
Malfunction of the balloon button or enterostomy long tube (eg, inability to deflate balloon, inability to rotate the button).
Problem with a non-balloon button, a gastrojejunal button or enterostomy long tube (eg, malfunction, breakage, displacement, leakage of liquid around it, blockage or accidental removal).
Inability to insert the gastrostomy balloon button or tube despite your interventions.
Bleeding in the gastric aspirates.
Feeding sessions
Sudden onset of respiratory distress during a feeding session (EMERGENCY).
Persistent nausea and/or vomiting during or between feeding sessions.
Persistent bloating and swelling of the belly.
Persistent abdominal pain during feeding sessions.
Presence of yellowish or greenish liquid in the feeding tube.
Persistent problem with the pump (eg, alarms) or equipment, despite your interventions.
General condition
Fever (≥ 38⁰C rectal or ≥ 37.5⁰C oral or ≥ 37.5⁰C armpit).
Yellowish or greenish vomiting.
Persistent nausea and vomiting between feeding sessions.
Persistent bloating and swelling of the belly between feeding sessions.
Signs of dehydration: increased thirst, dry and sticky tongue, dry and chapped lips, dark urine with strong odor and in small quantities.
Diarrhea with the presence of blood and/or fever.
Persistent diarrhea.
Persistent constipation.
Signs of fluid overload: difficulty breathing, swelling in the legs, feet and eye area, sudden rapid weight gain.
Signs of hypoglycemia between feeding sessions: chest pain, vomiting, headache, blurred vision, sweating, pallor, fatigue or irritability, tremors, convulsions.
Signs of hyperglycemia during and/or after the feeding session: headache, chest pain, severe thirst, weakness, agitation, irritability, abdominal cramps, diarrhea, urinating more often than usual, dizziness.
Your child’s healthcare team will use your child’s regular appointments to verify the proper functioning of the enteral nutrition equipment, to answer your questions and to make adjustments to the care as required.
Do not hesitate to contact your healthcare team with any specific questions concerning your child.
WARNING: The information in this section is meant as a general guide for parents and caregivers with certain problems related to enteral nutrition. It is not intended to replace the recommendations of your child’s healthcare team.
Discuss your child’s unique needs with the healthcare team, including WHO and WHEN to contact when problems arise.
NOTE: For ease of reading the rest of the text, the word (nutritional) “formula” also includes “breast milk”, “fortified breast milk” or “infant formula”.
Problems related to nasal tube
Difficulty or inability to irrigate the nasal tube
Possible cause(s)
Tube blockage (eg, debris from residual formula, reflux of stomach contents, improper preparation of medication)
Incorrect positioning of the tube (eg, end of the tube pressing against stomach walls)
Pinched tube
Damaged tube
What to do?
Try to find the source of the blockage.
Check the tube for bends, kinks or jamming.
If solid particles are visible, gently roll the tube between your fingers to try to loosen them, then gently aspirate with a syringe to try and remove particles
Change your child’s position.
Try irrigating the tube again.
If the problem persists:
try to unblock the tube by slowly injecting warm water before trying to irrigate again;
repeat several times.
If the problem still persists and it is a nasogastric tube and you have been taught to replace it.
In all other situations, rapidly contact your child’s healthcare team.
Difficulty or inability to aspirate stomach (gastric) contents from the nasal tube
Possible cause(s)
Blocking of the tube (eg, debris)
Incorrect positioning of the tube (eg, end of the tube pressed against the stomach walls or away from the accumulation of gastric fluid)
Collapse of the tube, causing the walls of the tube to stick together during attempt to aspirate
Empty stomach
What to do?
Check the tube location as taught by your healthcare team.
If the problem persists, inject 2 to 3 ml of air through the tube.
Try again to aspirate gastric secretions.
If the problem persists, reposition your child on the left side, wait 10 to 15 minutes and then try again to aspirate gastric secretions.
If the problem still persists and it is a nasogastric tube you have been taught to replace it.
In all other situations, rapidly contact your child’s healthcare team.
Until the problem is resolved, do not use the nasogastric tube.
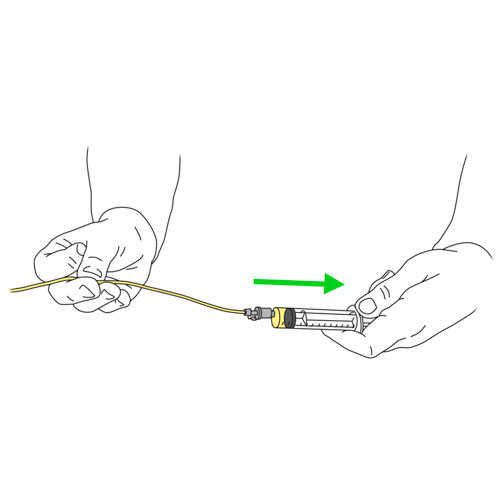
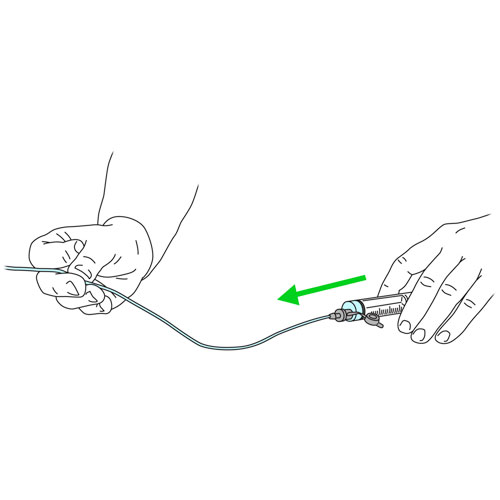
Displacement of the nasal tube
Possible cause(s)
Mishandling
Accident
What to do?
Stop the feeding session, if in progress.
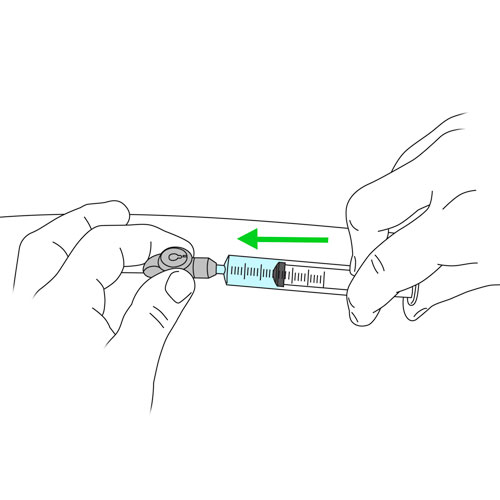
If your child has a nasogastric tube and you can no longer see the mark on the tube and you have been taught, gently pull the tube until the mark reaches the edge of the nostril.
If your child has a nasogastric tube and the mark on the tube has moved away from the edge of the nostril and you have been taught, remove the tube and reinsert it.
Once the tube is correctly positioned:
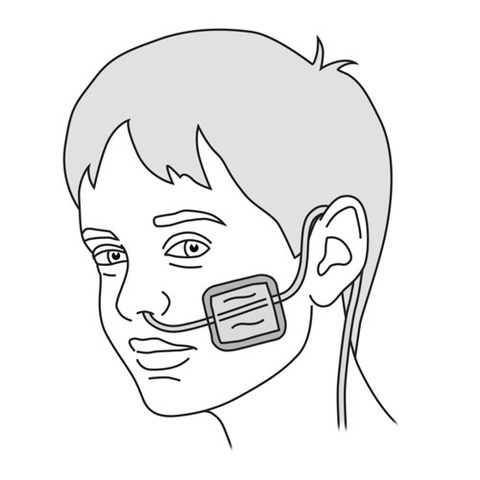
replace the adhesive bandage to secure the tube; make sure it is close to the nostril;
Use a method to distract your child as needed. Make sure your child is calm before trying to insert the tube again.
If necessary, soak the tube in a container of ice water or put it in the freezer for a few moments to make it more rigid and facilitate insertion into the nostril.
Encourage your child to swallow or give your baby a pacifier to suck while you insert the tube.
If the problem persists, contact your child’s healthcare team.
Redness around the nostril in a child with a nasal tube
Possible cause(s)
Skin irritation
Nasal discharge
Friction from poorly secured tube
Pressure sore caused by the tube
What to do?
Check if the tube is rubbing against the nostril.
If necessary, reposition the tube, making sure it is securely attached.
If your child has a nasogastric tube and you have been taught, remove the tube and insert it into the other nostril.
If the redness persists, contact your child’s healthcare team.
In all other situations, rapidly contact your child’s healthcare team.
Discontinue feeding or irrigation, if in progress.
Try to find the cause of the discharge.
If your child has had the stoma for more than 6 to 8 weeks (or other length of time as recommended by your healthcare team), has a gastrostomy balloon button or tube and you have been taught, check to see if the balloon of the button or tube is properly inflated.
Make sure the tube or button extension set is securely attached to your child and that there is no tension on the tubing.
Check the location of the gastrostomy tube by gently pulling it outward until the internal retention mechanism holding the tube in place is snug against the stomach wall.
Irrigate the button or the tube with water.
Place a few clean, dry compresses on the button or at the tube inlet to absorb the flow; change the compresses regularly depending on the amount of flow.
Keep the skin around the stoma clean and dry as much as possible.
Protect the healthy skin around the stoma with a barrier cream or petroleum jelly like Vaseline®.
If the problem persists, and if your child has a stoma for more than 6 to 8 weeks (or other length of time as recommended by your healthcare team), and if it is a gastrostomy balloon button or tube and you have been taught, remove the button or the tube and replace it.
In all other situations, rapidly contact your child’s healthcare team.
Accidental removal of the button or enterostomy long tube
Possible cause(s)
Mishandling
Accident
Pulled out by child
Too much tension on the tube (eg, incorrect use of dressings around the stoma)
Insufficient volume of water in the balloon or balloon bursting
Button or tube breakage
What to do?
If the stomach is too full, the contents may come out spontaneously from the stoma, as if your child were vomiting.
Thoroughly clean and dry the skin around the stoma.
If your child has had the stoma for less than 6 to 8 weeks (or other length of time as recommended by your healthcare team), rapidly contact your child’s healthcare team.
If your child has had the stoma for more than 6 to 8 weeks (or other length of time as recommended by your healthcare team), has a gastrostomy balloon button or tube and you have been taught:
check if the button (including its balloon) is in good condition;
if so, clean it, rinse it well and then put it back in place.
If your child has had the stoma for more than 6 to 8 weeks (or other length of time as recommended by your healthcare team) and he has another type of button or long tube:
If you are unable to insert the urinary catheter, try a smaller size catheter.
If you are still unable to insert a urinary catheter into the stoma, put a compress over the stoma opening and immediately contact your child’s healthcare team. A tube or button must be reinstalled very quickly to prevent the stoma from closing.
Red, crusty, moist, thick, red tissue around the stoma: looks like cauliflower or a turtleneck, soft to the touch, bleeds easily and may leak yellowish/brownish, sticky fluid
Possible cause(s)
Granulation tissue (or Granuloma or Hypergranulation) which is a reaction of the skin in response to irritation caused by:
Excessive movement of the button or tube (eg, insufficiently inflated balloon, loose external tube retention disc)
Incorrect adjustment of the button or tube (eg, button stem too long, tube diameter too small)
Rubbing of the tube or button inside the stoma
What to do?
Contact your child’s healthcare team who:
will evaluate the most appropriate treatment for your child’s condition (eg, medicated cream, silver nitrate),
will treat the infection, if present,
will check the appropriateness of changing the button or the tube, if necessary.
While waiting to discuss with your healthcare team:
If your child has had an the stoma for more than 6 to 8 weeks (or other length of time as recommended by your healthcare team) and you have been taught, check that the balloon of the gastrostomy button or tube is not broken and is properly inflated.
Make sure the tube or button extension set is securely attached to your child and that there is no tension on the tubing.
Put a few clean compresses around the button or tube if there is any discharge and change the compresses as soon as they get wet.
Redness of the skin around the stoma with or without tenderness, warmth, swelling, discharge different from the usual yellowish or brownish secretions, bad smell and/or fever (≥ 38⁰C rectal or ≥ 37.5⁰C oral or ≥ 37.5⁰C armpit)
Possible cause(s)
Infection
Inadequate ostomy care
Gastric fluid discharge
Improper fit of the tube or button causing injury to the skin around the stoma
Incorrect attachment of the tube or extension tube
Pressure sore
What to do?
Inspect the button or the tube; check the anti-reflux valve of the button for damage.
If your child has had the stoma for more than 6 to 8 weeks (or other length of time as recommended by your healthcare team) and you have been taught, check that the balloon of the gastrostomy button or tube is not broken and is properly inflated.
Make sure the tube or button extension set is securely attached to your child and that there is no tension on the tubing.
If the problem persists, rapidly contact your healthcare team.
While waiting to discuss with your healthcare team:
Keep skin clean and dry and leave it exposed to air as much as possible.
Put a few clean compresses around the button or tube if there is any discharge and change the compresses as soon as they get wet.
Difficulty or inability to aspirate stomach (gastric) contents from the gastrostomy button or long tube
Possible cause(s)
Empty stomach
Gastrostomy tube displacement
What to do?
Change your child’s position and try again to aspirate.
Make sure the extension set is properly connected.
Irrigate the button or the long tube with a small amount of water, as recommended by your healthcare team, then retry to aspirate stomach contents.
If the problem persists, contact your child’s healthcare team.
Difficulty or inability to irrigate the button or the enterostomy long tube
Possible cause(s)
Blockage of the button, extension set or tube (eg, debris, reflux of stomach contents, improper preparation of medication)
Pinched tube or extension set
Button, extension set or long tube damaged (eg, wear)
Gastrostomy tube displacement
What to do?
Try to find the source of the blockage.
Check to see if the button extension set or the tube is bent, kinked or jammed.
Check if all clamps are open.
Roll the tube between your fingers if solid particles are visible (to try to remove them).
Try to aspirate with a syringe if particles are present (to try to mobilize them).
Disconnect the extension set, if in place, and try to irrigate it to check for blockage; change the extension set if necessary.
Do not use a sharp object to attempt to unblock the tube or button.
Do not press too hard on the syringe plunger to attempt to irrigate the button, as excessive pressure may damage the extension set.
If the problem persists, try to unblock by slowly injecting lukewarm water.
If the problem persists, if your child has had the stoma for more than 6 to 8 weeks (or other length of time as recommended by your healthcare team), has a gastrostomy balloon button or tube and you have been taught, remove the button or the long tube and change it.
In all other situations, rapidly contact your child’s healthcare team.
Difficulty or inability to insert gastrostomy balloon button or long tube
Possible cause(s)
Agitated child
Poor insertion technique
Shrinkage of the stoma
What to do?
Remove the button or the long tube.
Make sure your child is in the correct position; have a second person help you if necessary.
leave it in place until you have a new button or replacement tube.
notify your healthcare team.
If you are unable to insert a temporary urinary catheter into the stoma, put a compress over the opening and contact your healthcare team immediately. A long tube or button must be reinstalled very quickly to prevent the stoma from closing.
Button or enterostomy long tube breakage (in place)
Possible cause(s)
Button or tube damaged (eg, wear)
Manufacturing defect of the button or long tube
Mishandling
What to do?
Discontinue feeding or irrigation, if in progress.
If your child has had the stoma for less than 6 to 8 weeks (or other length of time as recommended by your healthcare team):
do not change the button or tube;
contact your healthcare team.
If your child has had the stoma for more than 6 to 8 weeks (or other length of time as recommended by your healthcare team), has a gastrostomy balloon button or tube and you have been taught:
If your child has had the stoma for more than 6 to 8 weeks (or other length of time as recommended by your healthcare team) and has another type of button or long tube:
do not change the button or tube;
contact your child’s healthcare team.
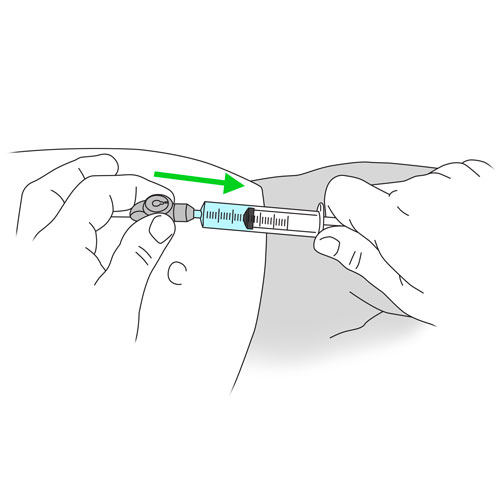
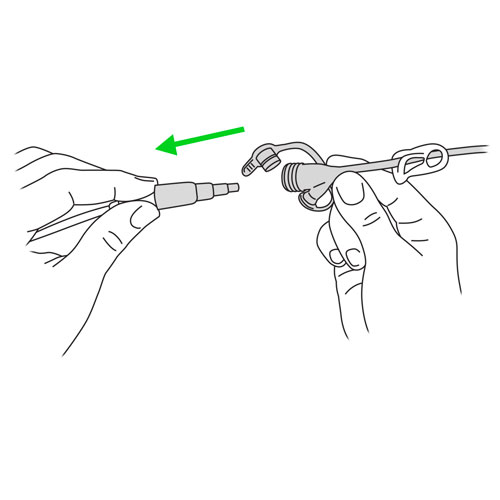
Disconnection of the extension set during the feeding session
Possible cause(s)
Accidental disconnection
Wrong connection of the button extension
What to do?
Stop the feeding session, if in progress.
Try to estimate the volume of formula lost.
Thoroughly clean the button feeding port with soapy water and rinse it well.
Clean the inside of the extension set port.
Connect the extension set to the button and irrigate it.
Resume the feeding session and replace the estimated amount of formula lost during disconnection if possible.
Bleeding through or around the stoma
Possible cause(s)
Injury
Irritation
Granulation tissue
Infection
What to do?
If the bleeding is severe:
Discontinue feeding or irrigating session, if in progress.
Apply pressure with a compress or clean cloth to the site of bleeding.
Contact your healthcare team immediately.
If the bleeding is light:
Thoroughly clean and dry the skin around the stoma.
Keep the skin clean and dry and leave it exposed to air as much as possible.
Put a few clean compresses around the button or tube and change the compresses as soon as they get wet.
Contact your child’s healthcare team.
Blood in the (stomach) gastric aspirate from the button or enterostomy long tube
Possible cause(s)
Injury
Stomach irritation
Stomach ulcer
Infection
What to do?
Rapidly contact your child’s healthcare team.
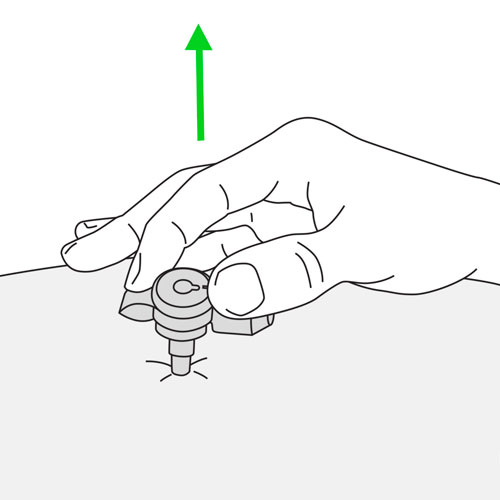
Outward movement of the button or enterostomy long tube
Possible cause(s)
Insufficient volume of water in the balloon or broken balloon
Excess tension on the tube (eg, use of dressings around the stoma)
Incorrect adjustment of the tube or button
What to do?
Stop the feeding session, if in progress.
Check the tube for excessive tension and reattach it properly, if necessary.
If your child has had the stoma for more than 6 to 8 weeks (or other length of time as recommended by your healthcare team), has a gastrostomy balloon button or tube and you have been taught:
check the volume of water in the balloon;
gently push the button stem or tube inward;
add the necessary amount of water missing from the balloon, if necessary.
In all other situations, rapidly contact your child’s healthcare team.
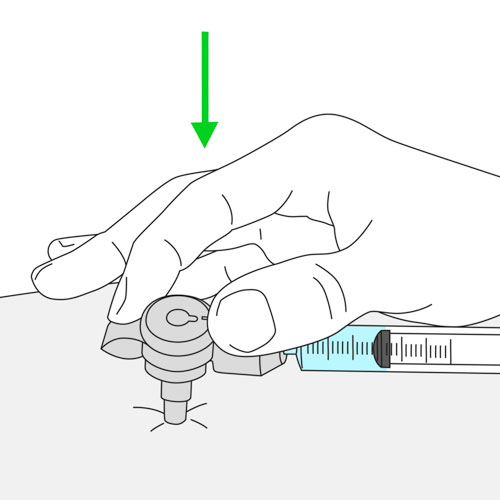
Inward movement of the button or enterostomy long tube
Possible cause(s)
External bolster (to stabilize the tube at skin level) displaced or absent
Incorrectly secured tube
Button stem too short
Incorrect adjustment of the tube or button
What to do?
Stop the feeding session, if in progress.
If your child has had the stoma for more than 6 to 8 weeks (or other length of time as recommended by your healthcare team), has a gastrostomy balloon button or tube and you have been taught:
gently pull the tube outward until the internal bolster is seated against the stomach wall;
make sure the tube’s external bolster is attached to the stomach wall, leaving a space about the thickness of a dime;
secure the tube to the belly.
If the problem persists and in all other situations, rapidly contact your child’s healthcare team.
Unable to deflate the balloon of the gastrostomy button or tube (in place)
Possible cause(s)
Debris in the balloon fill valve
Button or tube breakage
What to do?
Make sure that the balloon fill valve is clean and not blocked by debris from formula; clean it if necessary.
Then firmly insert the syringe into the valve by pushing and turning it a quarter turn; try withdrawing the syringe plunger again.
If the problem persists and in all other situations, contact your child’s healthcare team.
Inability to rotate the gastrostomy balloon button
Possible cause(s)
Incorrect button adjustment
Inadequate ostomy care
What to do?
Cleanse the skin around the button.
Then try turning the button again.
If you are unable to rotate the device, contact your child’s healthcare team.
Problems related to feeding session or general condition of the child
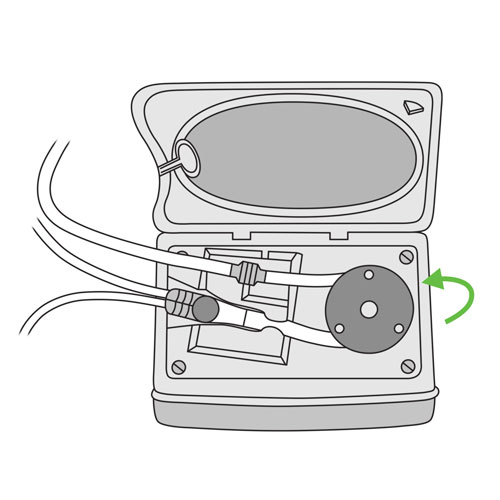
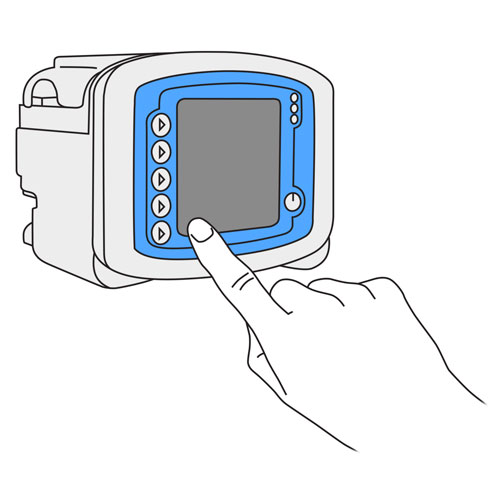
Feeding pump alarms
Possible cause(s)
Various
What to do?
Press the appropriate button to stop the alarm tone.
Look at the message on the screen.
Follow the instructions accordingly.
If a help screen is available for the alarm, follow the instructions provided.
If necessary, consult the pump instructions that you have been given.
If you still cannot resolve the problem, contact your healthcare team.
Difficulty or inability to administer formula or medication through the tube or button (eg, inability to push the plunger on the feeding syringe, blocked or slowed flow of formula by gravity or pump)
Possible cause(s)
Blockage of the button, extension set, tube or tubing of the bag (eg, inadequate irrigation of the button or tube before use, accumulation of debris, thick texture of the formula, nature of the medication), poor preparation of the medication, interactions between formula and medication, between medications or with gastric secretions, contaminated formula during preparation or poor maintenance of the equipment, which can change the consistency)
Tube, extension set or tubing clamped
Button, extension set or tube damaged (eg, worn out)
Pump malfunction
Poor administration technique (eg, bag hung too low)
Intermittent administration of the formula
Stomach too full
What to do?
Try to find the source of the blockage.
Make sure that all tubes are properly connected.
Check the button extension set, tube or bag tubing for bends, kinks or pinches.
Make sure clamps are fully open.
Reposition your child.
Roll the tube between your fingers if solid particles are visible.
Try to irrigate the tube or button. Disconnect the extension and irrigate as needed before reconnecting it again.
Do not use a sharp object to clean the tube or button.
If necessary, try to unblock by slowly injecting lukewarm water.
Revise the technique if necessary.
Look at the message on the screen and if appropriate, follow the instructions accordingly.
If necessary, consult the pump instructions.
Change the pump to a back up pump if available, in case of emergency.
If your child has had the stoma for more than 6 to 8 weeks (or other length of time as recommended by your healthcare team), has a gastrostomy balloon button or tube and you have been taught, change the tube or button.
In all other situations, rapidly contact your child’s healthcare team.
Nausea and/or vomiting between feeding sessions
Possible cause(s)
Interval between feeding sessions too short
Formula administration speed too fast
Too much formula administered
Intolerance or allergy to the formula
Constipation
Gastric reflux (stomach contents rise up into the esophagus)
Dumping syndrome (or rapid gastric emptying): the stomach empties too quickly into the intestine
What to do?
If your child is nauseated, place the child in an upright seated position
If your child is vomiting, put your child’s head to the side.
In both cases:
Postpone the next feeding session for 30 to 60 minutes.
Reduce the amount or rate of formula to be administered, as recommended by your healthcare team.
If the problem persists, contact your child’s healthcare team.
Nausea and/or vomiting during feeding session
Possible cause(s)
Formula administration speed too fast
Excess air in the stomach
Too much formula administered
Formula too cold
Formula too concentrated
Intolerance or allergy to the formula
Contamination of the formula (during preparation, poor maintenance of the equipment)
Gastric reflux (stomach contents rise up into the esophagus)
Gastric emptying is fast or too slow (the stomach empties too quickly or too slowly into the intestine)
Change in administration schedule
Constipation
Infection
What to do?
If your child has nausea:
Place the child in an upright seated position, if possible.
Slow down or stop feeding until your child is comfortable and then resume feeding.
If the problem persists, contact your child’s healthcare team.
If your child vomits:
Turn your child’s head to the side.
Stop feeding for 30 to 60 minutes and then start again more slowly.
If the problem persists, contact your child’s healthcare team.
Breathing difficulties (eg, coughing, choking, noisy and/or wheezy breathing, increased work of breathing (retraction of the skin around the ribs and collarbones), bluish discoloration of the lips and skin) during a feeding session
Possible cause(s)
Aspiration (accidental entry of formula into the lungs): caused by improper positioning of the child or the nasal tube, vomiting or gastric reflux
Condition of the child
Respiratory infection
What to do?
Stop the feeding session immediately.
Stay calm and reassure your child.
If your child is in respiratory distress:
Call immediately 911.
Begin CPR as taught.
If your child is not in respiratory distress:
Put your child in a sitting position or turn the child onto the side to make breathing easier.
If your child has a nasogastric tube, check the tube location. If it is not in the stomach, remove it immediately and reinsert it when your child becomes calm again.
If your child has a button or another type of tube, rapidly contact your child’s healthcare team.
If your child has other discomforts in addition to breathing difficulties, rapidly contact your child’s healthcare team.
Bloating / swelling of the belly during feeding session
Possible cause(s)
Formula administration speed too fast
Excessive swallowing of air (eg, in children with non-invasive ventilatory support, crying)
Excess gas produced by digestion or infection
Too much formula at each feeding session
Intolerance to the formula
Poor absorption of the formula
Gastric emptying too slow (the stomach contents empty too slowly into the intestine)
Bowel obstruction
Condition of the child
What to do?
If your child has severe abdominal pain and/or other discomforts (eg, vomiting), stop the feeding session and immediately contact your child’s healthcare team.
If this is not the case, reduce the flow rate of the formula, according to your child’s tolerance.
If the problem persists:
stop the feeding session for 30 to 60 minutes;
if you have been instructed, decompress (or vent) the button or tube to let air out of the stomach.
If your child does not have any more discomfort afterwards, resume the feeding session by increasing the speed of flow progressively.
If the problem persists, contact your child’s healthcare team.
Bloating / swelling of the belly between feeding sessions
Possible cause(s)
Excessive swallowing of air (eg, in children with non-invasive ventilatory support, crying)
Excess gas produced by digestion or infection
Too much formula at each feeding session
Intolerance to the formula
Poor absorption of the formula
Gastric emptying too slow (the stomach contents empty too slowly into the intestine)
Bowel obstruction
Condition of the child
What to do?
If your child has severe abdominal pain and/or other discomforts (eg, vomiting), stop the feeding session and and immediately contact your child’s healthcare team.
If this is not the case and if you have been instructed, decompress (or vent) the button or tube to let air out of the stomach.
Be sure to close the tube cap tightly between feeding sessions.
If your child can also feed by mouth, eliminate liquids and foods that cause gas or intolerance, as recommended by your healthcare team.
If the problem persists, contact your child’s healthcare team.
Abdominal pain during feeding session
Possible cause(s)
Formula administration speed too fast
Too much formula at each feeding session
Formula too cold
Excess air in the stomach
Gastric emptying too slow (the stomach contents empty too slowly into the intestine)
If your child has severe abdominal pain, stop the feeding session and and immediately contact your child’s healthcare team.
If the pain is fairly mild, reduce the flow rate of the formula, according to your child’s tolerance
If the problem persists, discontinue administration for 30 to 60 minutes, which may help reduce symptoms and then gradually resume the feeding session.
If the problem still persists and you have been taught, decompress (or vent) the button or tube to let air out of the stomach and then gradually resume the feeding session.
If the problem persists, contact your child’s healthcare team.
Diarrhea (soft or liquid stools more frequent than usual) with or without cramps and/or abdominal pain
Possible cause(s)
Infection
Formula administration speed too fast
Use of formulas that have passed the expiry date
Contamination of the formula (during preparation, poor maintenance of the equipment)
Side effects of medication (eg, antibiotics)
Intolerance to the formula
Movement of the tube or button
Too much fiber in the diet
Food allergies or intolerances
Dumping syndrome (or rapid gastric emptying): the stomach contents empty too quickly into the intestine.
Condition of the child
What to do?
Discontinue feeding session if in progress.
If your child has bloody diarrhea, fever or episodes of diarrhea are frequent, immediately contact your child’s healthcare team.
If this is not the case, check your child’s hydration level (thirst, dry lips and tongue, darker urine, with a strong odour and in small quantities, weakness, dizziness).
If your child seems dehydrated or is having many more stools than usual, immediately contact your child’s healthcare team.
If your child is adequately hydrated, delay feeding for 30 to 60 minutes to relieve symptoms; resume feeding session more slowly over the next few hours.
Review the cleanliness guidelines for formula preparation and storage recommendations (including in the hanging bag).
Check the expiry date of the formula: discard products that are past their expiry date or return them to the pharmacy.
If the problem persists, consult your child’s healthcare team.
Constipation (infrequent and/or difficult to pass stool for more than a day) with or without nausea, vomiting, abdominal bloating, cramps and/or abdominal pain
Possible cause(s)
Insufficient hydration
Inactivity
Lack of fibre in the diet
Change of formula
Side effects of medication
Intolerance to the formula
Change of medication
Condition of the child
What to do?
Make sure your child gets all the fluid he or she needs.
Increase the amount of physical activity your child gets, if possible.
Contact your healthcare team for advice on nutrition (eg, increasing dietary fibre).
If the problem still persists, contact your child’s healthcare team.
Dry mouth
Possible cause(s)
Insufficient hydration
Lack of mouth stimulation
Side effects of medication
Condition of the child
What to do?
If your child can take fluids by mouth and has no fluid restriction, give more water by mouth.
Rinse your child’s mouth often with water.
Moisten your child’s mouth with foam-tipped oral swabs or a clean damp washcloth.
Yellowish or greenish vomiting (bile) or yellowish or greenish liquid visible in the feeding tube
Possible cause(s)
Movement of the gastrostomy tube or urinary Foley™ catheter into the intestine
Bowel obstruction
Intussusception or intestinal invagination (folding of the intestines on top of each other, like a telescope: most common with nasojejunal or gastrojejunal tubes)
What to do?
Discontinue feeding session or irrigation, if in progress.
Check that the gastrostomy tube or urinary Foley™ catheter is in the right place, as taught to you by your healthcare team.
If not, reinstall the tube or catheter correctly.
If the tube or catheter is in the right place and the problem persists, immediately contact your child’s healthcare team.
One or more of these symptoms between feeding sessions: Headaches; Chest pain; Vomiting; Blurred vision; Perspiration (sweating); Pallor (pale skin); Fatigue or irritability; Tremors (shakiness); Convulsions
Possible cause(s)
Hypoglycemia (low blood sugar)
Infection
Dumping syndrome (or rapid gastric emptying): the stomach contents empty too quickly into the intestine
What to do?
If your child is having a convulsion or is not responsive, immediately contact 911.
If not, check your child’s blood glucose, if already discussed and you have been taught by your healthcare team.
Rapidly give your child an additional source of sugar as recommended by your healthcare team in this situation.
Immediately contact your child’s healthcare team.
One or more of these symptoms during and/or after feeding session: Headaches; Chest pain; Strong thirst; Weakness; Agitation; Irritability; Abdominal cramps; Diarrhea; Urine more often than usual
Possible cause(s)
Hyperglycemia (high blood sugar)
Infection
Dumping syndrome (or rapid gastric emptying): the stomach contents empty too quickly into the intestine
What to do?
Check your child’s blood glucose, if already discussed and you have been taught by your healthcare team.
Immediately contact your child’s healthcare team.
One or more of these symptoms: Increased thirst; Dry and sticky tongue; Dry and chapped lips; Hollow or sunken eyes; Darker urine, strong odor and in smaller quantities than usual; Urine less often than usual; Weakness; Dizziness
Possible cause(s)
Dehydration because of low water intake or significant fluid loss (eg, through vomiting, diarrhea, excessive sweating, fever, certain medications)
What to do?
Rapidly contact your child’s healthcare team.
Give your child rehydration formulas (eg, Pedialyte™, Gastrolyte™), if recommended by your healthcare team.
One or more of these symptoms: Faster breathing, difficulty breathing; Swelling especially in the legs, feet and around the eyes; Quick and sudden weight gain
Possible cause(s)
Fluid overload in the body
Low protein levels in your child
Infection
Condition of the child
What to do?
Immediately contact your child’s healthcare team.
Please do not hesitate to refer to your healthcare team for any questions or specific advice related to your child’s condition.
Everyday tips
Clothing
Make sure the tube or button extension set is securely attached to your child to avoid tension.
Avoid clothing with a tight belt so that it does not rub against the stoma or get caught in the tube or button.
Ideally, wear clothing that covers the button or enterostomy long tube (eg, long t-shirt, one-piece pyjamas, button-down sleepsuit, overalls).
Bathing and swimming
Bathing:
Your child can take a bath or shower with his or her feeding tube or button, unless your healthcare team advises otherwise. Make sure the cover is securely in place.
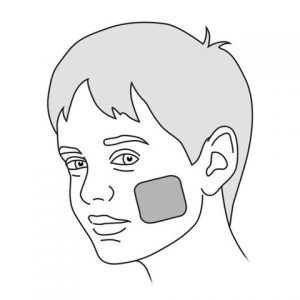
You can take advantage of the bath time to change the nasogastric tube; make sure the skin on the cheek is dry before reinserting the tube after the bath, if necessary.
Ostomy care:
Clean the skin around the stoma with a small washcloth soaked in room temperature tap water and unscented mild soap (eg, “Dove”). Start on the inside (the area of skin closest to the stoma) and clean outward (the area of skin furthest from the stoma).
Gently lift the button or the long tube external bolster and clean the ostomy site in the same manner.
Observe the skin around the stoma; it should be clean, dry, and intact (same appearance as usual: similar to the color of the belly or slightly pinkish). Check for signs of infection (redness, tenderness, swelling, discharge different from the usual yellowish or brownish discharge, bad odour).
It is normal for a small amount of yellowish or brownish discharge to come out of the stoma. They may become crusty as they dry. You can easily remove them with a cotton swab. Rinse and dry the skin well.
If your child has had a stoma for less than 6-8 weeks (or other length of time, as recommended by your healthcare team), check with your healthcare team to see if cleaning the stoma site with saline solution is needed. Refer to your healthcare team for the recipe and storage of homemade saline solution, if recommended.
As with all children, avoid bubble baths and scented oils.
Do not apply cream or lotion to the skin around the stoma unless recommended by your healthcare team.
If there is a small amount of milk or nutritional formula leakage, you can place a compress under the button or around the tube on the skin to absorb the leakage and protect the skin; change the compress as soon as it is wet to keep the skin clean and dry. You can purchase button pads, made for children, from many online retailers (eg, www.feedingtubeawareness.org/g-gj-tube-pads/). Discuss this with your healthcare team.
Mouth care:
Even if your child is not eating, your child’s mouth should be cleaned at least twice a day.
If your child has no teeth, use a small face cloth or a compress dampened with water and rolled around your index finger, to gently rub your child’s gums and tongue.
Once teeth start to appear, brush your child’s teeth after each meal and at bedtime. Since young children have a tendency to swallow toothpaste instead of spitting it out, use only the size of a small grain of rice in children under 2 years old and the size of a small pea in children up to 6 years old. Use this time to also gently massage their gums with the toothbrush.
As your child matures, teach and supervise brushing of the teeth.
Apply, if required, a hydrating lip balm.
Nasal hygiene:
In all children, secretions, along with bacteria and viruses collect in the nose. Keeping your child’s nose clean helps prevent lung infections.
If your child cannot blow his/her nose effectively, refer to your healthcare team for the appropriate technique for nasal hygiene with a saline solution that will allow your child to clear his/her nose properly (recipe and storage of the “homemade” saline solution, quantity to use, how to proceed according to your child’s age, etc.). To this end, you can refer to the brochure published by the Centre hospitalier universitaire Ste-Justine that explains the technique of nasal hygiene: Nasal hygiene.
Swimming:
Immediately following tube placement, your child can bathe according to the recommendations of the healthcare team.
Unplug your child from the feeding system and remove the extension set, if in place, before swimming.
Make sure the tube is securely fastened so that it will not get snagged or ripped off while swimming.
Make sure the cover on the nasal tube, button feeding port or enterostomy long tube ports is securely closed.
Consult your healthcare team for recommendations specific to your child.
Sleeping
As with all children under one year of age, lay your baby on his or her back to sleep.
If applicable, refer to your healthcare team to obtain an IV pole for overnight feedings.
Nutrition and hydration
Your healthcare team is responsible for identifying the specific type of nutritional formula for your child. Follow their instructions for preparation, if applicable, and for the amount to give according to the feeding schedule agreed upon with you.
Always check the expiry date on the original container or package before preparing or using the product; do not use products that are past their expiry date.
For ease of reading the rest of the text, the word (nutritional) “formula” also includes “breast milk”, “fortified breast milk” or “infant formula”.
Preparation of the nutritional formula:
Follow the manufacturer’s or your healthcare team’s instructions carefully.
Confirm with your healthcare team the type of water, if any, to be used for preparation: tap water, sterile water or cooled boiled water. The type of water varies according to the age and condition of your child.
Conservation of the nutritional formula:
Follow the manufacturer’s or your healthcare team’s instructions carefully.
The conservation time of the formula depends on how it is prepared (ready-to-use or reconstituted from liquid concentrate or powder).
Unopened original containers or packaging may be stored until their expiry date.
Remaining portions should be stored in a clean, airtight container.
Administer the formula at the temperature your child can tolerate, as recommended by your healthcare team.
Do not reheat the container in the microwave.
The length of time the formula is kept in the feeding bag varies according to several factors (eg, the form of the product used, whether or not supplements have been added, etc.). Follow the instructions of the manufacturer or your healthcare team. Pour only the amount needed for the feeding session and discard the formula that remains in the bag afterwards.
The following are general recommendations for the preparation and storage of the nutritional formula:
Preparation and conservation of the nutritional formula
Formats
Preparation
Conservation: Remaining portion of the prepared formula
Conservation: Remaining portion of the original container
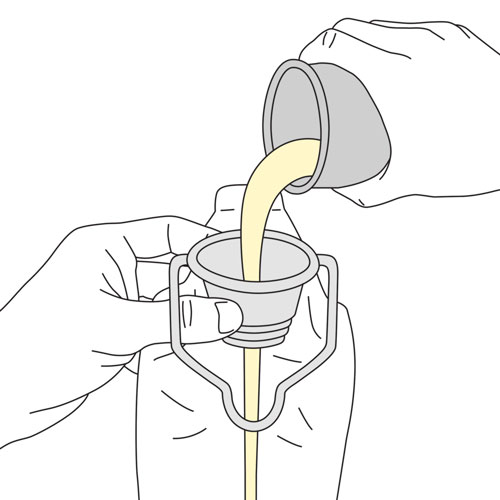
Ready to serve
Wipe the top of the container with a clean cloth;
Shake container well before opening;
Do not add water or other ingredients unless your healthcare team advises you to do so;
Pour the required amount into the feeding bag.
X
Store in a clean container
24 hours maximum in the refrigerator
Liquid concentrate
Wipe the top of the container with a clean cloth;
Shake container well before opening;
Empty the necessary concentrate into a clean, dry container;
Add the required amount of water for the recipe;
Mix well until the formula is homogeneous (smooth);
Pour the required amount into the feeding bag.
4 hours at room temperature
24 hours in the refrigerator
Store in a clean, airtight container
48 hours maximum in the refrigerator
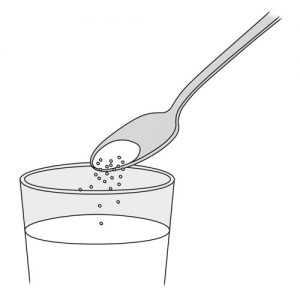
Powder
Take a clean and dry container;
Prepare water at the temperature specified by your healthcare team;
Measure the amount of water and powder needed for the recipe;
Carefully follow the manufacturer’s or your healthcare team’s instructions for further recipe preparation;
Pour the required amount into the feeding bag.
4 hours at room temperature
24 hours in the refrigerator
Store in the original container
One month at room temperature (powder)
Precautions for the content of the feeding bag:
Check that the feeding bag and tubing have been rinsed thoroughly before use.
Do not add new formula to the bag if there is any left over from the previous feeding session.
Check with your healthcare team as to how much formula to put in the feeding bag to ensure that it will keep for the correct conservation time.
Always check that the formula is at the temperature your child can tolerate, as recommended by your healthcare team, before transferring it to the feeding bag.
Never place the filled feeding bag near a source of heat (eg, a furnace) or in a sunny place.
Follow the recommended conservation time for the formula in the feeding bag to avoid contamination and the development of an infection in your child.
Your healthcare team may recommend pureed (blenderized) tube or button feeding for your child. If this is the case, they will give you the appropriate details.
Discuss with your healthcare team whether your child’s condition also allows for drinking and/or eating by mouth.
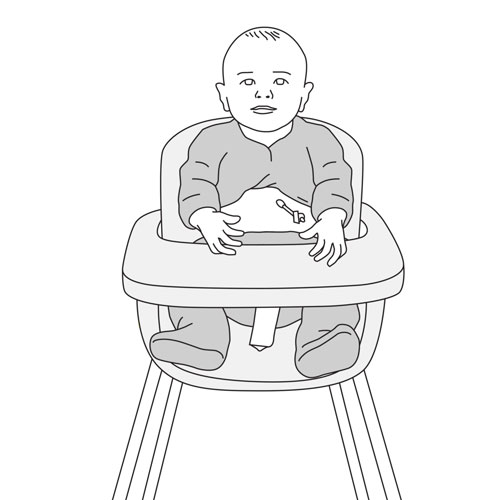
Even if your child is receiving enteral feeding, you can encourage your child to sit at the table while other family members eat their meal. It is important that your child participates in the meals at the table. Mealtime is a social activity for the whole family. If your child can eat by mouth, take advantage of these opportunities to encourage your child to touch and taste the food.
You can hold your baby in your arms during feeding sessions as if you were feeding by breast or bottle.
Discuss with your healthcare team the best position for your child during feeding to help ease digestion, avoid discomfort (eg, nausea, vomiting, reflux) and the risk of aspiration (accidental entry of formula into the lungs).
You can burp your baby after feeding.
If your child has a stoma, you can also decompress (or vent) the stomach prior to feeds, as taught by your healthcare team; this will help release gas and relieve bloating.
Activities
Your child can continue regular daily activities, according to the limits of your child’s health conditions. Make sure that the button or enterostomy long tube is always well protected. Discuss this with your healthcare team.
However, your child should avoid:
activities that may cause the tube or button to move accidentally (eg, pulling, contact sports),
the use of scissors near the tube and tubings,
having pets in contact with the pump and tubings, which could cause damage.
Your child can return to school or daycare if otherwise well. If necessary, discuss your child’s equipment, care and feeding needs with school or daycare staff. Discuss your child’s return to school or daycare with your healthcare team.
Your child can be placed on his or her stomach for play and placed in a baby carrier or car seat.
Travel and transportation
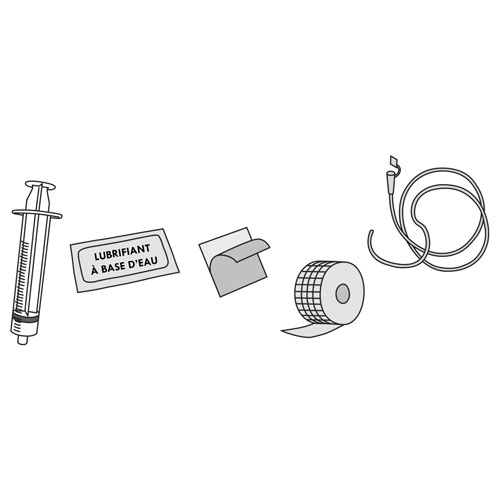
Always bring with you the equipment needed to administer enteral nutrition and medications when you are not at home, including a “troubleshooting kit” in case of complications. This equipment contains at least:
the nutritional formula (with ice packs if necessary) or the ingredients required to prepare it,
medications and a device to crush tablets to powder, if necessary,
an oral/enteral feeding syringe or feeding bags,
an oral/enteral syringe (to administer medication),
an oral/enteral syringe (for irrigation or flushing, after medication administration or feeding),
two button extension sets, if applicable,
the enteral feeding pump and backpack, if applicable,
the power cable for wall outlet, if necessary,
a spare nasogastric tube, gastrostomy balloon button or tube for replacement,
two urinary Foley™ catheters, if your child has a stoma: one the same size and one smaller than your child’s tube or button,
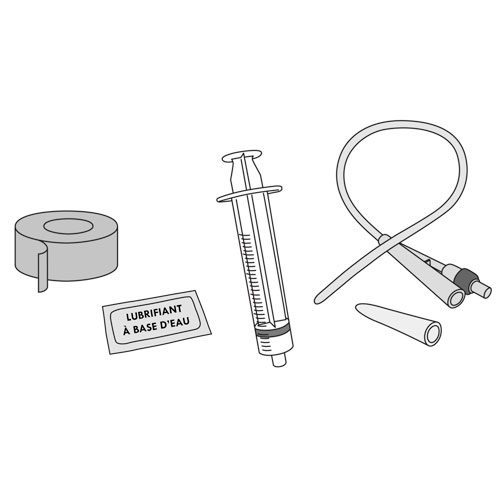
water-soluble lubricant,
a syringe (for the button balloon or urinary Foley™ catheter),
a thin protective bandage, if appropriate,
adhesive bandages,
water (for irrigation),
towels.
Always have an up-to-date list of materials and equipment needed in the travel bag; replace used or missing items. Confirm the frequency of checking expiry dates and equipment status with your healthcare team.
Keep the specific instructions of the enteral pump used by your child, if applicable, handy.
Keep a resource list close at hand with the names and telephone numbers of hospital, doctors, other members of your child’s healthcare team and equipment providers. Make sure you know how to contact these resources outside of regular hours and during vacations.
Before leaving on a trip:
always check with your insurance company to see if travel to your destination is covered;
check that the appropriate voltage for the enteral feeding pump is available at your destination;
make sure you have a document from your healthcare team describing your child’s condition and your child’s needs regarding enteral nutrition along with a complete list of medications;
bring enough supplies to last for the duration of the trip and add a bit extra as a reserve;
be aware of the presence of suppliers and other resources that may be required while traveling to or from the destination, in case there is equipment breakdown or other health need;
plan what to do in case of an emergency (eg, unintentional removal of the tube or button that you cannot change yourself, broken pump, lack of nutritional formula).
For travel by airplane:
contact the airline company to inquire about their policy concerning the transport of equipment and formula;
keep all equipment, formula, medications and documents from your healthcare team with you in the cabin.
While traveling: make sure the battery of the enteral feeding pump is fully charged.
Discuss with your healthcare team the possibility of using an alternative method of feeding (push, gravity) while traveling.
Others
Oral stimulation:
Even if your child’s feeding is partially or not at all possible through the mouth, stimulation of the lips, gums and tongue is important for speech development and to maintain a normal feeling of touch, temperature and taste.
You can encourage your child to develop these skills by:
Playing with toys and objects of different sizes and textures that are appropriate for age and developmental level and intended for use in the mouth (eg, sponges, terry towels, rubber toys, small soft toothbrushes),
Playing with cold rattles or cooled teething toys to stimulate the inside of the mouth,
Using a pacifier during feeding sessions so that sucking can be combined with the pleasure brought by the food.
As your child grows older, find more opportunities for sucking and chewing. Oral stimulation should always be pleasant and safe.
Maintaining this type of stimulation can help prevent your child from developing an oral aversion (not wanting to put anything near the mouth or lips, gagging easily).
Depending on certain conditions, some children may need more specific techniques or exercises. Discuss this with your healthcare team.
Care of feeding tubes and buttons:
COMMON care for all types of tubes and buttons:
Checking the location of the tube or button is essential to ensure that it is used safely (to avoid administering the formula or medication in the wrong place). Several methods are used (eg, measuring external length, checking for stomach contents, checking pH, etc.). Confirm the most appropriate methods for your child’s situation with your healthcare team.
It is essential to verify the correct location of the tube or button in all of the following circumstances:
after installing a nasogastric tube, gastrostomy balloon button or tube (the healthcare team will check the location of other types of tubes and buttons when they are installed),
before using them (feeding session, medication administration),
every 4 hours if your child is receiving continuous feeding,
if your child has certain symptoms (eg, difficulty breathing, coughing, choking, vomiting, reflux, discomfort during feeding, etc.),
if there are signs that the tube or button is displaced (eg, change in the length of the outer portion of the tube or button stem, detachment of the adhesive bandage or other fastening system, etc.),
daily, if the tube or button is not used on a regular basis,
if the tube is blocked, leaking or at the request of your healthcare team.
Irrigation of the tube and button is very important to maintain proper functioning and to avoid blockages (eg, removing traces of formula or medication). Never irrigate the button directly with a syringe as this may damage the anti-reflux valve; always connect an extension set to the button.
It is essential to irrigate the tube or button in all of the following circumstances:
after installing a nasogastric tube, gastrostomy balloon button or tube,
before and after use (feeding session, medication administration)
in-between the administration of each medication,
after aspirating gastric contents to check the pH,
every 4 hours during continuous feeding,
daily, if the tube or button is not used on a regular basis,
in all other circumstances, at the request of your healthcare team.
The quantity and type of water used for irrigation (eg, tap water or cooled boiled water) depends on the model of tube or button (including the extension set) and on the child (eg, age, health condition, etc.). Always follow the instructions of your healthcare team. Each irrigation should be done with the smallest amount of water recommended to prevent the tube or button from becoming blocked.
Other solutions may be recommended for irrigation if the button/tube becomes blocked.
The same care recommendations apply to the urinary Foley™ catheter (until it is replaced by a button or a enterostomy long tube).
SPECIFIC care for nasal tubes:
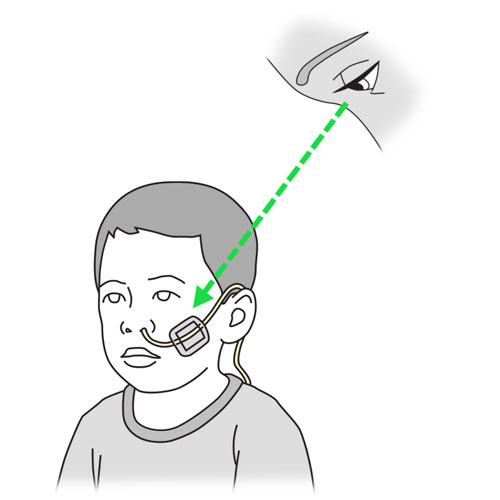
Before each use: Monitor the condition of your child’s nostrils and check that the reference point is always in the same place on the tube.
Every day: Perform nasal hygiene and check that the dressing securing the tube is clean and securely in place; change it if necessary.
SPECIFIC care for buttons and enterostomy long feeding tubes:
NEVER INSTALL OR REPLACE THE BUTTON OR LONG TUBE IF YOUR CHILD HAS A STOMA FOR LESS THAN 6 TO 8 WEEKS (or other length of time as recommended by your healthcare team) as the stoma is not fully healed; all re-insertions in this time period are the responsibility of your healthcare team.
It is normal for a small amount of yellowish or brownish secretions to come out of the stoma.
Keep the stoma site as open to air as possible, unless a dressing is recommended by your healthcare team (eg, heavy drainage).
Every day:
Clean the skin around the stoma with a small washcloth soaked in room temperature tap water and unscented mild soap (eg, “Dove”). Start on the inside (the area of skin closest to the stoma) and clean outward (the area of skin furthest from the stoma).
Gently lift the button or the long tube external bolster and clean the ostomy site in the same manner. Secretions may become crusty as they dry. You can easily remove them with a cotton swab. Rinse and dry the skin well.
If your child has a stoma for less than 6-8 weeks (or other length of time as recommended by your healthcare team), check with your healthcare team to see if the cleaning should be done with saline solution. Refer to your healthcare team for the recipe and storage of homemade saline solution.
After removing the cover, clean the feeding port of the button or tube with a cotton swab soaked in soapy water to remove any remains of formula. Also clean the anti-reflux valve on the button that is accessible when you open the feeding port. Close the cover tightly.
Observe the condition of the skin around the stoma; it should be clean, dry and intact (same appearance as usual: similar to the color of the belly or a little pinkish). Check for signs of infection (redness, tenderness, swelling, discharge different from the usual yellowish or brownish discharge, bad odor).
Check that there is not too much tension on the long tube and that the external bolster is well adjusted to the abdominal wall, as directed by your healthcare team.
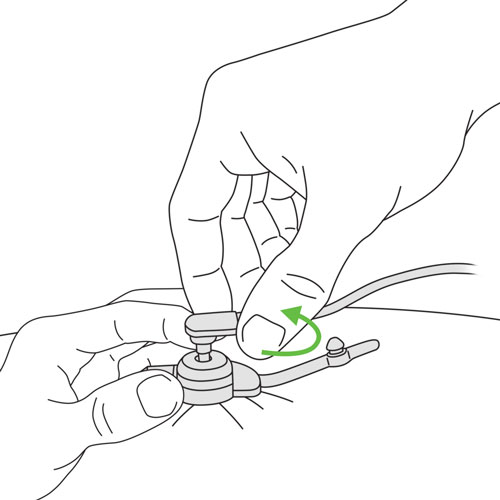
As recommended by your healthcare team, gently rotate the gastrostomy/jejunostomy button to check for mobility and avoid skin irritation.
Never turn the gastrojejunal button as you could move the portion that is in the jejunum.
Check with your healthcare team for specifics for gastrostomy and jejunostomy tube care.
After each feeding session (or minimally every day if the tube or button is not used on a regular basis):
Observe the condition of the skin around the stoma; it should be clean, dry and intact (same appearance as usual: similar to the color of the belly or a little pinkish). Check for signs of infection (redness, tenderness, swelling, discharge different from the usual yellowish or brownish discharge, bad odor).
Check if there is any leakage of milk or nutritional formula; if so, place a compress under the button or the external bolster of the tube to absorb it and protect the skin; change the compress as soon as it is wet to keep the skin clean and dry. Discuss this with your healthcare team.
Weekly for balloon models but only after 6 to 8 weeks following surgery (or other duration as recommended by your healthcare team): Check the amount of water in the balloon to ensure that there are no leaks and that the balloon is functioning properly.
Connect the specific syringe for this purpose into the balloon port.
Remove all water and discard. The water may not be colourless.
Inject the required amount of water into the balloon.
It is normal to take out a little less water than the amount you put in initially. The water may have evaporated from the balloon. If the difference is more than 0.5 ml, the balloon may be defective.
If there is not enough water in the balloon when you try to deflate it, inject the usual amount of water into the balloon. Wait 3 to 4 hours and then try to remove the water. a) If the amount has not changed, check after a few days to make sure the balloon is working properly. b) If the balloon is empty, the balloon is probably broken; the tube or button needs to be changed.
Preparation of medications for enteral administration
Refer to your healthcare team for specifics regarding the preparation and expiration date of medications.
Medications should always be given in liquid form to avoid blocking the tube or button:
Use the liquid form of the medication if available.
If the medication is in tablet form, check with your healthcare team to see if you can crush it into a fine powder and mix it with a little water.
If the medication is in a capsule, check with your healthcare team to see if you can open it and mix the contents with a little water.
Coated or extended-release medications cannot be crushed as this may interfere with their effectiveness.
Never mix medications with the formula to prevent them from reacting with each other and clogging the button or tube.
Never mix medications in the same syringe. Give one medication at a time.
Frequency of equipment replacement:
Follow your healthcare team’s recommendations about how often equipment should be replaced.
Any part must be changed if it appears damaged or does not function properly (eg, breakage, color change, stains, rigidity, etc.).
Maintenance and cleaning of material and equipment:
Always refer to the manufacturer’s recommendations and those provided by your healthcare team if they are different from the following. Your healthcare team will be able to take various factors into consideration (eg, your child’s health condition, comfort, safety, environment, etc.) to provide specific advice for the cleaning and maintenance of materials and equipment.
Proper cleaning and quick rinsing after use prevents milk or formula remains from drying and accumulating in the equipment.
We suggest the following way of cleaning the equipment that can be used as a general guide:
Disassemble all equipment (bag with tubing, extension set, syringe body and plunger, etc.).
Always clean and rinse with lukewarm water as hot water can damage the quality of the plastic: it can make it stiff, erase the numbers on the syringes and make the plungers sticky.
Never use bleach, alcohol, alcohol-based products, peroxide or strongly scented products to clean the equipment. These products can damage the equipment.
Do not put any parts in the dishwasher.
After each feeding session:
Rinse each piece with warm tap water. Make sure the draining water runs clear (no residue).
Bags and tubing: Use a bottle brush to clean the inside of the bag. If gravity feed: Hang the bag from a hook or the IV pole to clean the tubing; stand over the sink or a large bowl; put 500 ml of warm water in the bag and run it through the tubing until it is clean.
If pump feeding: leave the tubing in place in the pump; refer to your healthcare team’s or manufacturer’s instructions for rinsing the tubing.
Extension sets: Fill a syringe with warm water, connect it to the extension set and inject water through the ports until drains out clearly.
Drain and air-dry all parts on a clean cloth and place them so that the water drains well; air dry the tubing and the hanging bag without the cap on.
Reassemble the pieces when they are completely dry. Make sure that the black rubber tip of the plunger is completely dry before putting it back into the syringe barrel; otherwise, it may stretch and crack and the syringe will be unusable.
Store unused equipment in a clean container with a lid until the next use.
Every day or more often, if necessary:
Prepare soapy water: 15 ml of dishwasher soap diluted in 125 ml of boiling water. Let it cool before using it.
Bags and tubing: Put 250 ml of warm water and 1 ml of soapy water in the bag. Use a bottle brush to clean the inside. Run the water through the tubing to clean it.
If residues remain stuck to the walls of the bag, tubing or nasogastric tube or if odours persist: fill with a solution of 1/2 white vinegar – 1/2 warm tap water. Let stand with the solution in a sink or other container for 10 minutes; then empty the contents of the bag, tubing and nasogastric tube; rinse with clear warm water at least twice to remove any vinegar odour.
Extension sets: Clean with a syringe of soapy water diluted with warm water; roll the extension set between your fingers to dislodge any sticky residue; thoroughly clean the inside of the feeding and medication port.
Syringes: Clean the body and plunger with soap and water diluted with warm water.
Thoroughly rinse all parts with warm tap water until the return water is clear (no soap residue); repeat this rinse as many times as necessary.
Pay special attention to the connection points.
Drain and air-dry all parts on a clean cloth and place them so that the water drains well; air dry the tubing and hanging bag without the cap on.
Reassemble the parts when they are completely dry; make sure that the black rubber tip of the plunger is completely dry before putting it back into the syringe barrel; otherwise, it could stretch and crack and the syringe would be unusable.
Store unused equipment in a clean container with a lid until the next use.
When changing the nasogastric tube: fill a syringe with warm soapy water and inject the water into the tube until it comes out clear.
If formula is given continuously, clean the equipment before adding formula to the bag; some families find it advantageous to use a second bag (eg, when one bag is cleaned, the second bag can be set up to continue enteral feeding).
The following are specific recommendations for the maintenance and cleaning of the enteral pump after each feeding session:
Unplug the pump from the electrical outlet before cleaning.
Clean the exterior surface with a damp cloth.
Check with the manufacturer or your healthcare team for maintenance and cleaning specifications for the interior.
Clean the outside of the power cord thoroughly with a damp cloth.
Never immerse the pump or power cord in water or any other cleaning solution.
Make sure all parts are dry, including the power cord, before reconnecting the pump.
Your healthcare team will advise you of the procedures for periodic inspection of the pump (recertification/recalibration) to ensure proper operation and safety.
Charging the enteral pump:
The pump can be recharged in different ways:
by electricity in a wall outlet or in a power strip extension equipped with a circuit breaker,
by an integrated rechargeable battery, if present in the device.
Do not plug the unit into a wall outlet controlled by a wall switch.
It is not recommended to use a portable charger (eg, power bank) to operate the pump.
When a battery is used, make sure it is sufficiently charged for the expected operating time of the pump.
Emergencies:
Always have a telephone nearby in case of an emergency. Make sure your cell phone is charged at all times.
Make sure that the pump, if used, is always charged.
Have the necessary equipment available in case of a power failure (eg, ice-packs and cooler for the formula).
Have the equipment available to administer the nutritional formula or milk and medications by push (feeding syringe) or gravity (gravity feed bag with tubing) in the event of a problem with the pump (eg, malfunction, inability to recharge).
Keep a resource list close at hand with the names and telephone numbers of hospital, doctors, other members of your child’s healthcare team and equipment providers. Make sure you know how to contact these resources outside of regular hours and during vacations.
Accident prevention:
Do not use over-the-counter medications without a doctor’s advice.
Never leave your child alone during the feeding session; it is important to check that your child is tolerating the formula, is not vomiting, is not accidentally disconnected, etc.
Attach and secure the tube or button extension set as directed by your healthcare team.
Make sure the tubing is out of your child’s reach (eg, under clothing) during gravity or pump feeding; if your baby pulls on the tube often, cover the hands in mittens or socks.
Verify the correct location of the tube or button at these times:
after installing a nasogastric tube, gastrostomy balloon button or tube (the healthcare team will check the location of all other types of tubes and buttons when they are installed),
before use (feeding session, medication administration),
every 4 hours during continuous feeding,
if your child has certain symptoms (eg, difficulty breathing, coughing, choking, vomiting, reflux, discomfort with feeds etc.),
if there are signs that the tube or button is displaced (eg, change in length in the outer portion of the tube or button stem, detachment of the adhesive bandage or other fastening system, etc.),
daily, if the tube or button is not used on a regular basis,
in all other circumstances, at the request of your healthcare team (eg, blocked tube).
If your child moves around with an IV pole supporting the bag with or without the pump, it is important to make a few changes around the house to avoid obstacles (eg, move some furniture to provide more space, attach a ramp to allow easy access to the bathroom, remove carpets).
Infection prevention:
Always wash your hands before providing care to your child and have your child wash his hands before and after all meals and frequently during the day.
Properly clean the work surface for preparing the milk or nutritional formula to be administered.
Follow your healthcare team’s recommendations on how often to change the equipment used at home.
Make sure to clean and maintain the equipment and materials as recommended. Discuss special cleaning and maintenance measures if your child is immunosuppressed.
Daycare and school:
Your child’s healthcare team will evaluate your child’s needs and will support you in the planning of integration to daycare or to school.
Advise school staff of the treatment and care that your child requires.
Methods of care : Insertion and removal of a nasogastric tube
Indications
A nasogastric tube is inserted to provide enteral nutrition if prescribed by your child’s doctor. Some medications can also be given through the nasogastric tube.
The nasogastric tube can be removed after each feeding session or at a time agreed upon with your healthcare team.
We suggest a procedure that you can use as a guide; discuss with your healthcare team the specific equipment recommended for your child.
Considerations:
Ideally, the nasogastric tube should be inserted when your child’s stomach is empty (two hours after the last feeding session) to minimize the risk of vomiting or aspiration (accidental entry of formula into the lungs).
In general, it is recommended to alternate between the right and left nostrils each time that the tube is inserted to optimize your child’s comfort. Also, by alternating nostrils, the skin on the cheek has a chance to heal if it has been irritated by the adhesive bandage. You can continue to use the same nostril if the other one is blocked or if it is impossible to insert the tube.
It is important to measure the length of the tube to be inserted; it may vary depending on your child’s growth.
It is normal for your child to feel nauseated or cough while the tube is being inserted. This should stop after the procedure.
Always check the correct placement of the tube: during insertion, before each feeding , before medication is given via the tube, if your child is vomiting or coughing a lot, and if there are any signs that the tube has changed position (eg, protective dressing or adhesive bandage is loose, external length changed, permanent marker pen mark on the tube not visible, etc.).
Assess the need to be have a second person available during the procedure to keep your child in a safe position (e.g., if your child is young and/or moving).
Refer to your healthcare team to adjust the method if your child is able to do the care on his or her own.
Good hand washing is essential before and after performing this care.
Frequency
The frequency of insertion and removal of the nasogastric tube is determined by your healthcare team. It varies, among other things, according to your child’s age, his or her specific needs and the type of tube used. For example, tubes may be:
inserted before each feeding session and removed at the end OR
left in place continuously, even at night.
Required materials
Nasogastric tube
Adhesive bandage (eg, Hypafix™, Tegaderm™): to secure the tube to the cheek
Oral/enteral syringe
Depending on what is used to lubricate the tube: Tap water at room temperature in a glass or container or Water-soluble lubricant (never petroleum jelly like Vaseline®)
Tissue paper
pH indicator paper
If needed:
Permanent marker pen (to identify the tube insertion length)
Thin protective dressing (eg, Duoderm™ extra-thin): to protect the skin of the cheek before attaching the tube if kept in place after use
Pacifier for infants and young children
Bowl (in case of vomiting)
Refer to your healthcare team if the material used at home or the sequence of steps taught is different from what is described in the method of care.
Depending on your child’s age and condition, always encourage your child’s autonomy in carrying out the method of care.
Collaborate and form a team with your child. When you invest the time to form a strong team, children feel more comfortable and less anxious – this will help you complete the care with less stress – for you and your child.
Use these tips, from the start, to set the stage for a positive care procedure:
Create the right moment: integrate the care in a routine.
Alert your child to the needed care and communicate together.
Form a team with your child: Encourage autonomy by offering realistic choices such as the method of distraction. Stay tuned to your child. Manage pain and anxiety, using distraction and positioning for comfort.
Prepare the environment: Identify a routine place for care. Close windows, doors and fans. Wash and dry the work surface and gather the needed materials for the care and to distract your child.
Prepare your child: Get help if needed. Position your child for comfort to receive the care and start to use the selected distraction method.
Prepare yourself: Find the right time when you are ready to provide the care safely. Review the list of care steps. Wash your hands.
Now that you are ready to start the care procedure, take the opportunity to encourage and praise your child.
Safety: Carefully follow the care practice steps as you have been taught.
Flexibility: Be ready to adjust according to your child’s reactions during the procedure. As needed, reposition or select an alternative distraction strategy. Follow your child’s pace and rhythm.
Collaboration: Reassure your child, verbally and non-verbally. Acknowledge your child’s emotions and reactions. Help your child differentiate between the different sensations during a procedure.
Step 4: Prepare the material
Set up on a flat surface or a well-cleaned table.
Gather the necessary equipment.
Remove the tube from its packaging or container.
Inspect the tube to ensure that it is not damaged or soiled.
Cut the appropriate size of the protective dressing, if applied.
Cut the appropriate size of the adhesive bandage that will secure the tube to the cheek.
Open the lubricant packet; place a small amount of lubricant on the open tube package.
Why ?
This step ensures that the required materials are on hand in order to start the procedure.
Step 5: Prepare your child
Ask your child to blow his or her nose, if possible.
If he or she is unable to do so, remove secretions from your child’s nose with a tissue or suction nasal secretions, as instructed by your healthcare team.
Choose which side the tube will be inserted.
Make sure the skin on the cheek on the same side as that nostril is clean and dry.
If the tube will be left in place for a long period of time, attach the protective dressing to the cheek where the adhesive bandage will be placed.
Why ?
Clean nostrils make it easier to insert the tube.
The protective dressing minimizes irritation to the cheek.
Swaddle the baby in a blanket if necessary, depending on the baby’s age and degree of collaboration.
If your child is older, position your child in a seated or semi-seated position and tilt your child’s head slightly forward.
Why ?
This position facilitates swallowing as well as the progression of the tube through the nose into the stomach and reduces the risk of aspiration into the lungs.
Swaddling the baby increases the safety of the procedure.
Step 7: Determine the tube insertion length
Take the end of the tube and put it on the tip of your child’s nose.
Holding the end of the tube in place, measure the distance from the tip of the nose (1) ⇒ to the base of the earlobe (2) ⇒ to the base of the sternum breastbone) (3) ⇒ to halfway between the base of the sternum and the navel (belly button) (4).
Make a mark at this point on the tube with a permanent marker pen or note the number on the tube if it is graduated (numbers pre-marked).
Why ?
Measuring the insertion length of the tube helps ensure that, once fully inserted, the tube will be correctly positioned for use.
Step 8: Lubricate the tube
If you use a water-soluble lubricant:
Spread the lubricant (size of a pea) on the first 3 cm of the tube.
Roll the end of the tube on in the lubricant.
If you use water:
Dip the end of the tube into the glass or water container.
Shake slightly to remove excess water drops.
Why ?
Lubrication of the tube makes it easier to insert and more comfortable for your child.
Step 9: Insert the tube
Give your baby a pacifier to suck on or if your child is older, ask your child to swallow or sip water from a glass with a straw.
Hold the pre-measured, lubricated tube like a pencil about 3-4 cm from the tip.
Slowly insert the tube into one nostril while your child swallows; gently but quickly push the tube backwards and down. Do not force.
Continue to insert the tube until the mark reaches the edge of the nostril.
Why ?
This method of insertion follows the natural curves inside the nose and the back of the throat and avoids injury.
Swallowing, drinking or sucking while inserting the tube helps advance it into the back of the throat.
Inserting the tube quickly will minimize gagging and discomfort.
Inserting the tube up to the mark allows placement in the stomach.
Step 10: Tape the tube
If the tube is going to be removed after the feeding session: attach the tube to your child’s cheek with the adhesive bandage.
If the tube will be left in place for a longer period of time: place the tube over the protective dressing already stuck on the cheek and secure it by placing the adhesive dressing over it.
Make sure that the pen mark on the tube is clearly visible on the edge of the nostril.
Make sure that the position of the tube does not compress the edge of the nostril.
Why ?
This step reduces the risk of accidental removal of the tube.
Do not put too much pressure on the nostril to avoid injury from the tube.
Step 11: Check the tube location
With one hand, bend the tube near the outside end of it.
With your other hand, remove the cap from the end of the tube, if in place.
Connect the syringe.
Stop bending the tube.
Gently pull on the plunger to withdraw some gastric secretions (liquid from the stomach, usually clear or light yellow in colour) into the syringe.
Bend the tube again.
Disconnect the syringe.
Replace the cap at the end of the tube.
Stop bending the tube.
Check the pH of the gastric secretions: soak the pH indicator paper with a few drops of the liquid collected in the syringe.
If the result is 5.5 or less, the tube is in the correct position.
If the result is 6 or higher, the tube may not be in the correct place; remove the tube and reinsert it.
Discard any gastric fluid remaining in the syringe.
Why ?
This step is used to check if the tube is in the stomach. If so, the pH indicator paper will confirm the acidity of the gastric liquid.
Bending the tube prevents the gastric secretions from leaking out if there is no cap at the end of the tube.
Step 12: Irrigate the tube
Put the tip of the syringe into the water container.
Withdraw the plunger and fill the syringe with the amount of water recommended by your healthcare team to irrigate the tube.
With one hand, bend the tube.
With the other hand, remove the cap in place from the end of the tube.
Connect the syringe.
Stop bending the tube.
Slowly depress the plunger of the syringe to push the water into the tube.
Bend the tube again.
Disconnect the syringe.
Replace the cap at the end of the tube.
Stop bending the tube.
Why ?
This step clears the tube and prevents blockage.
Step 13: Secure the tube
Put the tube behind your child’s ear, if this is what your healthcare team recommends.
The tube should be positioned so that it does not put pressure on your child’s nostril and allows your child to move his or her head.
Attach the tube according to your healthcare team’s instructions: slide it under clothing or roll it up and tape it to your child’s back with adhesive tape.
Why ?
This step prevents unintentional removal of the tube, minimizes the risk of strangulation and promotes your child’s comfort.
Step 14: Administer the formula, if applicable
Go to the next step if you want to give your child medication instead.
Observe your child for any signs of discomfort when the feeding session is started (eg, nausea, vomiting, difficulty breathing, abdominal pain, sweating, etc.).
Be prepared to recognize the challenges faced and to provide positive feedback. Help your child recognize his/her strengths. Acknowledge the collaborative teamwork.
Listen to what your child says about the parts of the procedure that were difficult or painful.
Comfort your child and recognize your child’s collaboration with positive feedback.
Highlight your child’s specific strengths that helped make the procedure positive.
Discuss with your child what might be done the same or differently the next time the care is needed.
Keep your promises if you have promised a reward, follow through.
Reward yourself too.
.Reviser : NRoss.Version : 1.0
Methods of care : Change of the gastrostomy balloon button
Indications
The gastrostomy balloon button must be changed if it is accidentally removed, if it is defective or broken (eg, blocked or slowly leaking by the button, balloon deflation or bursting, breakage of the anti-reflux valve) and as directed by your healthcare team.
We suggest a procedure that you can use as a guide; discuss with your healthcare team the specific equipment used for your child.
Considerations:
NEVER CHANGE THE BUTTON IF YOUR CHILD HAS A STOMA FOR LESS THAN 6 TO 8 WEEKS (or other duration as recommended by your healthcare team). If changing the button is necessary at this time, contact your healthcare team.
Except in an emergency, change the button when your child’s stomach is empty (minimum 2 hours after the last feeding session or as recommended by your healthcare team).
Always use the amount of water recommended by your healthcare team to inflate the balloon. The amount needed depends on the size and fit of the button. In some cases, it may be necessary to put more water in the balloon to prevent leakage around the stoma if the button is not tight enough. Never put more water than the maximum amount recommended by the manufacturer, as the balloon may burst.
Assess the need to have a second person available during the procedure to keep your child in a safe position (eg, if your child is young and/or moving).
Refer to your healthcare team to adjust the method if your child is able to do the care on his or her own.
Collaborate and form a team with your child. When you invest the time to form a strong team, children feel more comfortable and less anxious – this will help you complete the care with less stress – for you and your child.
Use these tips, from the start, to set the stage for a positive care procedure:
Create the right moment: integrate the care in a routine.
Alert your child to the needed care and communicate together.
Form a team with your child: Encourage autonomy by offering realistic choices such as the method of distraction. Stay tuned to your child. Manage pain and anxiety, using distraction and positioning for comfort.
Prepare the environment: Identify a routine place for care. Close windows, doors and fans. Wash and dry the work surface and gather the needed materials for the care and to distract your child.
Prepare your child: Get help if needed. Position your child for comfort to receive the care and start to use the selected distraction method.
Prepare yourself: Find the right time when you are ready to provide the care safely. Review the list of care steps. Wash your hands.
Now that you are ready to start the care procedure, take the opportunity to encourage and praise your child.
Safety: Carefully follow the care practice steps as you have been taught.
Flexibility: Be ready to adjust according to your child’s reactions during the procedure. As needed, reposition or select an alternative distraction strategy. Follow your child’s pace and rhythm.
Collaboration: Reassure your child, verbally and non-verbally. Acknowledge your child’s emotions and reactions. Help your child differentiate between the different sensations during a procedure.
Step 4: Prepare the material
Set up on a flat surface or a well-cleaned table.
Gather the necessary equipment.
Remove the new button from its packaging.
Remove the extension set from its packaging or container.
Inspect the button and extension set for damage.
Open the lubricant packet; place a small amount of lubricant on the open package of the button.
Fill syringe #1 with the amount of water needed to inflate the new button balloon, according to the manufacturer’s recommendations or as directed by your healthcare team.
Fill syringe #2 with the amount of water needed to irrigate the extension set as recommended by your healthcare team.
Why ?
This step ensures that the required materials are on hand in order to start the procedure.
Step 5: Check the function of the new button balloon
Hold the sides of the button with one hand.
With the other hand, connect the tip of syringe #1 into the balloon port until the connection is solid.
Depress the plunger of the syringe to inject the full amount of water into the balloon.
While leaving the syringe connected and maintaining pressure on the plunger, check that the balloon is intact and properly inflated.
If the balloon does not leak, remove the water from the balloon by withdrawing the plunger.
Leave the syringe filled with water connected to the balloon port.
Why ?
This step is used to check if the balloon is functioning properly and has no leaks.
Holding the sides of the button will stabilize it during this step.
Screwing the tip of the syringe into the balloon port opens the balloon fill valve.
The lying down position makes the procedure easier because it provides better access to the stoma site.
Step 7: Lubricate the new button
Spread a sufficient amount of lubricant on the tip of the new button.
Why ?
Lubrication makes the button insertion easier and more comfortable for your child.
Step 8: Deflate the balloon from the old button, if in place
If the old button is not in place, go to step 10.
Hold the sides of the button with one hand until the end of the step.
With the other hand, connect the tip of syringe #3 into the balloon port of the old button until securely connected.
Remove water from the balloon by withdrawing the plunger.
If the water does not return, there may be no water left or the syringe may not be inserted deep enough; push the syringe a little more into the balloon port and try to remove the water again.
When all the water has been removed, disconnect the syringe.
Set the syringe aside.
Why ?
This step is necessary to avoid injuring the stoma while removing the old button.
Holding the sides of the button helps stabilize the button during the step.
Screwing the tip of the syringe into the balloon port opens the balloon fill valve.
Step 9: Remove the old button, if in place
Put one hand on your child’s belly and then slowly remove the button pulling vertically with the other hand.
Even if you feel a little resistance, continue gently but DO NOT FORCE.
Use this time to observe the stoma and the skin around it.
Wipe the skin with the towel if any gastric secretions come out of the stoma.
Why ?
This step is necessary to install the new button.
There may be a small amount of resistance as the old button is removed, even if the balloon is correctly deflated.
Step 10: Insert the new button in the gastrostomy
Gently insert the button vertically through the stoma until it is flush with the stomach wall.
Try inserting the button as your child takes in a breath, when your child is usually more relaxed.
Slight pressure may be needed to insert the button, especially if your child cries during the procedure, but NEVER FORCE TO INSERT THE BUTTON. Try to calm your child down before continuing.
Why ?
This prevents injury to the gastrostomy during insertion of the button.
There may be a small amount of resistance as the new button is inserted, even if the balloon is correctly deflated.
It may be a little difficult to insert the button if your child is crying because this causes the abdominal muscles to contract.
Step 11: Inflate the button balloon
When the button is properly inserted, hold the sides with one hand until the end of the step.
Depress the plunger of syringe #1 (already connected to the balloon port) with the other hand to inject the full amount of water into the balloon.
Disconnect the syringe from the balloon port by holding the plunger.
Set the syringe aside.
Make sure there is a distance of about a dime between the button and the belly.
Turn the button at skin level; you should be able to do this without any problem.
Why ?
Inflating the balloon properly ensures that the button remains in place in the gastrostomy.
Holding the sides of the button helps to stabilize it during the step.
Holding the plunger when disconnecting the syringe prevents water from coming out of the balloon.
The ability to rotate the button confirms that it is not too deeply inserted into the gastrostomy.
Step 12: Irrigate the button extension set
Remove the cover from the extension set feeding port, if in place.
If the extension set has two ports, make sure the medication port is closed.
Connect the syringe #2 to the end of the extension set.
Make sure the extension set clamp is open.
Depress the plunger of the syringe to inject water all the way to the end of the extension set.
Close the clamp on the extension set.
Leave the syringe connected to the extension set.
Why ?
This step ensures that the extension set tubing is filled with water and ready to flush into the button feeding port.
Step 13: Connect the extension set to the button
Remove the cover from the button feeding port, if closed.
Hold the sides of the button and insert the extension set into the feeding port.
Lock the extension set into the button, according to the manufacturer’s instructions or those of your healthcare team.
Why ?
This step prepares for verification of the button location and irrigation.
Holding the sides of the button helps to stabilize it during the installation of the extension set.
Step 14: Check the location of the button
Open the clamp of the extension set.
Gently withdraw the plunger of the syringe #2 (already connected to the extension set) to draw some gastric secretions into the syringe.
Why ?
This step confirms that the button is installed correctly in the stomach.
Step 15: Irrigate the button
Slowly depress the plunger of syringe #2 to push back the gastric secretions and flush water from the extension set into the button.
When the syringe is empty, close the clamp of the extension set.
Disconnect the syringe.
Why ?
This step ensures that the button is patent, ready to use and reduces the risk of the button being blocked with debris.
Step 16: Administer the formula, if applicable
Go to the next step if you want to give your child medication instead.
Observe your child for any signs of discomfort when the feeding session is started (eg, nausea, vomiting, difficulty breathing, abdominal pain, sweating, etc.).
Step 17: Administer medication, if appropriate
Go to the next step if the button is not used immediately.
Unlock the button extension set, as directed by the manufacturer or your healthcare team.
Remove the extension set from the button feeding port.
Put the cover on the button feeding port.
Why ?
Removing the extension set prevents your child from accidentally pulling on it, moving the button and causing irritation at the insertion site. In addition, an unused extension set is cumbersome.
Holding the sides of the button helps stabilize the button while the extension set is being removed.
Closing the cover prevents leakage of the stomach contents through the button in between feeding sessions.
Be prepared to recognize the challenges faced and to provide positive feedback. Help your child recognize his/her strengths. Acknowledge the collaborative teamwork.
Listen to what your child says about the parts of the procedure that were difficult or painful.
Comfort your child and recognize your child’s collaboration with positive feedback.
Highlight your child’s specific strengths that helped make the procedure positive.
Discuss with your child what might be done the same or differently the next time the care is needed.
Keep your promises if you have promised a reward, follow through.
Reward yourself too.
.Reviser : NRoss.Version : 1.0
Methods of care : Temporary installation of a urinary Foley™ catheter in the stoma
Indications
A urinary Foley™ catheter can be temporarily installed to keep the stoma open if:
the gastrostomy balloon button or tube breaks or is accidentally removed and no other replacement button or tube is available for you to replace it with or you are unable to do so,
another type of button or enterostomy long tube breaks or is accidentally removed.
We suggest a procedure that you can use as a guide; discuss with your healthcare team the specific equipment used for your child.
Considerations:
NEVER INSTALL URINARY FOLEY™ CATHETER IF YOUR CHILD HAS A STOMA FOR LESS THAN 6 TO 8 WEEKS (or other length of time as recommended by your healthcare team). If a button or enterostomy long tube change is necessary at this time, contact your healthcare team.
You can feed your child through the urinary Foley™ catheter, if recommended by your healthcare team, while waiting to have it replaced by the button or enterostomy long tube.
If you can use the catheter for feeding, validate with your healthcare team how to check the location after initial installation and before using it to ensure it is in the stomach.
Contact your healthcare team rapidly if you cannot use the urinary catheter to make arrangements to replace the button or long tube.
It is essential that the urinary Foley™ catheter is securely fixed after installation.
While waiting for the urinary Foley™ catheter to be replaced with a button or long tube, you should measure the length of the catheter on the outside of the body to prevent it from going deeper into the stomach; if the catheter is too short, reposition it by gently pulling it back until you feel the balloon press against the inside of the stomach and then secure it with tape.
Assess the need to be have a second person available during the procedure to keep your child in a safe position (eg, if your child is young and/or moving).
Good hand washing is essential before and after performing this care.
Collaborate and form a team with your child. When you invest the time to form a strong team, children feel more comfortable and less anxious – this will help you complete the care with less stress – for you and your child.
Use these tips, from the start, to set the stage for a positive care procedure:
Create the right moment: integrate the care in a routine.
Alert your child to the needed care and communicate together.
Form a team with your child: Encourage autonomy by offering realistic choices such as the method of distraction. Stay tuned to your child. Manage pain and anxiety, using distraction and positioning for comfort.
Prepare the environment: Identify a routine place for care. Close windows, doors and fans. Wash and dry the work surface and gather the needed materials for the care and to distract your child.
Prepare your child: Get help if needed. Position your child for comfort to receive the care and start to use the selected distraction method.
Prepare yourself: Find the right time when you are ready to provide the care safely. Review the list of care steps. Wash your hands.
Now that you are ready to start the care procedure, take the opportunity to encourage and praise your child.
Safety: Carefully follow the care practice steps as you have been taught.
Flexibility: Be ready to adjust according to your child’s reactions during the procedure. As needed, reposition or select an alternative distraction strategy. Follow your child’s pace and rhythm.
Collaboration: Reassure your child, verbally and non-verbally. Acknowledge your child’s emotions and reactions. Help your child differentiate between the different sensations during a procedure.
Step 4: Prepare the material
Set up on a flat surface or a well-cleaned table.
Gather the necessary equipment.
Open the package of the urinary Foley™ catheter and inspect it to make sure it is not damaged or soiled.
Put the plug on the end of the catheter.
Cut out the appropriate size of adhesive bandage that will secure the catheter to the belly.
Open the bag of lubricant and pour a small amount onto the opened catheter package.
Fill syringe with the amount of water needed to inflate the catheter balloon, according to the manufacturer’s recommendations or as directed by your healthcare team.
Why ?
This step ensures that the required materials are on hand in order to start the procedure.
Step 5: Check the function of the catheter balloon
Grasp the balloon port of the catheter with one hand.
With the other hand, connect the tip of syringe into this port until securely connected.
Depress the plunger of the syringe to inject the full amount of water into the balloon.
While leaving the syringe connected and maintaining pressure on the plunger, check that the balloon is intact and properly inflated.
If the balloon does not leak, remove the water from the balloon by withdrawing the plunger.
Leave the syringe, filled with water, connected to the catheter.
Why ?
This step is used to check if the balloon is functioning properly and has no leaks.
Screwing the tip of the syringe into the balloon port opens the balloon fill valve.
The lying down position makes the procedure easier because it provides better access to the stoma site.
Step 7: Lubricate the catheter
Spread enough lubricant over the first 3 cm of the tip of the catheter.
Roll the tip of the catheter in the lubricant.
Why ?
Lubrication makes the catheter insertion easier and more comfortable for your child.
Step 8: Insert the catheter into the stoma
With one hand, hold the catheter about 7-10 cm from its tip.
Gently insert the tip of the catheter into the stoma; gently push the catheter all the way to the end of this length.
Some pressure may be needed to insert the catheter, especially if your child cries during the procedure; take time to calm your child NEVER FORCE THE CATHETER IN.
If you are unable to insert the catheter, try a smaller size catheter.
Wipe the skin with the towel if any stomach contents come out of the stoma.
Thoroughly clean and dry the skin around the stoma.
Why ?
This prevents injury to the stoma during insertion of the catheter.
There may be a small amount of resistance as the catheter is inserted, even if the balloon is correctly deflated.
It may be a little difficult to insert the catheter if your child is crying because this causes the abdominal muscles to contract.
Step 9: Inflate the catheter balloon
Take the balloon opening with one hand.
Depress the plunger of the syringe (already connected in the balloon port) to inject the entire amount of water into the balloon.
While maintaining pressure on the plunger, disconnect the syringe.
Set the syringe aside.
Gently pull the catheter until you feel a slight resistance.
Why ?
Balloon inflation ensures that the catheter remains in place in the stoma.
Pulling slightly on the catheter positions balloon against the stomach wall.
Step 10: Attach and secure the catheter
Secure the catheter in place on the belly with tape to prevent it from moving, according to the method suggested by your healthcare team.
You can hold it in place using the “H” technique: form an “H” with tape and attach it to the catheter and then to the skin.
Why ?
Attaching the catheter securely prevents the catheter from moving and irritating the stoma.
Be prepared to recognize the challenges faced and to provide positive feedback. Help your child recognize his/her strengths. Acknowledge the collaborative teamwork.
Listen to what your child says about the parts of the procedure that were difficult or painful.
Comfort your child and recognize your child’s collaboration with positive feedback.
Highlight your child’s specific strengths that helped make the procedure positive.
Discuss with your child what might be done the same or differently the next time the care is needed.
Keep your promises if you have promised a reward, follow through.
Reward yourself too.
.Reviser : NRoss.Version : 1.0
Methods of care : Administration of nutritional formula: Nasal tube
Indications
NOTE: For ease of reading the rest of the text, the word (nutritional) “formula” also includes “breast milk”, “fortified breast milk” or “infant formula”.
The formula is given to your child through the enteral route to provide nutrients and calories to meet their nutritional needs.
We suggest administration methods (by push, gravity and feeding pump) that can be used as a guide; discuss with your healthcare team the specific method and equipment for your child.
Considerations:
Do not administer the formula if you are not sure that the tube is in the right place after making the usual checks.
Check and follow the manufacturer’s or your healthcare team’s instructions for preparation and storage of the formula.
Discard expired formula or return them to the pharmacy.
Always administer the formula at the temperature your child tolerates, as recommended by your healthcare team.
Never add new substances to the formula without consulting your healthcare team.
Always follow the flow rate (or rate of administration) prescribed for your child. Changes in formula volume or delivery time may require an adjustment of the gravity flow rate or reprogramming of the pump to your child’s tolerance. Check with your healthcare team to determine what adjustments are necessary.
Follow the recommended storage time for formula in the feeding bag to avoid contamination and potential development of an infection in your child.
Never increase the speed of formula administration (eg, To “catch up” after a delayed start to feeds) unless recommended by your healthcare team.
The amount and type of water used for irrigation (eg, tap water or cooled boiled water) depends on the type of tube and the child (eg, age, health condition, etc.). Always follow the guidelines of your healthcare team.
Assess the need to be have a second person available during the procedure to keep your child in a safe position (eg, if your child is young and/or moving).
Good hand washing is essential before and after performing this care.
Frequency
The formula is given as a bolus (intermittently) or continuously, depending on the specific recommendations of your healthcare team.
Bolus administration allows the child to receive certain amounts of formula several times a day, with breaks in-between feeding sessions. Each feeding session typically lasts approximately 30 to 60 minutes.
Continuous administration allows the child to receive small amounts of formula continuously throughout the day or night without interruption (for eg, over 8 to 24 hours a day).
Required materials
Breast milk, fortified breast milk, infant formula or prepared nutritional formula
Water at room temperature in a container
Oral/enteral syringe (for irrigation)
Push method:
Oral/enteral feeding syringe from 30 to 60 ml
Container for formula
Gravity method:
Gravity feeding bag with tubing and roller clamp
Hook or IV pole
Pump method:
Feeding bag with tubing for pump
Enteral feeding pump
Hook or IV pole
Refer to your healthcare team:
if the material used at home or the sequence of steps taught is different from what is described in the method of care,
to review the functioning of the enteral feeding pump used for your child.
Depending on your child’s age and condition, always encourage your child’s autonomy in carrying out the method of care.
The steps of the methods of care are illustrated by a nasogastric tube.
The steps of the “By pump” method of care are illustrated by a Kangaroo Joey pump ™.
Collaborate and form a team with your child. When you invest the time to form a strong team, children feel more comfortable and less anxious – this will help you complete the care with less stress – for you and your child.
Use these tips, from the start, to set the stage for a positive care procedure:
Create the right moment: integrate the care in a routine.
Alert your child to the needed care and communicate together.
Form a team with your child: Encourage autonomy by offering realistic choices such as the method of distraction. Stay tuned to your child. Manage pain and anxiety, using distraction and positioning for comfort.
Prepare the environment: Identify a routine place for care. Close windows, doors and fans. Wash and dry the work surface and gather the needed materials for the care and to distract your child.
Prepare your child: Get help if needed. Position your child for comfort to receive the care and start to use the selected distraction method.
Prepare yourself: Find the right time when you are ready to provide the care safely. Review the list of care steps. Wash your hands.
Now that you are ready to start the care procedure, take the opportunity to encourage and praise your child.
Safety: Carefully follow the care practice steps as you have been taught.
Flexibility: Be ready to adjust according to your child’s reactions during the procedure. As needed, reposition or select an alternative distraction strategy. Follow your child’s pace and rhythm.
Collaboration: Reassure your child, verbally and non-verbally. Acknowledge your child’s emotions and reactions. Help your child differentiate between the different sensations during a procedure.
Step 4: Prepare the material
Set up on a flat surface or a well-cleaned table.
Gather and inspect all equipment to ensure that it is not damaged.
Fill the irrigation syringe with the amount of water recommended by your healthcare team.
Why ?
This step ensures that the required materials are on hand in order to start the procedure.
This position facilitates digestion and avoids aspiration of the formula into the lungs.
Step 6: Check the location of the nasal tube
Make a visual inspection of your child’s tube; check to see if it is intact.
Check to see if there are any changes in the outer portion of the tube, if the mark is still in the same place and if the adhesive bandage is securely in place.
Aspirate some gastric secretions, if recommended by your healthcare team: first inject air to empty the tube and then aspirate to get a sample directly from the stomach.
Afterwards, check the pH of this gastric fluid, if recommended by your healthcare team.
Why ?
This step ensures the safe use of the tube.
Step 7: Irrigate the nasal tube
Bend the tube and remove its cap.
Connect the syringe to the end of the tube.
Release the tube.
Slowly depress the plunger of the syringe to push the water into the tube.
When the syringe is empty, bend the tube.
Disconnect the syringe.
Replace the cap at the end of the tube.
Release the tube.
Why ?
This step clears the tube and prevents blockage.
Step 8: Aspirate the formula into the feeding syringe
Remove the protective cap from the feeding syringe.
Dip the end of the syringe into the container and withdraw up the formula by pulling the plunger.
Fill the syringe with the required amount of formula.
Hold the syringe with the pointed end upwards and remove the air from the syringe by pushing gently on the plunger until a drop of formula comes out of the tip of the syringe.
Why ?
This step fills the syringe with the amount of formula to be administered and removes the air from the syringe.
Step 9: Connect the feeding syringe to the nasal tube
Bend the tube and remove its cap.
Connect the syringe to the end of the tube.
Release the tube.
Why ?
Connecting the filled syringe allows for administration of the formula by push.
Step 10: Administer the formula
Slowly depress the plunger of the feeding syringe and push a small amount of formula at a time, at the speed recommended by your healthcare team.
Every time the syringe is empty:
bend the tube,
disconnect the syringe,
put the cap at the end of the tube,
release the tube,
fill the syringe with formula,
bend the tube again,
remove the cap from the tube,
reconnect the syringe to the end of the tube,
continue the administration.
Administer the formula for 20-30 minutes until your child has received the required amount or for the length of time agreed upon with your healthcare team.
Observe your child for any signs of discomfort when the feeding session is started (eg, nausea, vomiting, difficulty breathing, abdominal pain, sweating, etc.).
Why ?
This ensures that the formula reaches the stomach safely.
The length of the feeding session depends on the amount of formula required and your child’s tolerance.
Step 11: Disconnect the feeding syringe from the nasal tube
When the feeding session is over:
Bend the tube.
Disconnect the feeding syringe from the tube.
Replace the cap at the end of the tube.
Release the tube.
Why ?
This step prepares the tube for irrigation.
Step 12: Irrigate the nasal tube
Bend the tube and remove its cap.
Connect the syringe to the end of the tube.
Release the tube.
Slowly depress the plunger of the syringe to push the water into the tube.
When the syringe is empty, bend the tube.
Disconnect the syringe.
Replace the cap at the end of the tube.
Release the tube.
Why ?
Irrigation ensures that your child has received all of the formula and prevents debris from sticking to the tube and blocking it.
Step 13: Keep your child in the same position after the session
Leave your child in a seated or semi-seated position for at least 30 minutes after formula administration, if possible.
Burp your baby after feeding, as needed.
Why ?
This position facilitates digestion and reduces regurgitation.
Burping your baby avoids abdominal pain (bloating and swelling).
Be prepared to recognize the challenges faced and to provide positive feedback. Help your child recognize his/her strengths. Acknowledge the collaborative teamwork.
Listen to what your child says about the parts of the procedure that were difficult or painful.
Comfort your child and recognize your child’s collaboration with positive feedback.
Highlight your child’s specific strengths that helped make the procedure positive.
Discuss with your child what might be done the same or differently the next time the care is needed.
Keep your promises if you have promised a reward, follow through.
Collaborate and form a team with your child. When you invest the time to form a strong team, children feel more comfortable and less anxious – this will help you complete the care with less stress – for you and your child.
Use these tips, from the start, to set the stage for a positive care procedure:
Create the right moment: integrate the care in a routine.
Alert your child to the needed care and communicate together.
Form a team with your child: Encourage autonomy by offering realistic choices such as the method of distraction. Stay tuned to your child. Manage pain and anxiety, using distraction and positioning for comfort.
Prepare the environment: Identify a routine place for care. Close windows, doors and fans. Wash and dry the work surface and gather the needed materials for the care and to distract your child.
Prepare your child: Get help if needed. Position your child for comfort to receive the care and start to use the selected distraction method.
Prepare yourself: Find the right time when you are ready to provide the care safely. Review the list of care steps. Wash your hands.
Now that you are ready to start the care procedure, take the opportunity to encourage and praise your child.
Safety: Carefully follow the care practice steps as you have been taught.
Flexibility: Be ready to adjust according to your child’s reactions during the procedure. As needed, reposition or select an alternative distraction strategy. Follow your child’s pace and rhythm.
Collaboration: Reassure your child, verbally and non-verbally. Acknowledge your child’s emotions and reactions. Help your child differentiate between the different sensations during a procedure.
Step 4: Prepare the material
Set up on a flat surface or a well-cleaned table.
Gather and inspect all equipment to ensure that it is not damaged.
Fill the irrigation syringe with the amount of water recommended by your healthcare team.
Check that the roller clamp on the bag tubing is securely closed.
Why ?
This step ensures that the required materials are on hand in order to start the procedure.
This position facilitates digestion and avoids aspiration of the formula into the lungs.
Step 6: Check the location of the nasal tube
Make a visual inspection of your child’s tube; check to see if it is intact.
Check to see if there are any changes in the outer portion of the tube, if the mark is still in the same place and if the adhesive bandage is securely in place.
Aspirate some gastric secretions, if recommended by your healthcare team: first inject air to empty the tube and then aspirate to get a sample directly from the stomach.
Afterwards, check the pH of this gastric fluid, if recommended by your healthcare team.
Why ?
This step ensures the safe use of the tube.
Step 7: Irrigate the nasal tube
Fold the tube and remove its cap.
Connect the syringe to the end of the tube.
Release the tube.
Slowly depress the plunger of the syringe to push the water into the tube.
When the syringe is empty, fold the tube.
Disconnect the syringe.
Replace the cap at the end of the tube.
Release the tube.
Why ?
This step clears the tube and prevents blockage.
Step 8: Pour the formula into the bag
Open the cap of the feeding bag.
Pour the formula into the bag, adding about 30 ml more than the amount to be given to get rid of the the air in the tubing.
Close the cap of the bag.
Why ?
This step allows you to fill the bag with the formula.
Step 9: Hang the bag
Hang the bag at a height of 45 to 90 cm above your child’s head.
Hang it from a coat rack, a wall hook, or place it on the IV pole.
Why ?
The correct positioning of the bag promotes the safe administration of the formula.
Step 10: Empty the air out of the bag tubing
Compress the drip chamber to fill it with formula to 1/3 or 1/2 of its capacity.
Remove the cap from the end of the tubing.
Then open the roller clamp to allow the formula to flow down through the tubing and get rid of air from the rest of the tubing.
Direct the end of the tubing into a container to catch the few drops of formula that will drip out of the tubing.
When the tubing is filled with formula, close the roller clamp.
Why ?
This step avoids the entry of air into the stomach and prevents swelling of the belly from excess air.
Step 11: Connect the tubing to the nasal tube
Bend the tube and remove its cap.
Connect the tubing to the end of the tube.
Release the tube.
Why ?
Once the feeding bag tubing is connected to the nasal tube, the feeding can begin.
Step 12: Administer the formula
Open the roller clamp and slowly roll the roller up or down until you get the flow rate agreed upon with your healthcare team.
Feeding volume
Drop rate
60 ml / hour
16 drops / minute
80 ml / hour
20 drops / minute
100 ml / hour
24 drops / minute
120 ml / hour
28 drops / minute
140 ml / hour
32 drops / minute
Observe your child for any signs of discomfort when the feeding session is started (eg, nausea, vomiting, difficulty breathing, abdominal pain, sweating, etc.).
If the formula is administered over a long period of time or continuously:
Be prepared to recognize the challenges faced and to provide positive feedback. Help your child recognize his/her strengths. Acknowledge the collaborative teamwork.
Listen to what your child says about the parts of the procedure that were difficult or painful.
Comfort your child and recognize your child’s collaboration with positive feedback.
Highlight your child’s specific strengths that helped make the procedure positive.
Discuss with your child what might be done the same or differently the next time the care is needed.
Keep your promises if you have promised a reward, follow through.
Collaborate and form a team with your child. When you invest the time to form a strong team, children feel more comfortable and less anxious – this will help you complete the care with less stress – for you and your child.
Use these tips, from the start, to set the stage for a positive care procedure:
Create the right moment: integrate the care in a routine.
Alert your child to the needed care and communicate together.
Form a team with your child: Encourage autonomy by offering realistic choices such as the method of distraction. Stay tuned to your child. Manage pain and anxiety, using distraction and positioning for comfort.
Prepare the environment: Identify a routine place for care. Close windows, doors and fans. Wash and dry the work surface and gather the needed materials for the care and to distract your child.
Prepare your child: Get help if needed. Position your child for comfort to receive the care and start to use the selected distraction method.
Prepare yourself: Find the right time when you are ready to provide the care safely. Review the list of care steps. Wash your hands.
Now that you are ready to start the care procedure, take the opportunity to encourage and praise your child.
Safety: Carefully follow the care practice steps as you have been taught.
Flexibility: Be ready to adjust according to your child’s reactions during the procedure. As needed, reposition or select an alternative distraction strategy. Follow your child’s pace and rhythm.
Collaboration: Reassure your child, verbally and non-verbally. Acknowledge your child’s emotions and reactions. Help your child differentiate between the different sensations during a procedure.
Step 4: Prepare the material
Set up on a flat surface or a well-cleaned table.
Gather and inspect all equipment to ensure that it is not damaged.
Fill the irrigation syringe with the amount of water recommended by your healthcare team.
Make sure the pump is properly charged or plugged into a wall outlet.
Place the pump on a solid surface (eg, chest of drawers, bedside table or kitchen table), on an IV pole or in a backpack.
Why ?
This step ensures that the required materials are on hand in order to start the procedure.
This position facilitates digestion and avoids aspiration of the formula into the lungs.
Step 6: Check the location of the nasal tube
Make a visual inspection of your child’s tube; check to see if it is intact.
Check to see if there are any changes in the outer portion of the tube, if the mark is still in the same place and if the adhesive bandage is securely in place.
Aspirate some gastric secretions, if recommended by your healthcare team: first inject air to empty the tube and then aspirate to get a sample directly from the stomach.
Afterwards, check the pH of this gastric fluid, if recommended by your healthcare team.
Why ?
This step ensures the safe use of the tube.
Step 7: Irrigate the nasal tube
Bend the tube and remove its cap.
Connect the syringe to the end of the tube.
Release the tube.
Slowly depress the plunger of the syringe to push the water into the tube.
When the syringe is empty, bend the tube.
Disconnect the syringe.
Replace the cap at the end of the tube.
Release the tube.
Why ?
This step clears the tube and prevents blockage.
Step 8: Pour the formula into the bag
Open the cap of the feeding bag.
Pour the formula into the bag, adding about 30 ml more than the amount to be given to get rid of the the air in the tubing.
Close the cap of the bag.
Why ?
This step allows you to fill the bag with the formula.
Step 9: Hang the bag
Install the bag so that the highest level of the formula is about 15 cm above the pump.
Hang it from a coat rack, a wall hook, or place it on the IV pole.
If the bag is put in a backpack, keep the bag upright.
Why ?
The correct positioning of the bag promotes the safe administration of the formula.
Step 10: Prepare the pump
As directed by the manufacturer or your healthcare team:
Turn on the pump.
Verify that the prescribed delivery parameters (eg, volume, flow rate) are set.
Insert the bag tubing onto the pump.
Why ?
This step ensures secure administration of the formula.
Step 11: Empty the air out of the bag tubing
Remove the cap from the end of the tubing.
Get rid of the air from the bag tubing, as instructed by the manufacturer or your healthcare team.
Why ?
This step avoids the entry of air into the stomach and prevents swelling of the belly from excess air.
Step 12: Connect the tubing to the nasal tube
Bend the tube and remove its cap.
Connect the tubing to the end of the tube.
Release the tube.
Why ?
Once the bag tubing is connected to the nasal tube, the feeding can begin.
Step 13: Start the pump
Start the pump as directed by the manufacturer or your healthcare team.
Why ?
This step starts the delivery of the formula.
Step 14: Administer the formula
Observe your child for any signs of discomfort when the feeding session is started (eg, nausea, vomiting, difficulty breathing, abdominal pain, sweating, etc.).
If the formula is administered over a long period of time:
Be prepared to recognize the challenges faced and to provide positive feedback. Help your child recognize his/her strengths. Acknowledge the collaborative teamwork.
Listen to what your child says about the parts of the procedure that were difficult or painful.
Comfort your child and recognize your child’s collaboration with positive feedback.
Highlight your child’s specific strengths that helped make the procedure positive.
Discuss with your child what might be done the same or differently the next time the care is needed.
Keep your promises if you have promised a reward, follow through.
Reward yourself too.
.Reviser : NRoss.Version : 1.0
Methods of care : Administration of nutritional formula: Button
Indications
NOTE: For ease of reading the rest of the text, the word (nutritional) “formula” also includes “breast milk”, “fortified breast milk” or “infant formula”.
The formula is given to your child through the enteral route to provide nutrients and calories to meet their nutritional needs.
We suggest administration methods (by push, gravity and feeding pump) that can be used as a guide; discuss with your healthcare team the specific method and equipment recommended for your child.
Considerations:
Do not administer the formula if you are not sure that the button is in the right place after making the usual checks.
Check and follow the manufacturer’s or your healthcare team’s instructions for preparation and storage of the formula.
Discard expired formula or return them to the pharmacy.
Always administer the formula at the temperature your child tolerates, as recommended by your healthcare team.
Never add new substances to the formula without consulting your healthcare team.
Always follow the flow rate (or rate of administration) prescribed for your child. Changes in formula volume or delivery time may require an adjustment of the gravity flow rate or reprogramming of the pump to your child’s tolerance. Check with your healthcare team to determine what adjustments are necessary.
Follow the recommended storage time for formula in the feeding bag to avoid contamination and potential development of an infection in your child.
Never increase the speed of formula administration (eg, To “catch up” after a delayed start to feeds) unless recommended by your healthcare team.
The amount and type of water used for irrigation (eg, tap water or cooled boiled water) depends on the type of tube and the child (e.g., age, health condition, etc.). Always follow the guidelines of your healthcare team.
Assess the need to be have a second person available during the procedure to keep your child in a safe position (eg, if your child is young and/or moving).
Good hand washing is essential before and after performing this care.
Frequency
The formula is given as a bolus (intermittently) or continuously, depending on the specific recommendations of your healthcare team.
Bolus administration allows the child to receive certain amounts of formula several times a day, with breaks in-between feeding sessions. Each feeding session typically lasts approximately 30 to 60 minutes.
Continuous administration allows the child to receive small amounts of formula continuously throughout the day or night without interruption (for eg, over 8 to 24 hours a day).
Required materials
Breast milk, fortified breast milk, infant formula or prepared nutritional formula
Water at room temperature in a container
Oral/enteral syringe (for irrigation)
Extension set
Push method:
Oral/enteral feeding syringe from 30 to 60 ml
Container for formula
Gravity method:
Gravity feeding bag with tubing and roller clamp
Hook or IV pole
Pump method:
Feeding bag with tubing for pump
Enteral feeding pump
Hook or IV pole
Refer to your healthcare team:
if the material used or the sequence of steps taught at home is different from what is described in the method of care,
to review the functioning of the enteral feeding pump used for your child.
Depending on your child’s age and condition, always encourage your child’s autonomy incarrying out the method of care.
The steps of the methods of care are illustrated by a Mic-Key® gastrostomy button.
The steps of the “By pump” method of care are illustrated by a Kangaroo Joey pump ™.
Collaborate and form a team with your child. When you invest the time to form a strong team, children feel more comfortable and less anxious – this will help you complete the care with less stress – for you and your child.
Use these tips, from the start, to set the stage for a positive care procedure:
Create the right moment: integrate the care in a routine.
Alert your child to the needed care and communicate together.
Form a team with your child: Encourage autonomy by offering realistic choices such as the method of distraction. Stay tuned to your child. Manage pain and anxiety, using distraction and positioning for comfort.
Prepare the environment: Identify a routine place for care. Close windows, doors and fans. Wash and dry the work surface and gather the needed materials for the care and to distract your child.
Prepare your child: Get help if needed. Position your child for comfort to receive the care and start to use the selected distraction method.
Prepare yourself: Find the right time when you are ready to provide the care safely. Review the list of care steps. Wash your hands.
Now that you are ready to start the care procedure, take the opportunity to encourage and praise your child.
Safety: Carefully follow the care practice steps as you have been taught.
Flexibility: Be ready to adjust according to your child’s reactions during the procedure. As needed, reposition or select an alternative distraction strategy. Follow your child’s pace and rhythm.
Collaboration: Reassure your child, verbally and non-verbally. Acknowledge your child’s emotions and reactions. Help your child differentiate between the different sensations during a procedure.
Step 4: Prepare the material
Set up on a flat surface or a well-cleaned table.
Gather and inspect all equipment to ensure that it is not damaged.
Fill the irrigation syringe with the amount of water recommended by your healthcare team.
Why ?
This step ensures that the required materials are on hand in order to start the procedure.
This position facilitates digestion and avoids aspiration of the formula into the lungs.
Step 6: Check the location of the button
Make a visual inspection your child’s button; check to see if it is intact.
Check to see if the button is correctly in place and not pushed into the stoma, or too far out of the stoma.
Why ?
This step ensures the safe use of the button.
Step 7: Irrigate the button extension set
Remove the cover from the extension set feeding port.
If the extension set has two ports, make sure that the medication port remains closed throughout the procedure.
Connect the syringe to the end of the extension set.
Make sure the extension set clamp is open.
Depress the plunger of the syringe to inject water all the way to the end of the extension set.
Close the clamp on the extension set.
Leave the syringe connected to the extension set.
Why ?
This step ensures that the extension set tubing is filled with water and ready to flush into the button feeding port.
Step 8: Connect the extension set to the button
Remove the cover from the button feeding port, if closed.
Make sure the port is clean.
Hold the sides of the button and insert the extension set into the feeding port.
Lock the extension set into the button, according to the manufacturer’s instructions or those of your healthcare team.
Why ?
This step prepares for verification of the button location and irrigation.
Holding the sides of the button helps to stabilize it during the installation of the extension set.
Step 9: Irrigate the button
Open the clamp of the extension set.
Slowly depress the plunger of the syringe (already connected to the extension set) to push the water into the button
When the syringe is empty, close the clamp of the extension set.
Disconnect the syringe.
Replace the cover on the feeding port of the extension set.
Why ?
This step ensures that the button is patent, ready to use and reduces the risk of the button being blocked with debris.
Step 10: Aspirate the formula into the feeding syringe
Remove the protective cap from the feeding syringe.
Dip the end of the syringe into the container and withdraw up the formula by pulling the plunger.
Fill the syringe with the required amount of formula.
Hold the syringe with the pointed end upwards and remove the air from the syringe by pushing gently on the plunger until a drop of formula comes out of the tip of the syringe.
Why ?
This step fills the syringe with the amount of formula to be administered and removes the air from the syringe.
Step 11: Connect the feeding syringe to the button extension set
Remove the cover from the extension set feeding port.
Connect the supply syringe into the extension port.
Open the extension set clamp.
Why ?
Connecting the feeding syringe makes it possible to administer the formula by push.
Step 12: Administer the formula
Slowly depress the plunger of the feeding syringe and push a small amount of formula at a time, at the speed recommended by your healthcare team.
Every time the syringe is empty:
close the extension set clamp,
disconnect the syringe,
put the cover on the extension feeding port,
fill the syringe with formula,
remove the cover from the feeding port,
reconnect the syringe from the extension port,
open the extension clamp,
continue the administration.
Administer the formula for 20-30 minutes until your child has received the required amount or for the length of time agreed upon with your healthcare team.
Observe your child for signs of discomfort when the feeding session is started (eg, nausea, vomiting, difficulty breathing, abdominal pain, sweating, etc.).
Why ?
This ensures that the formula reaches the stomach safely.
The length of the feeding session depends on the amount of formula required and your child’s tolerance.
Step 13: Disconnect the feeding syringe from the button extension set
When the feeding session is over:
Close the button extension set clamp.
Disconnect the feeding syringe from the extension set.
Replace the cover on the extension set.
Why ?
This step clears the extension for irrigation.
Step 14: Irrigate the button
Remove the cover from the extension set.
Connect the syringe to the end of the extension set.
Open the clamp of the extension set.
Slowly depress the plunger of the syringe to push the water into the button.
When the syringe is empty, close the clamp of the extension set.
Disconnect the syringe.
Replace the cover on the feeding port of the extension set.
Why ?
This step ensures that all of the formula was given and reduces the risk of the button being blocked with left over traces of formula.
Step 15: Disconnect the button extension set
Hold the sides of the button.
Unlock the button extension set, as directed by the manufacturer or your healthcare team.
Remove the extension set from the button feeding port.
Put the cover on the button feeding port.
Why ?
If the extension set is kept in place, your child may accidentally pull on it and move the button, in addition to it being cumbersome.
Holding the sides of the button helps stabilize the button while the extension set is being removed.
Closing the cover prevents leakage of the stomach contents through the button in between feeding sessions.
Step 16: Keep your child in the same position after the session
Leave your child in a seated or semi-seated position for at least 30 minutes after formula administration, if possible.
Burp your baby after feeding, as needed.
Why ?
This position facilitates digestion and reduces regurgitation.
Burping your baby avoids abdominal pain (bloating and swelling).
Be prepared to recognize the challenges faced and to provide positive feedback. Help your child recognize his/her strengths. Acknowledge the collaborative teamwork.
Listen to what your child says about the parts of the procedure that were difficult or painful.
Comfort your child and recognize your child’s collaboration with positive feedback.
Highlight your child’s specific strengths that helped make the procedure positive.
Discuss with your child what might be done the same or differently the next time the care is needed.
Keep your promises if you have promised a reward, follow through.
Collaborate and form a team with your child. When you invest the time to form a strong team, children feel more comfortable and less anxious – this will help you complete the care with less stress – for you and your child.
Use these tips, from the start, to set the stage for a positive care procedure:
Create the right moment: integrate the care in a routine.
Alert your child to the needed care and communicate together.
Form a team with your child: Encourage autonomy by offering realistic choices such as the method of distraction. Stay tuned to your child. Manage pain and anxiety, using distraction and positioning for comfort.
Prepare the environment: Identify a routine place for care. Close windows, doors and fans. Wash and dry the work surface and gather the needed materials for the care and to distract your child.
Prepare your child: Get help if needed. Position your child for comfort to receive the care and start to use the selected distraction method.
Prepare yourself: Find the right time when you are ready to provide the care safely. Review the list of care steps. Wash your hands.
Now that you are ready to start the care procedure, take the opportunity to encourage and praise your child.
Safety: Carefully follow the care practice steps as you have been taught.
Flexibility: Be ready to adjust according to your child’s reactions during the procedure. As needed, reposition or select an alternative distraction strategy. Follow your child’s pace and rhythm.
Collaboration: Reassure your child, verbally and non-verbally. Acknowledge your child’s emotions and reactions. Help your child differentiate between the different sensations during a procedure.
Step 4: Prepare the material
Set up on a flat surface or a well-cleaned table.
Gather and inspect all equipment to ensure that it is not damaged.
Fill the irrigation syringe with the amount of water recommended by your healthcare team
Check that the roller clamp on the bag tubing is securely closed.
Why ?
This step ensures that the required materials are on hand in order to start the procedure.
This position facilitates digestion and avoids aspiration of the formula into the lungs.
Step 6: Check the location of the button
Make a visual inspection your child’s button; check to see if it is intact.
Check to see if the button is correctly in place and not pushed into the stoma, or too far out of the stoma.
Why ?
This step ensures the safe use of the button.
Step 7: Irrigate the button extension set
Remove the cover from the extension set feeding port.
If the extension set has two ports, make sure that the medication port remains closed throughout the procedure.
Connect the syringe to the end of the extension set.
Make sure the extension set clamp is open.
Depress the plunger of the syringe to inject water all the way to the end of the extension set.
Close the clamp on the extension set.
Leave the syringe connected to the extension set.
Why ?
This step ensures that the extension set tubing is filled with water and ready to flush into the button feeding port.
Step 8: Connect the extension set to the button
Remove the cover from the button feeding port, if closed.
Make sure the port is clean.
Hold the sides of the button and insert the extension set into the feeding port.
Lock the extension set into the button, according to the manufacturer’s instructions or those of your healthcare team.
Why ?
This step prepares for verification of the button location and irrigation.
Holding the sides of the button helps to stabilize it during the installation of the extension set.
Step 9: Irrigate the button
Open the clamp of the extension set.
Slowly depress the plunger of the syringe (already connected to the extension set) to push the water into the button
When the syringe is empty, close the clamp of the extension set.
Disconnect the syringe.
Replace the cover on the feeding port of the extension set.
Why ?
This step ensures that the button is patent, ready to use and reduces the risk of the button being blocked with debris.
Step 10: Pour the formula into the bag
Open the cap of the feeding bag.
Pour the formula into the bag, adding about 30 ml more than the amount to be given to get rid of the the air in the tubing.
Close the cap of the bag.
Why ?
This step allows you to fill the bag with the formula.
Step 11: Hang the bag
Hang the bag at a height of 45 to 90 cm above your child’s head.
Hang it from a coat rack, a wall hook, or place it on the IV pole.
Why ?
The correct positioning of the bag promotes the safe administration of the formula.
Step 12: Empty the air out of the bag tubing
Compress the drip chamber to fill it with formula to 1/3 or 1/2 of its capacity.
Remove the cap from the end of the tubing.
Then open the roller clamp to allow the formula to flow down through the tubing and get rid of air from the rest of the tubing.
Direct the end of the tubing into a container to catch the few drops of formula that will drip out of the tubing.
When the tubing and extension set are filled with formula, close the roller clamp.
Why ?
This step avoids the entry of air into the stomach and prevents swelling of the belly from excess air.
Step 13: Connect the tubing to the button extension set
Remove the cover from the extension set port.
Connect the tubing to the end of the extension set.
Open the extension set clamp.
Why ?
Once the feeding bag tubing is connected to the button extension set, the feeding can begin.
Step 14: Administer the formula
Open the roller clamp and slowly roll the roller up or down until you get the flow rate agreed upon with your healthcare team.
Feeding volume
Drop rate
60 ml / hour
16 drops / minute
80 ml / hour
20 drops / minute
100 ml / hour
24 drops / minute
120 ml / hour
28 drops / minute
140 ml / hour
32 drops / minute
Observe your child for signs of discomfort when the feeding session is started (eg, nausea, vomiting, difficulty breathing, abdominal pain, sweating, etc.).
If the formula is administered over a long period of time or continuously:
Be prepared to recognize the challenges faced and to provide positive feedback. Help your child recognize his/her strengths. Acknowledge the collaborative teamwork.
Listen to what your child says about the parts of the procedure that were difficult or painful.
Comfort your child and recognize your child’s collaboration with positive feedback.
Highlight your child’s specific strengths that helped make the procedure positive.
Discuss with your child what might be done the same or differently the next time the care is needed.
Keep your promises if you have promised a reward, follow through.
Collaborate and form a team with your child. When you invest the time to form a strong team, children feel more comfortable and less anxious – this will help you complete the care with less stress – for you and your child.
Use these tips, from the start, to set the stage for a positive care procedure:
Create the right moment: integrate the care in a routine.
Alert your child to the needed care and communicate together.
Form a team with your child: Encourage autonomy by offering realistic choices such as the method of distraction. Stay tuned to your child. Manage pain and anxiety, using distraction and positioning for comfort.
Prepare the environment: Identify a routine place for care. Close windows, doors and fans. Wash and dry the work surface and gather the needed materials for the care and to distract your child.
Prepare your child: Get help if needed. Position your child for comfort to receive the care and start to use the selected distraction method.
Prepare yourself: Find the right time when you are ready to provide the care safely. Review the list of care steps. Wash your hands.
Now that you are ready to start the care procedure, take the opportunity to encourage and praise your child.
Safety: Carefully follow the care practice steps as you have been taught.
Flexibility: Be ready to adjust according to your child’s reactions during the procedure. As needed, reposition or select an alternative distraction strategy. Follow your child’s pace and rhythm.
Collaboration: Reassure your child, verbally and non-verbally. Acknowledge your child’s emotions and reactions. Help your child differentiate between the different sensations during a procedure.
Step 4: Prepare the material
Set up on a flat surface or a well-cleaned table.
Gather and inspect all equipment to ensure that it is not damaged.
Fill the irrigation syringe with the amount of water recommended by your healthcare team.
Make sure the pump is properly charged or plugged into a wall outlet.
Place the pump on a solid surface (eg, chest of drawers, bedside table or kitchen table), on an IV pole or in its backpack.
Why ?
This step ensures that the required materials are on hand in order to start the procedure.
This position facilitates digestion and avoids aspiration of the formula into the lungs.
Step 6: Check the location of the button
Make a visual inspection your child’s button; check to see if it is intact.
Check to see if the button is correctly in place and not pushed into the stoma, or too far out of the stoma.
Why ?
This step ensures the safe use of the button.
Step 7: Irrigate the button extension set
Remove the cover from the extension set feeding port.
If the extension set has two ports, make sure that the medication port remains closed throughout the procedure.
Connect the syringe to the end of the extension set.
Make sure the extension set clamp is open.
Depress the plunger of the syringe to inject water all the way to the end of the extension set.
Close the clamp on the extension set.
Leave the syringe connected to the extension set.
Why ?
This step ensures that the extension set tubing is filled with water and ready to flush into the button feeding port.
Step 8: Connect the extension set to the button
Remove the cover from the button feeding port, if closed.
Make sure the port is clean.
Hold the sides of the button and insert the extension set into the feeding port.
Lock the extension set into the button, according to the manufacturer’s instructions or those of your healthcare team.
Why ?
This step prepares for verification of the button location and irrigation.
Holding the sides of the button helps to stabilize it during the installation of the extension set.
Step 9: Irrigate the button
Open the clamp of the extension set.
Slowly depress the plunger of the syringe (already connected to the extension set) to push the water into the button.
When the syringe is empty, close the clamp of the extension set.
Disconnect the syringe.
Replace the cover on the feeding port of the extension set.
Why ?
This step ensures that the button is patent, ready to use and reduces the risk of the button being blocked with debris.
Step 10: Pour the formula into the bag
Open the cap of the feeding bag.
Pour the formula into the bag, adding about 30 ml more than the amount to be given to get rid of the the air in the tubing.
Close the cap of the bag.
Why ?
This step allows you to fill the bag with the formula.
Step 11: Hang the bag
Install the bag so that the highest level of the formula is about 15 cm above the pump.
Hang it from a coat rack, a wall hook, or place it on the IV pole.
If the bag is put in a backpack, keep the bag upright.
Why ?
The correct positioning of the bag promotes the safe administration of the formula.
Step 12: Prepare the pump
As directed by the manufacturer or your healthcare team:
Turn on the pump.
Verify that the prescribed delivery parameters (eg, volume, flow rate) are set.
Insert the bag tubing onto the pump.
Why ?
This step ensures secure administration of the formula.
Step 13: Empty the air out of the bag tubing
Remove the cap from the end of the tubing.
Get rid of the air from the bag tubing, as instructed by the manufacturer or your healthcare team.
Why ?
This step avoids the entry of air into the stomach and prevents swelling of the belly from excess air.
Step 14: Connect the tubing to the button extension set
Remove the cover from the extension set port.
Connect the tubing to the end of the extension set.
Open the extension set clamp.
Why ?
Once the bag tubing is connected to the button extension set, the feeding can begin.
Step 15: Start the pump
Start the pump as directed by the manufacturer or your healthcare team.
Why ?
This step starts the delivery of the formula.
Step 16: Administer the formula
Open the extension set clamp.
Observe your child for signs of discomfort when the feeding session is started (eg, nausea, vomiting, difficulty breathing, abdominal pain, sweating, etc.).
If the formula is administered over a long period of time:
Be prepared to recognize the challenges faced and to provide positive feedback. Help your child recognize his/her strengths. Acknowledge the collaborative teamwork.
Listen to what your child says about the parts of the procedure that were difficult or painful.
Comfort your child and recognize your child’s collaboration with positive feedback.
Highlight your child’s specific strengths that helped make the procedure positive.
Discuss with your child what might be done the same or differently the next time the care is needed.
Keep your promises if you have promised a reward, follow through.
Reward yourself too.
.Reviser : NRoss.Version : 1.0
Methods of care : Administration of nutritional formula: Enterostomy long tube
Indications
NOTE: For ease of reading the rest of the text, the word (nutritional) “formula” also includes “breast milk”, “fortified breast milk” or “infant formula”.
The formula is given to your child through the enteral route to provide nutrients and calories to meet their nutritional needs.
We suggest administration methods (by push, gravity and feeding pump) that can be used as a guide; discuss with your healthcare team the specific method and equipment for your child.
Considerations:
Do not administer the formula if you are not sure that the tube is in the right place after making the usual checks.
Check and follow the manufacturer’s or your healthcare team’s instructions for preparation and storage of the formula.
Discard expired formula or return them to the pharmacy.
Always administer the formula at the temperature your child tolerates, as recommended by your healthcare team.
Never add new substances to the formula without consulting your healthcare team.
Always follow the flow rate (or rate of administration) prescribed for your child. Changes in formula volume or delivery time may require an adjustment of the gravity flow rate or reprogramming of the pump to your child’s tolerance. Check with your healthcare team to determine what adjustments are necessary.
Follow the recommended storage time for formula in the feeding bag to avoid contamination and potential development of an infection in your child.
Never increase the speed of formula administration (eg, To “catch up” after a delayed start to feeds) unless recommended by your healthcare team.
The amount and type of water used for irrigation (eg, tap water or cooled boiled water) depends on the type of tube and the child (eg, age, health condition, etc.). Always follow the guidelines of your healthcare team.
Assess the need to be have a second person available during the procedure to keep your child in a safe position (eg, if your child is young and/or moving).
Good hand washing is essential before and after performing this care.
Frequency
The formula is given as a bolus (intermittently) or continuously, depending on the specific recommendations of your healthcare team.
Bolus administration allows the child to receive certain amounts of formula several times a day, with breaks in-between feeding sessions. Each feeding session typically lasts approximately 30 to 60 minutes.
Continuous administration allows the child to receive small amounts of formula continuously throughout the day or night without interruption (for eg, over 8 to 24 hours a day).
Required materials
Breast milk, fortified breast milk, infant formula or prepared nutritional formula
Water at room temperature in a container
Oral/enteral syringe (for irrigation)
Push method:
Oral/enteral feeding syringe from 30 to 60 ml
Container for formula
Gravity method:
Gravity feeding bag with tubing and roller clamp
Hook or IV pole
Pump method:
Feeding bag with tubing for pump
Enteral feeding pump
Hook or IV pole
Refer to your healthcare team:
if the material used at home or the sequence of steps taught is different from what is described in the method of care,
to review the functioning of the enteral feeding pump used for your child.
Depending on your child’s age and condition, always encourage your child’s autonomy in carrying out the method of care.
The steps of the “By pump” method of care are illustrated by a Kangaroo Joey pump ™.
Collaborate and form a team with your child. When you invest the time to form a strong team, children feel more comfortable and less anxious – this will help you complete the care with less stress – for you and your child.
Use these tips, from the start, to set the stage for a positive care procedure:
Create the right moment: integrate the care in a routine.
Alert your child to the needed care and communicate together.
Form a team with your child: Encourage autonomy by offering realistic choices such as the method of distraction. Stay tuned to your child. Manage pain and anxiety, using distraction and positioning for comfort.
Prepare the environment: Identify a routine place for care. Close windows, doors and fans. Wash and dry the work surface and gather the needed materials for the care and to distract your child.
Prepare your child: Get help if needed. Position your child for comfort to receive the care and start to use the selected distraction method.
Prepare yourself: Find the right time when you are ready to provide the care safely. Review the list of care steps. Wash your hands.
Now that you are ready to start the care procedure, take the opportunity to encourage and praise your child.
Safety: Carefully follow the care practice steps as you have been taught.
Flexibility: Be ready to adjust according to your child’s reactions during the procedure. As needed, reposition or select an alternative distraction strategy. Follow your child’s pace and rhythm.
Collaboration: Reassure your child, verbally and non-verbally. Acknowledge your child’s emotions and reactions. Help your child differentiate between the different sensations during a procedure.
Step 4: Prepare the material
Set up on a flat surface or a well-cleaned table.
Gather and inspect all equipment to ensure that it is not damaged.
Fill the irrigation syringe with the amount of water recommended by your healthcare team.
Why ?
This step ensures that the required materials are on hand in order to start the procedure.
This position facilitates digestion and avoids aspiration of the formula into the lungs.
Step 6: Check the location of the long tube
Make a visual inspection of your child’s long tube; check to see if it is intact.
Check to see if there are any changes in the outer portion of the tube.
Why ?
This step ensures the safe use of the long tube.
Step 7: Irrigate the long tube
Bend the tube and remove its cover.
Connect the syringe to the tube.
Release the tube.
Slowly depress the plunger of the syringe to push the water into the tube.
When the syringe is empty, bend the tube.
Disconnect the syringe.
Replace the cover on the tube.
Release the tube.
Why ?
This step clears the long tube of any debris and prevents blockage.
Step 8: Aspirate the formula into the feeding syringe
Remove the protective cap from the feeding syringe.
Dip the end of the syringe into the container and withdraw up the formula by pulling the plunger.
Fill the syringe with the required amount of formula.
Hold the syringe with the pointed end upwards and remove the air from the syringe by pushing gently on the plunger until a drop of formula comes out of the tip of the syringe.
Why ?
This step fills the syringe with the amount of formula to be administered and removes the air from the syringe.
Step 9: Connect the feeding syringe to the long tube
Bend the tube and remove its cover.
Connect the syringe to the tube.
Release the tube.
Why ?
The installation of the syringe makes it possible to administer the formula by push.
Step 10: Administer the formula
Slowly depress the plunger of the feeding syringe and push a small amount of formula at a time, at the speed recommended by your healthcare team.
Every time the syringe is empty:
bend the tube,
disconnect the syringe,
put the cover on the tube,
release the tube,
fill the syringe with formula,
bend the tube again,
remove the cover from the tube,
reconnect the syringe to the tube,
continue the administration.
Administer the formula for 20-30 minutes until your child has received the required amount or for the length of time agreed upon with your healthcare team.
Observe your child for signs of discomfort when the feeding session is started (eg, nausea, vomiting, difficulty breathing, abdominal pain, sweating, etc.).
Why ?
This ensures that the formula reaches the stomach safely.
The length of the feeding session depends on the amount of formula required and your child’s tolerance.
Step 11: Disconnect the feeding syringe from the long tube
When the feeding session is over:
Bend the tube.
Disconnect the feeding syringe from the tube.
Replace the cover on the tube.
Release the tube.
Why ?
This step clears the long tube for irrigation.
Step 12: Irrigate the long tube
Bend the tube and remove its cover.
Connect the syringe to the tube.
Release the tube.
Slowly depress the plunger of the syringe to push the water into the tube.
When the syringe is empty, bend the tube.
Disconnect the syringe.
Replace the cover on the tube.
Release the tube.
Why ?
Irrigation ensures that your child has received all of the formula and prevents debris from sticking to the long tube and blocking it.
Step 13: Keep your child in the same position after the session
Leave your child in a seated or semi-seated position for at least 30 minutes after formula administration, if possible.
Burp your baby after feeding, as needed.
Why ?
This position facilitates digestion and reduces regurgitation.
Burping your baby avoids abdominal pain (bloating and swelling).
Be prepared to recognize the challenges faced and to provide positive feedback. Help your child recognize his/her strengths. Acknowledge the collaborative teamwork.
Listen to what your child says about the parts of the procedure that were difficult or painful.
Comfort your child and recognize your child’s collaboration with positive feedback.
Highlight your child’s specific strengths that helped make the procedure positive.
Discuss with your child what might be done the same or differently the next time the care is needed.
Keep your promises if you have promised a reward, follow through.
Collaborate and form a team with your child. When you invest the time to form a strong team, children feel more comfortable and less anxious – this will help you complete the care with less stress – for you and your child.
Use these tips, from the start, to set the stage for a positive care procedure:
Create the right moment: integrate the care in a routine.
Alert your child to the needed care and communicate together.
Form a team with your child: Encourage autonomy by offering realistic choices such as the method of distraction. Stay tuned to your child. Manage pain and anxiety, using distraction and positioning for comfort.
Prepare the environment: Identify a routine place for care. Close windows, doors and fans. Wash and dry the work surface and gather the needed materials for the care and to distract your child.
Prepare your child: Get help if needed. Position your child for comfort to receive the care and start to use the selected distraction method.
Prepare yourself: Find the right time when you are ready to provide the care safely. Review the list of care steps. Wash your hands.
Now that you are ready to start the care procedure, take the opportunity to encourage and praise your child.
Safety: Carefully follow the care practice steps as you have been taught.
Flexibility: Be ready to adjust according to your child’s reactions during the procedure. As needed, reposition or select an alternative distraction strategy. Follow your child’s pace and rhythm.
Collaboration: Reassure your child, verbally and non-verbally. Acknowledge your child’s emotions and reactions. Help your child differentiate between the different sensations during a procedure.
Step 4: Prepare the material
Set up on a flat surface or a well-cleaned table.
Gather and inspect all equipment to ensure that it is not damaged.
Fill the irrigation syringe with the amount of water recommended by your healthcare team.
Check that the roller clamp on the bag tubing is securely closed.
Why ?
This step ensures that the required materials are on hand in order to start the procedure.
This position facilitates digestion and avoids aspiration of the formula into the lungs.
Step 6: Check the location of the long tube
Make a visual inspection of your child’s long tube; check to see if it is intact.
Check to see if there are any changes in the outer portion of the tube.
Why ?
This step ensures the safe use of the long tube.
Step 7: Irrigate the long tube
Bend the tube and remove its cover.
Connect the syringe to the tube.
Release the tube.
Slowly depress the plunger of the syringe to push the water into the tube.
When the syringe is empty, bend the tube.
Disconnect the syringe.
Replace the cover on the
Release the tube.
Why ?
This step clears the long tube of any debris and prevents blockage.
Step 8: Pour the formula into the bag
Open the cap of the feeding bag.
Pour the formula into the bag, adding about 30 ml more than the amount to be given to get rid of the the air in the tubing.
Close the cap of the bag.
Why ?
This step allows you to fill the bag with the formula.
Step 9: Hang the bag
Hang the bag at a height of 45 to 90 cm above your child’s head.
Hang it from a coat rack, a wall hook, or place it on the IV pole.
Why ?
The correct positioning of the bag promotes the safe administration of the formula.
Step 10: Empty the air out of the bag tubing
Compress the drip chamber to fill it with formula to 1/3 or 1/2 of its capacity.
Remove the cap from the end of the tubing.
Then open the roller clamp to allow the formula to flow down through the tubing and get rid of air from the rest of the tubing.
Direct the end of the tubing into a container to catch the few drops of formula that will drip out of the tubing.
When the tubing is filled with formula, close the roller clamp.
Why ?
This step avoids the entry of air into the stomach and prevents swelling of the belly from excess air.
Step 11: Connect the tubing to the long tube
Bend the tube and remove its cover.
Connect the tubing to the end of the tube.
Release the tube.
Why ?
Once the feeding bag tubing is connected to the long tube, the feeding can begin.
Step 12: Administer the formula
Open the roller clamp and slowly roll the roller up or down until you get the flow rate agreed upon with your healthcare team.
Feeding volume
Drop rate
60 ml / hour
16 drops / minute
80 ml / hour
20 drops / minute
100 ml / hour
24 drops / minute
120 ml / hour
28 drops / minute
140 ml / hour
32 drops / minute
Observe your child for signs of discomfort when the feeding session is started (eg, nausea, vomiting, difficulty breathing, abdominal pain, sweating, etc.).
If the formula is administered over a long period of time or continuously:
Be prepared to recognize the challenges faced and to provide positive feedback. Help your child recognize his/her strengths. Acknowledge the collaborative teamwork.
Listen to what your child says about the parts of the procedure that were difficult or painful.
Comfort your child and recognize your child’s collaboration with positive feedback.
Highlight your child’s specific strengths that helped make the procedure positive.
Discuss with your child what might be done the same or differently the next time the care is needed.
Keep your promises if you have promised a reward, follow through.
Collaborate and form a team with your child. When you invest the time to form a strong team, children feel more comfortable and less anxious – this will help you complete the care with less stress – for you and your child.
Use these tips, from the start, to set the stage for a positive care procedure:
Create the right moment: integrate the care in a routine.
Alert your child to the needed care and communicate together.
Form a team with your child: Encourage autonomy by offering realistic choices such as the method of distraction. Stay tuned to your child. Manage pain and anxiety, using distraction and positioning for comfort.
Prepare the environment: Identify a routine place for care. Close windows, doors and fans. Wash and dry the work surface and gather the needed materials for the care and to distract your child.
Prepare your child: Get help if needed. Position your child for comfort to receive the care and start to use the selected distraction method.
Prepare yourself: Find the right time when you are ready to provide the care safely. Review the list of care steps. Wash your hands.
Now that you are ready to start the care procedure, take the opportunity to encourage and praise your child.
Safety: Carefully follow the care practice steps as you have been taught.
Flexibility: Be ready to adjust according to your child’s reactions during the procedure. As needed, reposition or select an alternative distraction strategy. Follow your child’s pace and rhythm.
Collaboration: Reassure your child, verbally and non-verbally. Acknowledge your child’s emotions and reactions. Help your child differentiate between the different sensations during a procedure.
Step 4: Prepare the material
Set up on a flat surface or a well-cleaned table.
Gather and inspect all equipment to ensure that it is not damaged.
Fill the irrigation syringe with the amount of water recommended by your healthcare team.
Make sure the pump is properly charged or plugged into a wall outlet.
Place the pump on a solid surface (eg, chest of drawers, bedside table or kitchen table), on an IV pole or in its backpack.
Why ?
This step ensures that the required materials are on hand in order to start the procedure.
This position facilitates digestion and avoids aspiration of the formula into the lungs.
Step 6: Check the location of the long tube
Make a visual inspection of your child’s long tube; check to see if it is intact.
Check to see if there are any changes in the outer portion of the tube.
Why ?
This step ensures the safe use of the tube.
Step 7: Irrigate the long tube
Bend the tube and remove its cap.
Connect the syringe to the end of the tube.
Release the tube.
Slowly depress the plunger of the syringe to push the water into the tube.
When the syringe is empty, bend the tube.
Disconnect the syringe.
Replace the cap at the end of the tube.
Release the tube.
Why ?
This step clears the long tube of any debris and prevents blockage.
Step 8: Pour the formula into the bag
Open the cap of the feeding bag.
Pour the formula into the bag, adding about 30 ml more than the amount to be given to get rid of the the air in the tubing.
Close the cap of the bag.
Why ?
This step allows you to fill the bag with the formula.
Step 9: Hang the bag
Install the bag so that the highest level of the formula is about 15 cm above the pump.
Hang it from a coat rack, a wall hook, or place it on the IV pole.
If the bag is put in a backpack, keep the bag upright.
Why ?
The correct positioning of the bag promotes the safe administration of the formula.
Step 10: Prepare the pump
As directed by the manufacturer or your healthcare team:
Turn on the pump.
Verify that the prescribed delivery parameters (eg, volume, flow rate) are set.
Insert the bag tubing onto the pump.
Why ?
This step ensures secure administration of the formula.
Step 11: Empty the air out of the bag tubing
Remove the cap from the end of the tubing.
Get rid of the air from the tubing, as instructed by the manufacturer or your healthcare team.
Why ?
This step avoids the entry of air into the stomach and prevents swelling of the belly from excess air.
Step 12: Connect the tubing to the long tube
Bend the tube and remove its cover.
Connect the tubing to the end of the tube.
Release the tube.
Why ?
Once the feeding bag tubing is connected to the long tube, the feeding can begin.
Step 13: Start the pump
Start the pump as directed by the manufacturer or your healthcare team.
Why ?
This step starts the administration of the formula.
Step 14: Administer the formula
Open the extension set clamp.
Observe your child for signs of discomfort when the feeding session is started (eg, nausea, vomiting, difficulty breathing, abdominal pain, sweating, etc.).
If the formula is administered over a long period of time:
Be prepared to recognize the challenges faced and to provide positive feedback. Help your child recognize his/her strengths. Acknowledge the collaborative teamwork.
Listen to what your child says about the parts of the procedure that were difficult or painful.
Comfort your child and recognize your child’s collaboration with positive feedback.
Highlight your child’s specific strengths that helped make the procedure positive.
Discuss with your child what might be done the same or differently the next time the care is needed.
Keep your promises if you have promised a reward, follow through.
Reward yourself too.
.Reviser : NRoss.Version : 1.0
Methods of care : Medication administration
Indications
NOTE: For ease of reading the rest of the text, the word (nutritional) “formula” also includes “breast milk”, “fortified breast milk” or “infant formula”.
Your healthcare team has agreed that certain medications can and should be given through your child’s feeding tube or button.
We suggest a procedure that you can use as a guide; discuss with your healthcare team the specific equipment used for your child.
Considerations:
Always check with your healthcare team which medications can be given through the tube or button.
Refer to your healthcare team for specifics regarding the preparation and expiration date of medications.
Medications should always be given in liquid form to avoid blocking the tube or button:
Use the liquid form of the medication if available, being careful to verify both the dose (mg) and volume (ml) of the medication.
If the medication is in tablet form, check with your healthcare team to see if it can be crushed into a fine powder and mixed with a little water.
If the medication is in a capsule, check with your healthcare team to see if you can open it and mix the contents with a little water.
Coated or extended-release medications cannot be crushed as this may interfere with their effectiveness.
Never mix medications with the formula to prevent them from reacting with each other and clogging the button or tube.
Administer each medication separately. Never mix different medications in the same syringe; give them one at a time in different syringes. Mixing medications can clog the button or tube or interfere with the effectiveness of the medication.
Stop the administration of the formula, if given continuously, to administer the medication.
Check with your healthcare team to see if there is a time delay between giving the formula and giving the medication.
Several medications can be administered in the same session, but it is important to irrigate the tube/button well between each medication.
Follow the recommendations for the expiration date of the medications. Return medications that are past their expiration date to the pharmacy.
If you are not sure that the button or tube is in the right place after you have done the usual checks, do not administer the medication. Replace the nasogastric tube, gastrostomy balloon button or tube, or contact your healthcare team if your child has another enteral feeding device.
The amount and type of water used to irrigate (eg, tap water or boiled cooled water) depends on the type of tube or button (including its extension set) and the child (eg, age, health condition, etc.). Always follow the instructions of your healthcare team.
Assess the need to be have a second person available during the procedure to keep your child in a safe position (e.g., if your child is young and/or moving).
Collaborate and form a team with your child. When you invest the time to form a strong team, children feel more comfortable and less anxious – this will help you complete the care with less stress – for you and your child.
Use these tips, from the start, to set the stage for a positive care procedure:
Create the right moment: integrate the care in a routine.
Alert your child to the needed care and communicate together.
Form a team with your child: Encourage autonomy by offering realistic choices such as the method of distraction. Stay tuned to your child. Manage pain and anxiety, using distraction and positioning for comfort.
Prepare the environment: Identify a routine place for care. Close windows, doors and fans. Wash and dry the work surface and gather the needed materials for the care and to distract your child.
Prepare your child: Get help if needed. Position your child for comfort to receive the care and start to use the selected distraction method.
Prepare yourself: Find the right time when you are ready to provide the care safely. Review the list of care steps. Wash your hands.
Now that you are ready to start the care procedure, take the opportunity to encourage and praise your child.
Safety: Carefully follow the care practice steps as you have been taught.
Flexibility: Be ready to adjust according to your child’s reactions during the procedure. As needed, reposition or select an alternative distraction strategy. Follow your child’s pace and rhythm.
Collaboration: Reassure your child, verbally and non-verbally. Acknowledge your child’s emotions and reactions. Help your child differentiate between the different sensations during a procedure.
Step 4: Prepare the material
Set up on a flat surface or a well-cleaned table.
Gather and inspect all equipment to ensure that it is not damaged.
Fill the syringe #1 with the amount of water recommended by your healthcare team.
Why ?
This step ensures that the required materials are on hand in order to start the procedure.
This position facilitates digestion and avoids aspiration of the medication into the lungs.
Step 6: Discontinue feeding session, if in progress
If the feeding session is not in progress, go to the next step.
Turn off the pump.
Bend the nasal tube.
Disconnect the tubing from the tube.
Replace the cap at the end of the tube.
Release the tube.
Put a cap on the end of the tubing or place the end of the tubing on a clean compress.
Then proceed to step 8.
Why ?
Mixing medications and formula may cause problems such as: changing the effect of the medication or causing blockages. Temporarily stopping the formula feeding to give medications reduces these risks.
Step 7: Check the location of the nasal tube
Make a visual inspection of your child’s tube; check to see if it is intact.
Check to see if there are any changes in the outer portion of the tube, if the mark is still in the same place and if the adhesive bandage is securely in place.
Aspirate some gastric secretions, if recommended by your healthcare team: first inject air to empty the tube and then aspirate to get a sample directly from the stomach.
Afterwards, check the pH of this gastric fluid, if recommended by your healthcare team.
Why ?
This step ensures the safe use of the tube.
Step 8: Irrigate the nasal tube
Bend the tube and remove its cap.
Connect the syringe to the end of the tube.
Release the tube.
Slowly depress the plunger of the syringe to push the water into the tube.
When the syringe is empty, bend the tube.
Disconnect the syringe.
Replace the cap at the end of the tube.
Release the tube.
Why ?
This step clears the tube and prevents blockage and possible interactions between the formula remaining in the tube and the medication.
Step 9: Aspirate the medication into the medication syringe
Remove the protective cap from the feeding syringe #2.
Dip the end of the syringe into the container and draw up the medication by pulling the plunger.
Fill the syringe with the required amount of medication.
Hold the syringe with the pointed end upwards and remove the air from the syringe by gently depressing the plunger until a drop of medication comes out of the tip of the syringe.
Why ?
This step fills the syringe with the amount of medication to be given and removes the air from the syringe.
Step 10: Connect the syringe to the nasal tube
Bend the tube and remove its cap.
Connect the syringe to the end of the tube.
Release the tube.
Why ?
Connecting the syringe to the nasal tube allows the medication to be given by push.
Step 11: Administer the medication
Slowly depress the plunger of the syringe #2.
Continue until your child has received all the medication.
Why ?
This ensures that the medication reaches the stomach safely.
Step 12: Disconnect the syringe from the nasal tube
When all the medication is administered:
Bend the tube.
Disconnect the syringe #2 from the tube.
Replace the cap at the end of the tube.
Release the tube.
Why ?
This step clears the tube for irrigation.
Step 13: Irrigate the nasal tube
Bend the tube and remove its cap.
Connect the syringe #1 to the end of the tube.
Release the tube.
Slowly depress the plunger of the syringe to push the water into the tube.
When the syringe is empty, bend the tube.
Disconnect the syringe #1.
Replace the cap at the end of the tube.
Release the tube.
Why ?
This step ensures that all of the medication was given and reduces the risk of the tube being blocked with left over traces of medication.
Step 14: Resume the feeding session, if necessary
Taking into account the time required after the administration of the medication, as indicated by your healthcare team:
Reconnect the tubing to the nasal tube.
Start the pump.
Why ?
This step allows you to continue the temporarily stopped feeding session.
Be prepared to recognize the challenges faced and to provide positive feedback. Help your child recognize his/her strengths. Acknowledge the collaborative teamwork.
Listen to what your child says about the parts of the procedure that were difficult or painful.
Comfort your child and recognize your child’s collaboration with positive feedback.
Highlight your child’s specific strengths that helped make the procedure positive.
Discuss with your child what might be done the same or differently the next time the care is needed.
Keep your promises if you have promised a reward, follow through.
Collaborate and form a team with your child. When you invest the time to form a strong team, children feel more comfortable and less anxious – this will help you complete the care with less stress – for you and your child.
Use these tips, from the start, to set the stage for a positive care procedure:
Create the right moment: integrate the care in a routine.
Alert your child to the needed care and communicate together.
Form a team with your child: Encourage autonomy by offering realistic choices such as the method of distraction. Stay tuned to your child. Manage pain and anxiety, using distraction and positioning for comfort.
Prepare the environment: Identify a routine place for care. Close windows, doors and fans. Wash and dry the work surface and gather the needed materials for the care and to distract your child.
Prepare your child: Get help if needed. Position your child for comfort to receive the care and start to use the selected distraction method.
Prepare yourself: Find the right time when you are ready to provide the care safely. Review the list of care steps. Wash your hands.
Now that you are ready to start the care procedure, take the opportunity to encourage and praise your child.
Safety: Carefully follow the care practice steps as you have been taught.
Flexibility: Be ready to adjust according to your child’s reactions during the procedure. As needed, reposition or select an alternative distraction strategy. Follow your child’s pace and rhythm.
Collaboration: Reassure your child, verbally and non-verbally. Acknowledge your child’s emotions and reactions. Help your child differentiate between the different sensations during a procedure.
Step 4: Prepare the material
Set up on a flat surface or a well-cleaned table.
Gather and inspect all equipment to ensure that it is not damaged.
Fill the syringe #1 with the amount of water recommended by your healthcare team.
Why ?
This step ensures that the required materials are on hand in order to start the procedure.
This position facilitates digestion and avoids aspiration of the medication into the lungs.
Step 6: Discontinue feeding session, if in progress
If the feeding session is not in progress, go to the next step.
Turn off the pump.
Close the clamp of the extension set.
Disconnect the tubing from the extension set.
Put a cap on the end of the tubing or place the end of the tubing on a clean compress.
Then proceed to step 10.
Why ?
Mixing medications and formula may cause problems such as: changing the effect of the medication or causing blockages. Temporarily stopping the formula feeding to give medications reduces these risks.
Step 7: Check the location of the button
Make a visual inspection your child’s button; check to see if it is intact.
Check to see if the button is correctly in place and not pushed into the stoma, or too far out of the stoma.
Why ?
This step ensures the safe use of the button.
Step 8: Irrigate the button extension set
Remove the cover from the feeding port or medication port, depending on the type of extension set.
If the extension set has two ports, ensure that the feeding port remains closed throughout the procedure.
Connect the #1 syringe to the end of the extension set.
Make sure the extension set clamp is open.
Depress the plunger of the syringe to inject water all the way to the end of the extension set.
Close the clamp on the extension set.
Leave the syringe connected to the extension set.
Why ?
This step ensures that the extension set tubing is filled with water and ready to flush into the button feeding port.
Step 9: Connect the extension set to the button
Remove the cover from the button feeding port, if closed.
Make sure the port is clean.
Hold the sides of the button and insert the extension set into the feeding port.
Lock the extension set into the button, according to the manufacturer’s instructions or those of your healthcare team.
Why ?
This step prepares for verification of the button location and irrigation.
Holding the sides of the button helps to stabilize it during the installation of the extension set.
Step 10: Irrigate the button
Open the clamp of the extension set.
Slowly depress the plunger of the syringe #1 (already connected to the extension set) to push the water into the button.
When the syringe is empty, close the clamp of the extension set.
Disconnect the syringe #1.
Replace the cover on the feeding port of the extension set.
Why ?
This step clears the button and prevents blockage and possible interactions between the formula remaining in the button and the medication.
Step 11: Aspirate the medication into the syringe for the medication
Remove the protective cap from the feeding syringe #2.
Dip the end of the syringe into the container and draw up the medication by pulling the plunger.
Fill the syringe with the required amount of medication.
Hold the syringe with the pointed end upwards and remove the air from the syringe by gently depressing the plunger until a drop of medication comes out of the tip of the syringe.
Why ?
This step fills the syringe with the amount of medication to be given and removes the air from the syringe.
Step 12: Connect the syringe to the button extension set
Remove the cover from the appropriate port of the extension set.
Connect the #2 syringe into the extension port.
Open the extension set clamp.
Why ?
Connecting the syringe to the button extension set allows the medication to be given by push.
Step 13: Administer the medication
Slowly depress the plunger of the syringe #2.
Continue until your child has received all the medication.
Why ?
This ensures that the medication reaches the stomach safely.
Step 14: Disconnect the syringe from the button extension set
When all the medication is administered:
Close the button extension set clamp.
Disconnect the syringe #2 from the extension set.
Replace the cover on the extension set
Why ?
This step clears the extension for irrigation.
Step 15: Irrigate the button
Remove the cover from the extension set.
Connect the syringe #1 to the end of the extension set.
Open the clamp of the extension set.
Slowly depress the plunger of the syringe #1 to push the water into the button.
When the syringe is empty, close the clamp of the extension set.
Disconnect the syringe #1.
Replace the cover on the feeding port of the extension set.
Why ?
This step ensures that all of the medication was given and reduces the risk of the button being blocked with left over traces of medication.
Step 16: Resume the feeding session, if necessary
Taking into account the time required after the administration of the medication, as indicated by your healthcare team:
Reconnect the tubing to the nasal tube.
Start the pump.
Why ?
This step allows you to continue the temporarily stopped feeding session.
Step 17: Disconnect the button extension set
Hold the sides of the button.
Unlock the button extension set, as directed by the manufacturer or your healthcare team.
Remove the extension set from the button feeding port.
Put the cover on the button feeding port.
Why ?
If the extension set is held in place, your child may accidentally pull on it and move the button, in addition to being cumbersome.
Holding the sides of the button helps stabilize the button while the extension set is being removed.
Closing the cover prevents leakage of the stomach contents through the button in between feeding sessions.
Be prepared to recognize the challenges faced and to provide positive feedback. Help your child recognize his/her strengths. Acknowledge the collaborative teamwork.
Listen to what your child says about the parts of the procedure that were difficult or painful.
Comfort your child and recognize your child’s collaboration with positive feedback.
Highlight your child’s specific strengths that helped make the procedure positive.
Discuss with your child what might be done the same or differently the next time the care is needed.
Keep your promises if you have promised a reward, follow through.
Collaborate and form a team with your child. When you invest the time to form a strong team, children feel more comfortable and less anxious – this will help you complete the care with less stress – for you and your child.
Use these tips, from the start, to set the stage for a positive care procedure:
Create the right moment: integrate the care in a routine.
Alert your child to the needed care and communicate together.
Form a team with your child: Encourage autonomy by offering realistic choices such as the method of distraction. Stay tuned to your child. Manage pain and anxiety, using distraction and positioning for comfort.
Prepare the environment: Identify a routine place for care. Close windows, doors and fans. Wash and dry the work surface and gather the needed materials for the care and to distract your child.
Prepare your child: Get help if needed. Position your child for comfort to receive the care and start to use the selected distraction method.
Prepare yourself: Find the right time when you are ready to provide the care safely. Review the list of care steps. Wash your hands.
Now that you are ready to start the care procedure, take the opportunity to encourage and praise your child.
Safety: Carefully follow the care practice steps as you have been taught.
Flexibility: Be ready to adjust according to your child’s reactions during the procedure. As needed, reposition or select an alternative distraction strategy. Follow your child’s pace and rhythm.
Collaboration: Reassure your child, verbally and non-verbally. Acknowledge your child’s emotions and reactions. Help your child differentiate between the different sensations during a procedure.
Step 4: Prepare the material
Set up on a flat surface or a well-cleaned table.
Gather and inspect all equipment to ensure that it is not damaged.
Fill the syringe #1 with the amount of water recommended by your healthcare team.
Why ?
This step ensures that the required materials are on hand in order to start the procedure.
Step 5: Position your child
Place your child in a seated or semi-seated position according to your child’s comfort and capacity.
Why ?
This position facilitates digestion and avoids aspiration of the formula into the lungs.
Step 6: Discontinue feeding session, if in progress
If the feeding session is not in progress, go to the next step.
Turn off the pump.
Bend the tube.
Disconnect the tubing from the long tube feeding port.
Replace the cover at the end of the feeding port.
Release the tube.
Put a cap on the end of the tubing or place the end of the tubing on a clean compress.
Then proceed to step 8.
Why ?
Mixing medications and formula may cause problems such as: changing the effect of the medication or causing blockages. Temporarily stopping the formula feeding to give medications reduces these risks.
Step 7: Check the location of the long tube
Make a visual inspection of your child’s long tube; check to see if it is intact.
Check to see if there are any changes in the outer portion of the tube.
Why ?
This step ensures the safe use of the long tube.
Step 8: Irrigate the long tube
Bend the tube and remove its cover.
Connect the syringe #1 to the tube.
Release the tube.
Slowly depress the plunger of the syringe to push the water into the tube.
When the syringe is empty, bend the tube.
Disconnect the syringe #1.
Replace the cover on the tube.
Release the tube.
Why ?
This step clears the tube and prevents blockage and possible interactions between the formula remaining in the long tube and the medication.
Step 9: Aspirate the medication into the medication syringe
Remove the protective cap from the feeding syringe #2.
Dip the end of the syringe into the container and draw up the medication by pulling the plunger.
Fill the syringe with the required amount of medication.
Hold the syringe with the pointed end upwards and remove the air from the syringe by gently depressing the plunger until a drop of medication comes out of the tip of the syringe.
Why ?
This step fills the syringe with the amount of medication to be given and removes the air from the syringe.
Step 10: Connect the feeding syringe to the long tube
Bend the tube and remove its cover.
Connect the syringe #2 to the tube.
Release the tube.
Why ?
Connecting the syringe to the long tube allows the medication to be given by push.
Step 11: Administer the medication
Slowly press the plunger of the syringe #2.
Continue until your child has received all the medication.
Why ?
This ensures that the medication reaches the stomach safely.
Step 12: Disconnect the syringe from the long tube
When all the medication is administered:
Bend the tube.
Disconnect the syringe #2 from the tube.
Replace the cover on the tube.
Release the tube.
Why ?
This step clears the long tube for irrigation.
Step 13: Irrigate the long tube
Bend the tube and remove its cover.
Connect the syringe #1 to the tube.
Release the tube.
Slowly depress the plunger of the syringe to push the water into the tube.
When the syringe is empty, bend the tube.
Disconnect the syringe #1.
Replace the cover on the tube.
Release the tube.
Why ?
This step ensures that all of the medication was given and reduces the risk of the long tube being blocked with left over traces of medication.
Step 14: Resume the feeding session, if necessary
Taking into account the time required after the administration of the medication, as indicated by your healthcare team:
Reconnect the tubing to the long tube feeding port.
Start the pump.
Why ?
This step allows you to continue the temporarily stopped feeding session.
Be prepared to recognize the challenges faced and to provide positive feedback. Help your child recognize his/her strengths. Acknowledge the collaborative teamwork.
Listen to what your child says about the parts of the procedure that were difficult or painful.
Comfort your child and recognize your child’s collaboration with positive feedback.
Highlight your child’s specific strengths that helped make the procedure positive.
Discuss with your child what might be done the same or differently the next time the care is needed.
Keep your promises if you have promised a reward, follow through.
Disclaimer of Liability: By using this site, you acknowledge that you have read this disclaimer
and agree to
all of its terms. Before making any decisions regarding your health or if you have any medical questions, you
should first consult a physician or qualified health care professional who can provide recommendations tailored
to your specific needs. The information published on this site does not constitute a recommendation for
treatment (preventive or curative), a prescription or a diagnosis and is not a substitute for the advice of a
physician or qualified health professional.
As medical and technical knowledge is constantly evolving, the content of this site is made available for
information purposes only. The contributors to this site, including clinical experts in pediatrics from across
Quebec, make every effort to ensure that the information made available on this site is as accurate and reliable
as possible, without guaranteeing the completeness or total absence of error of its content. The opinions
contained in this site are the sole responsibility of the author(s) and are not binding on the contributors to
this site. These opinions do not necessarily reflect the official viewpoint of the organizations mentioned, nor
that of their directors or representatives. The contributors to this site cannot and will not assume any
responsibility for the use of the published content or for the information otherwise accessible through any link
or reference source. Any quotation or reference to a source external to this site is for informational purposes
only and does not constitute an endorsement or claim, express or implied, regarding the content or validity of
the information obtained from that external source.
All rights reserved: The contents of this site may not be reproduced or disseminated, in whole
or in part, in any manner or by any means, electronic, mechanical, including photocopying, recording, or
otherwise, or stored in a retrieval system of any kind that is not limited to private use, without the prior
written permission of the copyright holder.
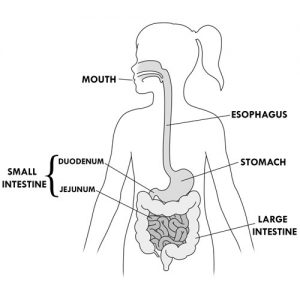
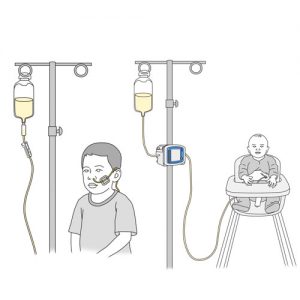
 flexible tube inserted into a nostril, running down the back of the throat (into the pharynx) to the esophagus and then into the stomach and small intestine (if necessary). The nasal tube is usually used over a short period of time (a few days to several weeks) to try enteral nutrition, to supplement food taken by mouth or to administer medication. The nasal tube can be inserted and removed after each feeding session or left in place, depending on the child’s condition.
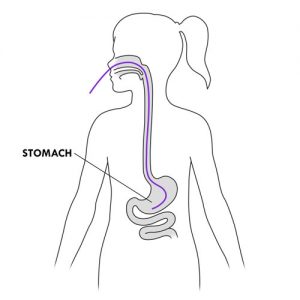
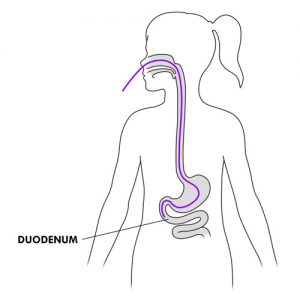
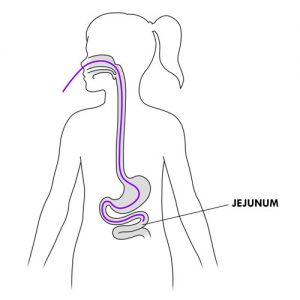

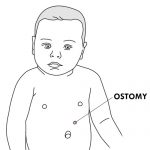 When food is to be administered directly into the stomach or small intestine, an opening must be made in the belly to install a tube. The opening is called a stoma. When the stoma is made in the stomach, it is called a gastrostomy. When the stoma is made in the small intestine, it is placed in the second part (jejunum); this is called a jejunostomy. In general, a stoma is used for comfort and safety reasons if: