Step 1: Anticipation

|
See the full description here
Summary:
Collaborate and form a team with your child. When you invest the time to form a strong team, children feel more comfortable and less anxious – this will help you complete the care with less stress – for you and your child.
Use these tips, from the start, to set the stage for a positive care procedure:
- Create the right moment: integrate the care in a routine.
- Alert your child to the needed care and communicate together.
- Form a team with your child: Encourage autonomy by offering realistic choices such as the method of distraction. Stay tuned to your child. Manage pain and anxiety, using distraction and positioning for comfort.
|
|
Step 2: Preparation

|
See the full description here
Summary:
- Prepare the environment: Identify a routine place for care. Close windows, doors and fans. Wash and dry the work surface and gather the needed materials for the care and to distract your child.
- Prepare your child: Get help if needed. Position your child for comfort to receive the care and start to use the selected distraction method.
- Prepare yourself: Find the right time when you are ready to provide the care safely. Review the list of care steps. Wash your hands.
Now that you are ready to start the care procedure, take the opportunity to encourage and praise your child.
|
|
Step 3: Procedure

|
See the full description here
Summary 3 key concepts:
- Safety: Carefully follow the care practice steps as you have been taught.
- Flexibility: Be ready to adjust according to your child’s reactions during the procedure. As needed, reposition or select an alternative distraction strategy. Follow your child’s pace and rhythm.
- Collaboration: Reassure your child, verbally and non-verbally. Acknowledge your child’s emotions and reactions. Help your child differentiate between the different sensations during a procedure.
|
|
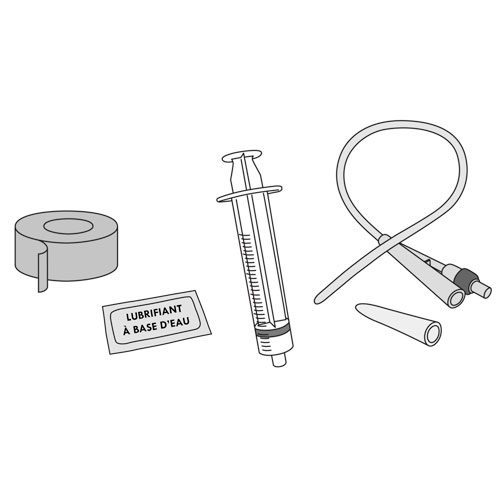
Step 4: Prepare the material
|
- Set up on a flat surface or a well-cleaned table.
- Gather the necessary equipment.
- Open the package of the urinary Foley™ catheter and inspect it to make sure it is not damaged or soiled.
- Put the plug on the end of the catheter.
- Cut out the appropriate size of adhesive bandage that will secure the catheter to the belly.
- Open the bag of lubricant and pour a small amount onto the opened catheter package.
- Fill syringe with the amount of water needed to inflate the catheter balloon, according to the manufacturer’s recommendations or as directed by your healthcare team.
Why ? This step ensures that the required materials are on hand in order to start the procedure.
|
|
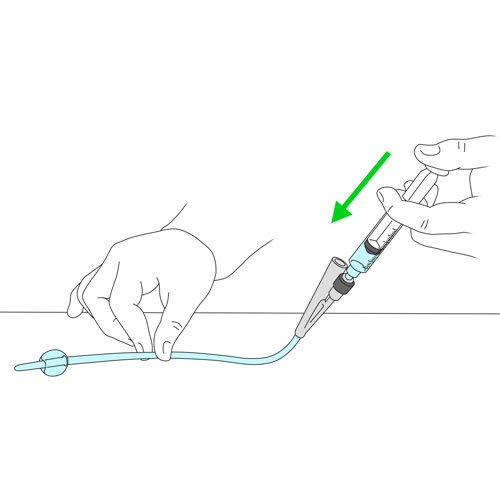
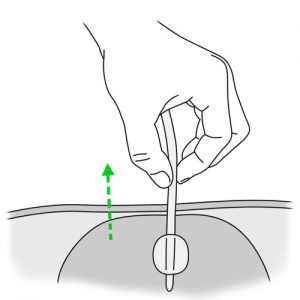
Step 5: Check the function of the catheter balloon
|
- Grasp the balloon port of the catheter with one hand.
- With the other hand, connect the tip of syringe into this port until securely connected.
- Depress the plunger of the syringe to inject the full amount of water into the balloon.
- While leaving the syringe connected and maintaining pressure on the plunger, check that the balloon is intact and properly inflated.
- If the balloon does not leak, remove the water from the balloon by withdrawing the plunger.
- Leave the syringe, filled with water, connected to the catheter.
Why ? This step is used to check if the balloon is functioning properly and has no leaks.
Screwing the tip of the syringe into the balloon port opens the balloon fill valve.
|
|
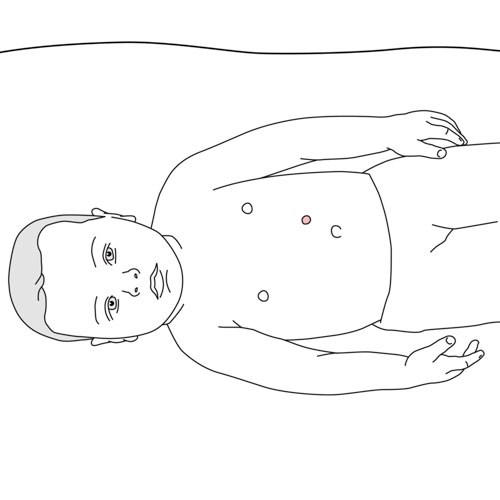
Step 6: Position your child
|
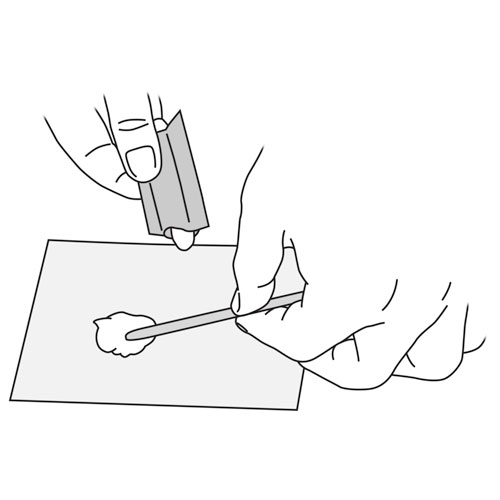
Step 7: Lubricate the catheter
|
- Spread enough lubricant over the first 3 cm of the tip of the catheter.
- Roll the tip of the catheter in the lubricant.
Why ? Lubrication makes the catheter insertion easier and more comfortable for your child.
|
|
Step 8: Insert the catheter into the stoma

|
- With one hand, hold the catheter about 7-10 cm from its tip.
- Gently insert the tip of the catheter into the stoma; gently push the catheter all the way to the end of this length.
- Some pressure may be needed to insert the catheter, especially if your child cries during the procedure; take time to calm your child NEVER FORCE THE CATHETER IN.
- If you are unable to insert the catheter, try a smaller size catheter.
- Wipe the skin with the towel if any stomach contents come out of the stoma.
- Thoroughly clean and dry the skin around the stoma.
Why ? This prevents injury to the stoma during insertion of the catheter.
There may be a small amount of resistance as the catheter is inserted, even if the balloon is correctly deflated.
It may be a little difficult to insert the catheter if your child is crying because this causes the abdominal muscles to contract.
|
|
Step 9: Inflate the catheter balloon
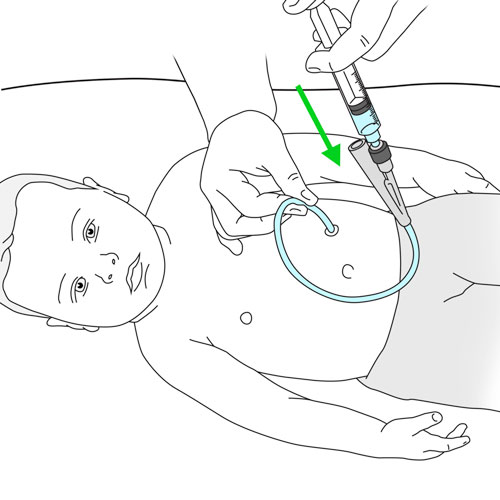
|
- Take the balloon opening with one hand.
- Depress the plunger of the syringe (already connected in the balloon port) to inject the entire amount of water into the balloon.
- While maintaining pressure on the plunger, disconnect the syringe.
- Set the syringe aside.
- Gently pull the catheter until you feel a slight resistance.
Why ? Balloon inflation ensures that the catheter remains in place in the stoma.
Pulling slightly on the catheter positions balloon against the stomach wall.
|
|
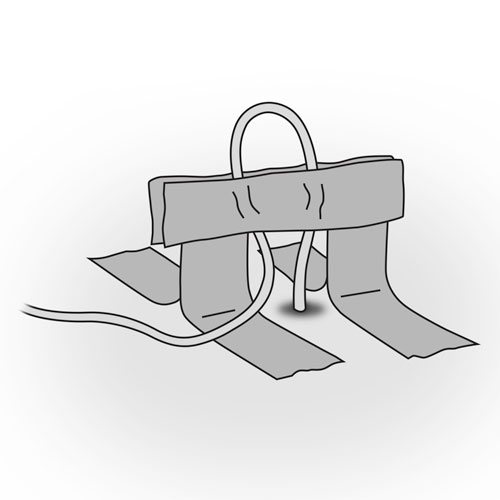
Step 10: Attach and secure the catheter
|
- Secure the catheter in place on the belly with tape to prevent it from moving, according to the method suggested by your healthcare team.
- You can hold it in place using the “H” technique: form an “H” with tape and attach it to the catheter and then to the skin.
Why ? Attaching the catheter securely prevents the catheter from moving and irritating the stoma.
|
|
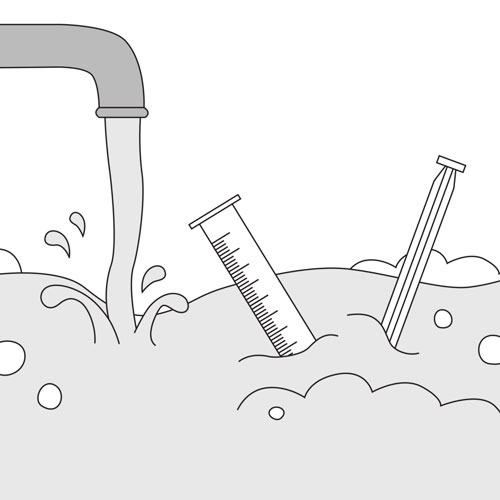
Step 11: Clean and store equipment
|
Clean, maintain and store equipment as recommended.
Why ? This step is necessary to ensure cleanliness and proper functioning of the equipment for the next use.
|
|
Step 12: Recovery

|
See the full description here
Summary:
The treatment is finished. Wash your hands again.
Be prepared to recognize the challenges faced and to provide positive feedback. Help your child recognize his/her strengths. Acknowledge the collaborative teamwork.
- Listen to what your child says about the parts of the procedure that were difficult or painful.
- Comfort your child and recognize your child’s collaboration with positive feedback.
- Highlight your child’s specific strengths that helped make the procedure positive.
- Discuss with your child what might be done the same or differently the next time the care is needed.
- Keep your promises if you have promised a reward, follow through.
- Reward yourself too.
|
|