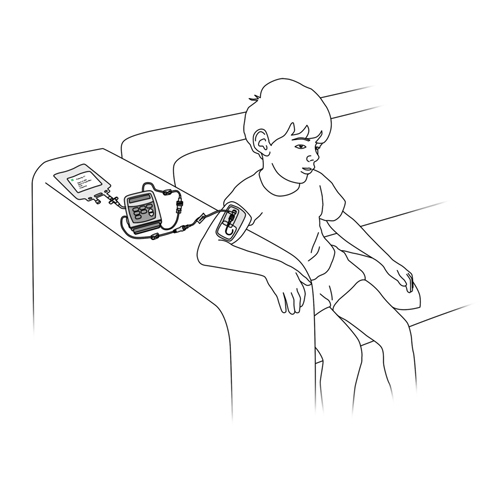

WARNING: The information in this section is meant as a general guide to help parents and caregivers with common issues and is not intended to replace the care provided by your child’s healthcare team.
Discuss your child’s unique needs with your healthcare team, including WHO and WHEN to contact when problems arise.
Fever with or without other symptoms: ≥ 38⁰C rectal or ≥ 37.5⁰C buccal or ≥ 37.5⁰C armpit
Possible cause(s)
- Ongoing infection for which your child is being treated
Infection of the skin at the catheter entry site
Blood infection
Other infection
What to do?
- Note any other symptoms that your child may have including: pain, irritability, loss of appetite, drowsiness, etc.
- Contact your healthcare team quickly.
General irritability, poor appetite, fatigue or wanting to sleep more than usual (lethargy)
Possible cause(s)
- Change in baseline health of the child may indicate new infection or other problem
What to do?
- Note any other changes or symptoms that your child may have.
- Contact your healthcare team quickly.
One or more of these symptoms: decreased urination - increased thirst - dry lips and mouth - faster heart rate than usual - weight loss
Possible cause(s)
- Dehydration
What to do?
- Contact your healthcare team quickly.
- Give oral rehydration solutions to your child (eg, Pedialyte™, Gastrolyte™), if recommended by your healthcare team.
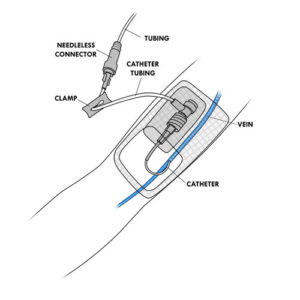
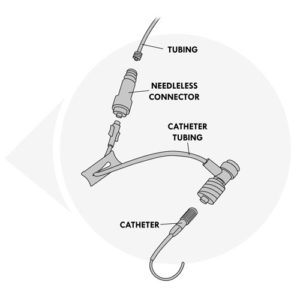
Redness, heat, swelling, tenderness or pain at the catheter entry site

Possible cause(s)
- Infection or inflammation at the catheter entry site
- Phlebitis (irritated vein)
What do to?
- If your child uses an elastomeric infusion pump:
- stop the infusion by closing the catheter tubing clamp and the pump tubing clamp.
- If your child uses an ambulatory infusion pump:
- press the “STOP/START” button on the pump to stop the infusion or shut the pump off as you have been shown by your healthcare team;
- close the clamps of the catheter tubing and the tubing of the pump.
- Contact your healthcare team quickly.
Blood leaking at catheter insertion site
Possible cause(s)
- Breakage or disconnection of the catheter or tubing
- Recent catheter insertion
- Child’s underlying health condition
What to do?
- If there is continuous bleeding, put a compress over the dressing and apply firm pressure.
- If your child uses an elastomeric infusion pump:
- close the catheter tubing clamp and the pump tubing clamp.
- If your child uses an ambulatory infusion pump:
- press the “STOP/START” button on the pump or close the pump as indicated,
- close the clamp of the catheter tubing and the tubing of the pump.
- Immediately contact your healthcare team.
One or more of these symptoms: burning or pain at the entrance site of the catheter, cold skin around the entrance site of the catheter, swelling of the arm (PICC line), swelling around the catheter catheter site, leakage at catheter entry site, change in skin color (whiteness or redness) around the catheter entry site
Possible cause(s)
- Infiltration (medication is leaking out of the vein and into the skin)
- Phlebitis of the vein (irritated vein)
What to do?
- If your child uses an elastomeric infusion pump:
- close the catheter tubing clamp and the pump tubing clamp.
- If your child uses an ambulatory infusion pump:
- press the “STOP/START” button on the pump or close the pump as indicated;
- close the clamp of the catheter tubing and the tubing of the pump.
- Immediately contact your healthcare team.
- If your child’s arm with the catheter is swollen, elevate it as much as possible.
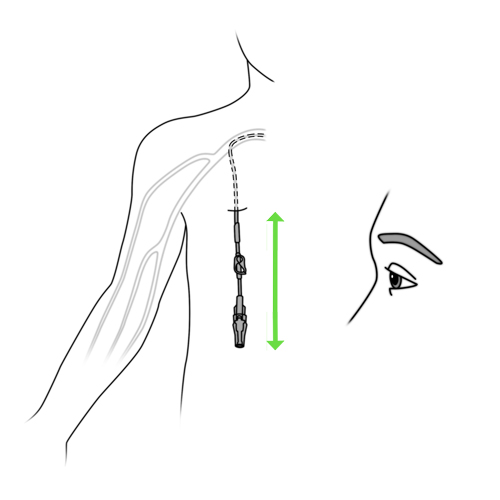
Length of the external portion of the catheter has changed (length is shorter or longer than usual) or the catheter is completely removed from the vein
Possible cause(s)
- Accidental displacement of the catheter
- Mishandling of the catheter
- Improperly adjusted dressing
- Child has moved excessively and displaced the catheter
What to do?
- Never push the catheter back into the vein.
- If your child uses an elastomeric infusion pump: close the catheter tubing clamp and the pump tubing clamp.
- If your child uses an ambulatory infusion pump:
- press the “STOP / START” button on the pump or close the pump as indicated;
- close the clamp of the catheter tubing and the tubing of the pump.
- If the catheter has been completely pulled out, put a clear dressing over the previous entrance site.
- Immediately contact your healthcare team.
Extended redness or itching of the skin under dressing
Possible cause(s)
- Contact dermatitis (ie, skin irritation due to the dressing)
- Sensitivity to the adhesive of the dressing
- Sensitivity to disinfectant solution
- Reaction of the skin to the disinfection technique
What to do?
- Contact your healthcare team who may suggest:
- a change in dressing materials,
- use of a topical corticosteroid,
- a change in disinfection technique.
Protective dressing is wet or damp due to leakage of blood, pus or other discharge
Possible cause(s)
- Breakage or disconnection of the catheter or tubing
- Blockage of the catheter
- Displacement of the catheter
- Displacement of the needle if the child has an implantable chamber device
- Infection
- Contact dermatitis
- Child’s underlying health condition
What to do?
- If your child uses an elastomeric infusion pump:
- close the catheter tubing clamp and the pump tubing clamp.
- If your child uses an ambulatory infusion pump:
- press the “STOP / START” button on the pump or close the pump as indicated;
- close the clamp of the catheter tubing and the tubing of the pump.
- Immediately contact your care team.
- If the dressing is falling off, put another dressing over it while waiting for the advice of your healthcare team.
- If the dressing is partially detached, do not remove it as you might remove the catheter by mistake.
Dressing is falling off, loose, punctured or torn
Possible cause(s)
- Various causes
What to do?
- If the dressing is falling off, tape the sides down.
- If it is punctured or torn, install another clear adhesive dressing over the old one.
- If the dressing is partially detached, do not remove it as you can remove the catheter by mistake.
- Immediately contact your healthcare team.
Cord-like sensation of the vein where the catheter is inserted (may be hard, red or tender to touch)
Possible cause(s)
Phlebitis (irritated vein)
What to do?
- If your child uses an elastomeric infusion pump:
- close the catheter tubing clamp and the pump tubing clamp.
- If your child uses an ambulatory infusion pump:
- press the “STOP/START” button on the pump or close the pump as indicated;
- close the clamp of the catheter tubing and the tubing of the pump.
- Contact your healthcare team quickly.
One or more of these symptoms: swelling of the hand, arm or side where the catheter is located, underarm pain in the arm where the catheter is located, swelling of the neck and face
Possible cause(s)
- Phlebitis of the vein (irritated vein)
- Blood clot in the vein with the catheter
What to do?
- Immediately contact your healthcare team.
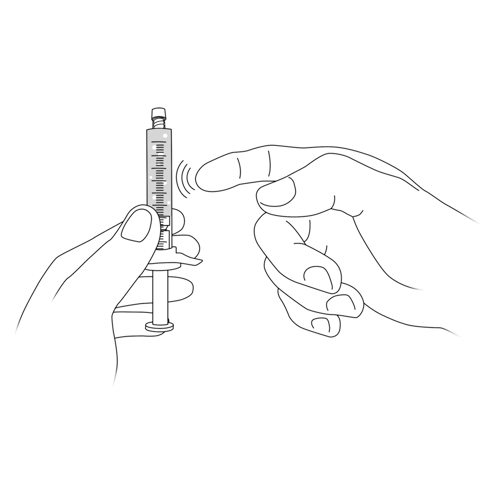
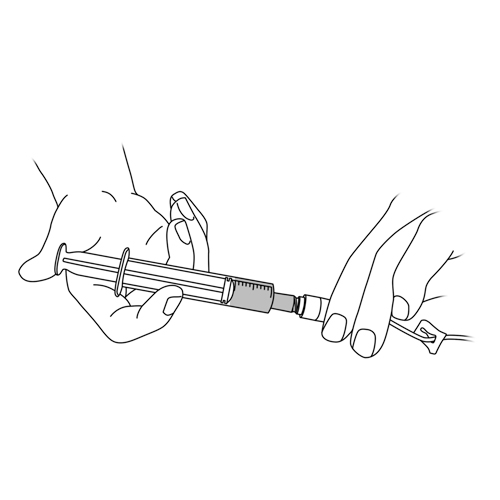
Resistance or inability to irrigate (flush) the catheter
Possible cause(s)
- Blockage or displacement of the catheter
- Blockage of the tubing
- Clamps are closed
- Displacement of the needle in children with an implantable chamber device (PORT)
What to do?
- Do not push the plunger of the syringe with saline solution or locking solution forcefully.
- Make sure tubing clamps are fully open.
- Check that the tubing is not pinched or bent.
- Ask your child to:
- move the arm on the side of the catheter,
- turn on each side,
- cough,
- turn thir head towards the opposite side of the catheter or to bear down (as if they were going to have a bowel movement).
- If your child has an implantable chamber catheter (eg, Port-a-Cath®): check if the needle has moved out of the correct position.
- If the problem persists:
- close the clamp of the catheter tubing;
- stop attempting to flush the line;
- contact your healthcare team immediately.
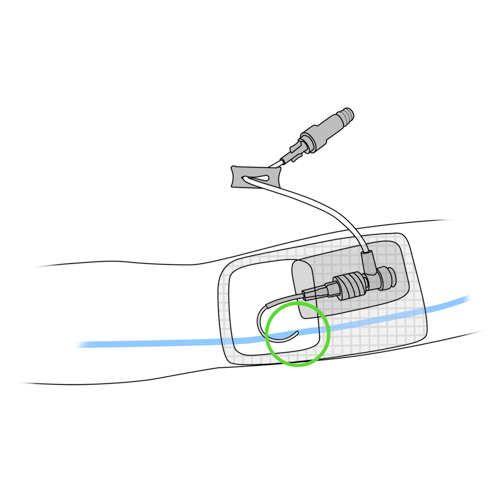
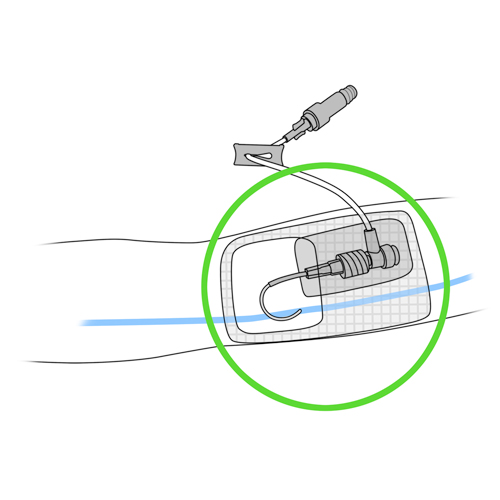
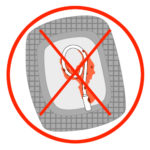
Presence of blood in catheter tubing
Possible cause(s)
- Return of blood (reflux)
What to do?
- Irrigate the catheter with the saline solution. Refer to steps 5 and 8 to 12 of the “Catheter Irrigation” method of care.
- If this happens more than once or twice a week, contact your healthcare team.
Broken (leaking) catheter or malfunctioning equipment
Possible cause(s)
- Mishandling
- Catheter or other defective equipment
- Blocked catheter
What to do?
- You may notice leakage of blood or fluid at the point where the catheter or other piece of equipment is broken.
- If your child uses an elastomeric infusion pump:
- close the catheter tubing clamp and the pump tubing clamp.
- If your child uses an ambulatory infusion pump:
- press the “STOP/START” button on the pump or close the pump as indicated;
- close the clamp of the catheter tubing and the tubing of the pump.
- If you can see where the equipment is broken or where the leakage is coming from: close the clamp between the catheter and the point of leakage. If there is no clamp, use the hemostat clamp, as your healthcare team has taught you, or bend the catheter in half and keep it folded in place with tape.
- If you do not see where the leakage is coming from or where the equipment is broken: put a gauze compress on the dressing to absorb the leakage.
- Immediately contact your healthcare team.
Child with an implantable chamber catheter (eg, Port-a-Cath®): pain or swelling at the site of insertion of the reservoir during the administration of the solution or irrigation
Possible cause(s)
- Disconnection from the implantable chamber of the catheter
- Displacement of the catheter
- Displacement of the noncoring needle
What to do?
- If your child uses an elastomeric infusion pump:
- close the catheter tubing clamp and the pump tubing clamp.
- If your child uses an ambulatory infusion pump:
- press the “STOP/START” button on the pump or close the pump as indicated;
- close the clamp of the catheter tubing and the tubing of the pump.
- If during irrgation:
- close the clamp of the catheter tubing,
- stop attempting to flush the line.
- Immediately contact your healthcare team.
Pain in the ear, throat, neck, armpit (under the arm) or shoulder on the same side of the catheter
Possible cause(s)
- Accidental displacement of the catheter
What to do?
- Immediately contact your healthcare team.
Particular odor or a strange taste reported by your child during irrigation
Possible cause(s)
Contact between the saline solution and the plastic of the syringe may activate your child’s sense of taste and smell
What to do?
- This is commonly reported. There is no danger to your child’s health.
- If the taste is very intense, contact your healthcare team.
Unusual sound heard by your child on the catheter side during irrigation of the catheter or administration of medication with or without: pain in the ear, throat pain
Possible cause(s)
- Displacement of the internal (inside the body) portion of the catheter
What to do?
- Close the clamp of the catheter tubing.
- Stop attempting to flush the line.
- Immediately contact your healthcare team.
Swelling in the neck, face or in the arm on the same side of the catheter; pain in the armpit (under the arm)
Possible cause(s)
- Phlebitis of the vein (irritated vein)
- Blood clot in the vein with the catheter
What to do?
- Immediately contact your healthcare team.
Presence of air bubbles or particles in the medication bag, cassette reservoir or elastomeric infusion pump
Possible cause(s)
- Contamination of the solution
- Problems in the preparation
What to do?
- Do not administer the medication.
- Contact your pharmacy or healthcare team quickly.
Medication administration time longer than usual
Possible cause(s)
- Medication too cold
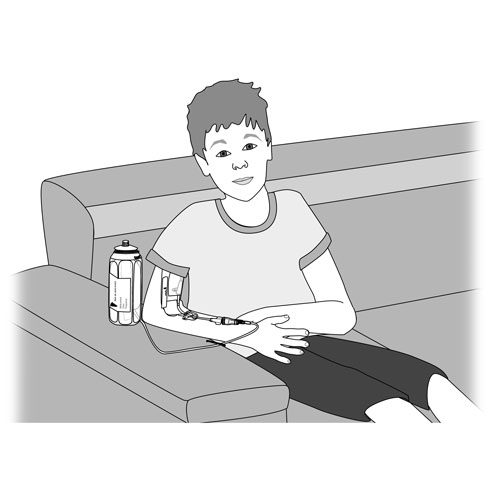
- If using an elastomeric infusion pump and it is placed lower than the catheter insertion site
- Malfunction of ambulatory infusion pump
- Displacement of the catheter
- Partial obstruction of the catheter
What to do?
- A cold solution can also cause headaches or chills.
- Irrigate the catheter with the saline solution. Refer to steps 5 and 8 to 12 of the “Catheter irrigation” method of care.
- If your child uses an elastomeric infusion pump:
- make sure the medication is at room temperature. A solution that is too cold increases the time it takes for the drug to flow;
- place the elastomeric infusion pump at the same height as the catheter insertion site.
- If the problem persists, contact your healthcare team promptly.
More solution left than expected in the medication bag/cassette reservoir at the end of administration
Possible cause(s)
- Pump malfunction
What to do?
- Contact your pharmacy or healthcare team quickly.
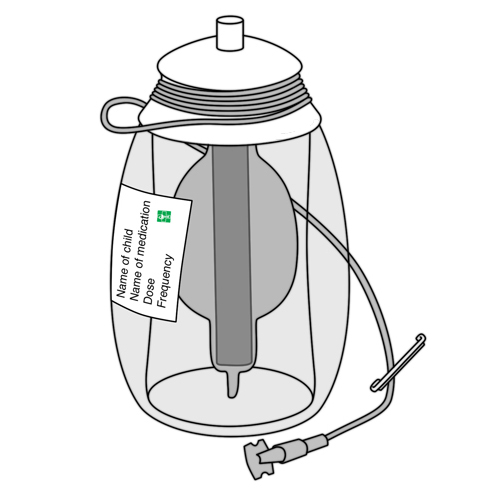
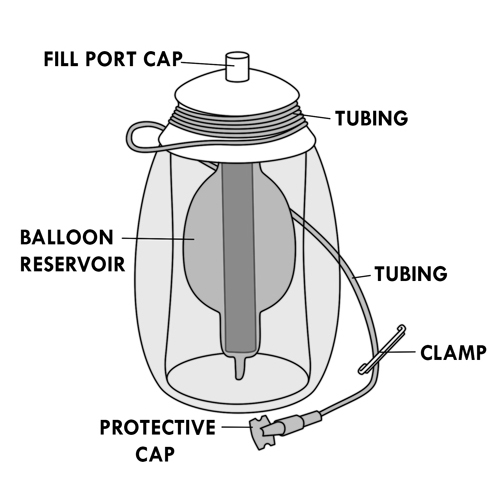
More solution left than expected in the balloon reservoir at the end of administration (the balloon should be empty, flattened and small ridges visible)
Possible cause(s)
- Pump malfunction
What to do?
- Contact your pharmacy or healthcare team quickly.
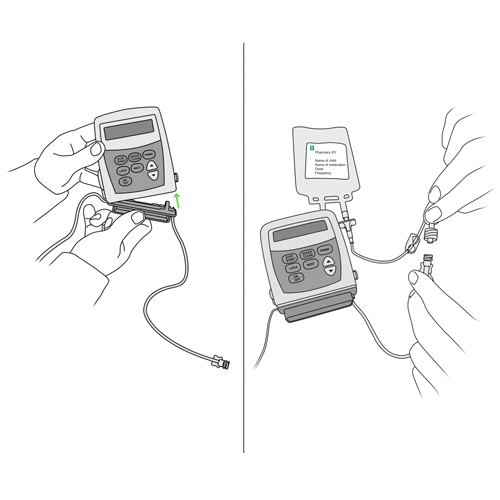
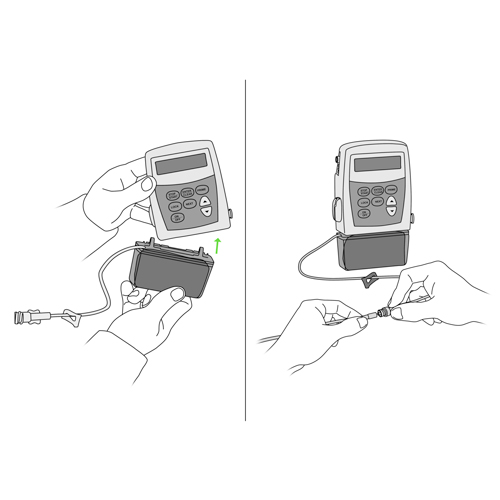
Inadvertent disconnection of the needleless connector or the pump tubing
Possible cause(s)
- Accident
- Mishandling
What to do?
- If your child uses an elastomeric infusion pump:
- close the catheter tubing clamp and the pump tubing clamp.
- If your child uses an ambulatory infusion pump:
- press the “STOP/START” button on the pump or close the pump as indicated;
- close the clamp of the catheter tubing and the tubing of the pump.
- Immediately contact your healthcare team.
Ambulatory infusion pump alarms
Possible cause(s)
Various
What to do?
- Close the clamp of the catheter tubing and the clamp of the pump tubing.
- Press the “STOP/START” button to stop the alarm or as indicated.
- Look at the message displayed on the screen.
- Follow the instructions accordingly.
- If necessary, consult the pump instructions you have been given.
- If you still can not resolve the problem, contact your healthcare team.
Leakage of the elastomeric infusion pump or bursting of the balloon
Possible cause(s)
- Breakage of the portable infusion device
- Technical defect of the device
What to do?
- Close the clamp of the catheter tubing and the tubing of the pump.
- Disconnect the catheter from the infusion pump.
- Irrigate the catheter with the saline solution. Refer to steps 5 and 8 to 12 of the “Catheter irrigation”.
- Contact your healthcare team quickly.
Do not hesitate to refer to your child’s healthcare team for any questions or for specific advice related to your child’s condition.