Step 1: Prepare the material
|
- Select and clean a workspace surface (eg, tabletop).
- Gather the necessary equipment.
- Open the packages (swabs, syringes, needles, filter needles, tubing) without touching the inner contents so that they remain clean.
- Check that the new tubing is not damaged.
- Check that the protective cover (often blue) is present over the cassette.
Why ? This step ensures safety and allows the subsequent procedure.
|
|
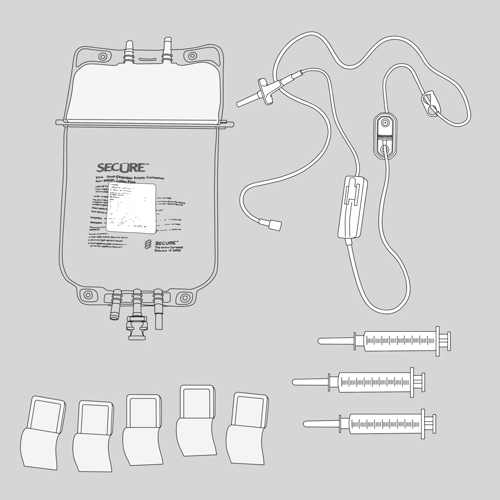
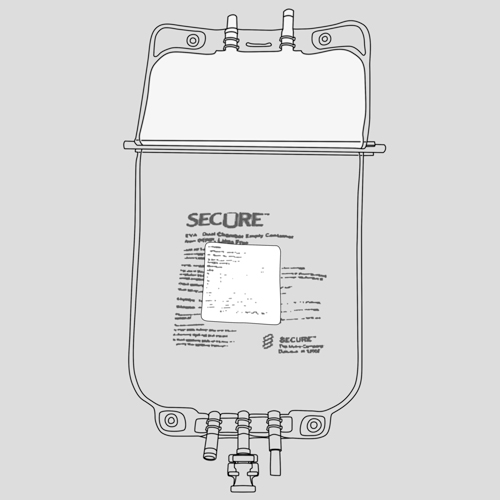
Step 2: Check the parenteral nutrition bag
|
- Remove the bag from its black envelope.
- Check on the label that:
- your child’s name appears,
- the date of the solution has not expired,
- the composition of the solution, the amount and duration of administration are the same as those prescribed for your child.
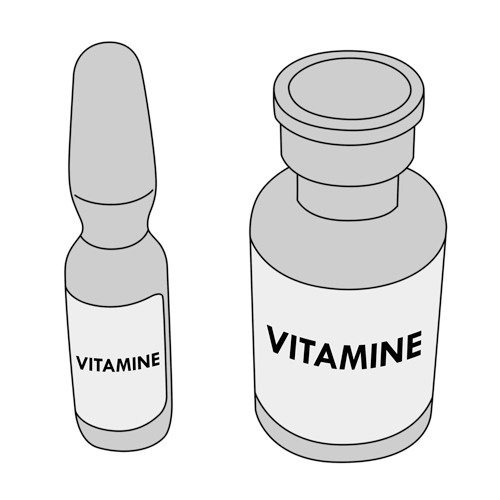
- Inspect the bag thoroughly. It should not leak. If particles are visible in the bag or there are more air bubbles than usual, put the bag aside and contact your pharmacy or healthcare team; repeat the check with a new bag.
- Check if the solution in the upper chamber of the bag (fat) is milky white and well blended. There should be no trace of fat droplets.
- Check if the solution in the lower chamber of the bag (amino acids) is transparent. It generally has a consistency of egg white but it can vary according to the different additions made by the pharmacist.
- Check that there are no small particles (precipitates or crystals) in the two chambers of the bag; a few bubbles may be apparent.
- From one bag to another, the solution should always have the same color and consistency (unless the prescription has been changed). Notify your pharmacy or healthcare team if this is not the case.
- Do not give solution if bag has been frozen.
Why ? This step ensures the safety of the procedure.
|
|
Step 3: Check the additive vials and the ampoules
|
Check on the labels on the box or the bag to verify that:
- your child’s name appears,
- the date of the solution has not expired (this information is also written on each vial and on each ampoule),
- the name of each additive and the dose are the same as those prescribed for your child.
Why ? This step ensures the safety of the procedure.
|
|
Step 4: Prepare the syringes
|
- If syringes and needles are separated: without touching the syringe tip, screw the needle (with the protective cap still on) into it by turning clockwise about ¼ turn.
- If you need to remove an additive from an ampoule, use the same procedure but with a filter needle.
- Prepare the required number of syringes, one per each additive.
- Keep the protective caps on the needles.
Why ? This step allows the rest of the procedure.
|
|
Step 5: Disinfect the rubber septum of the vial
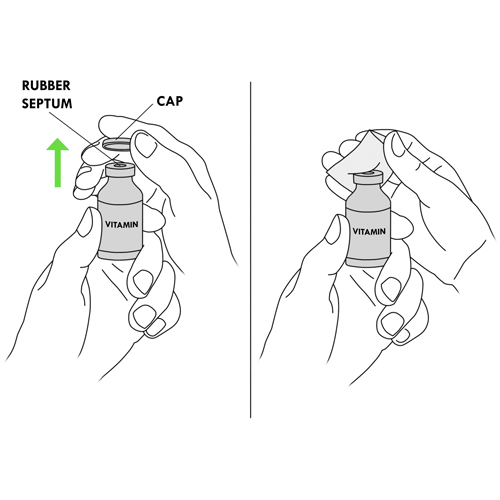
|
If you do not have an additive to add from a vial, go to step 8.
- Remove the protective cap from each additive vial.
- Use a disinfectant swab to vigorously scrub the septum (rubber cap) of each vial. Use a new swab for each vial.
- Let the rubber cap dry completely.
- Do not blow on the cleaned cap of the vials.
- Make sure that nothing touches the cap in order to avoid contamination.
Why ? The rubber cap of the vial is not sterile. Disinfection is necessary to prevent bacteria or particles from entering the additive.
|
|
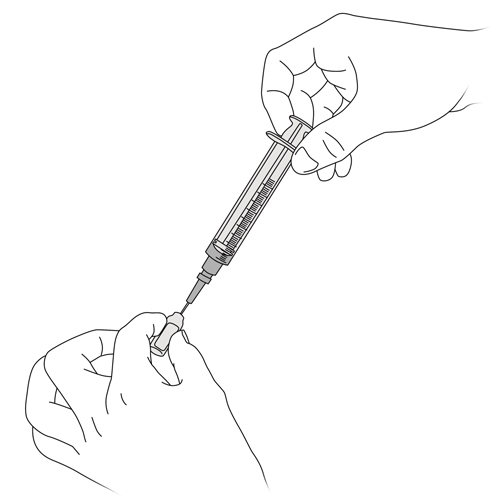
Step 6: Remove the additive from the vial
|
- Place the vial on the table.
- Remove the protective cap from the needle of a syringe.
- Pull the plunger of the syringe back to aspirate an amount of air equal to the amount of liquid to be drawn out of the vial.
- Hold the syringe like a pencil with one hand and hold the vial on the table with your other hand.
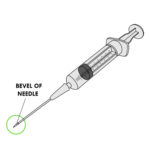
- Push the needle through the center of the rubber cap of the vial with the needle of the syringe held at a 45⁰ angle and with the bevel of the needle (open part of the needle at the tip) pointing upwards.
- Straighten the needle quickly to a 90⁰angle.
- Push the air contained in the syringe into the vial by pushing on the plunger of the syringe.
- Holding the tip of the needle in the solution, turn the vial upside down and upright. Make sure the tip of the needle remains in the solution.
- Withdraw the amount of additive required.
- Remove the needle from the vial.
Why ? This way of piercing the vial reduces the possibility that small pieces of rubber will fall into the solution in the vial.
|
|
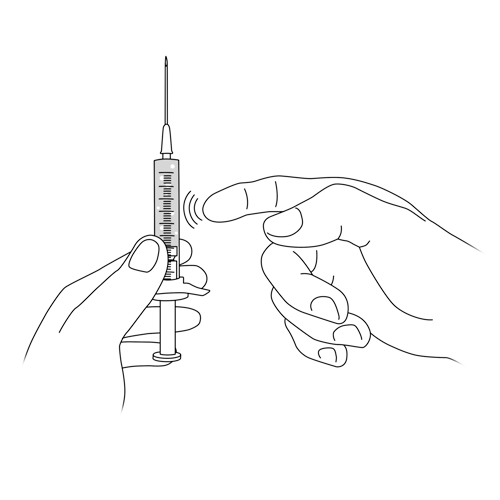
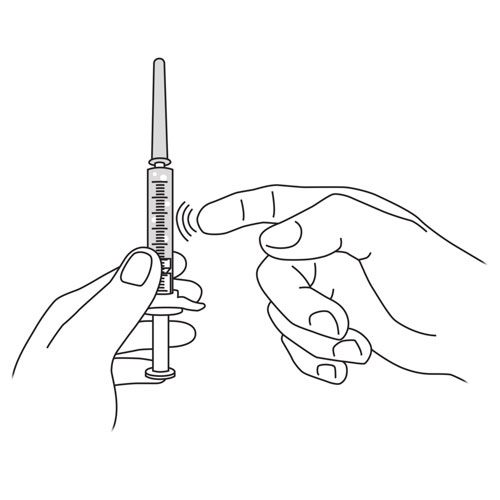
Step 7: Remove the air bubbles from the syringe
|
- Hold the syringe vertically with the needle up.
- Pull the plunger of the syringe down slightly so that all of the liquid in the needle collects in the syringe.
- Tap the side of the syringe vigorously with your thumb and forefinger so that the air bubbles rise to the top.
- Gently press the plunger of the syringe to release the bubbles.
- Push gently on the plunger of they syringe until there is no air in the syringe and a drop of liquid appears on the tip of the needle.
- Withdraw solution again from the vial if necessary until the quantity in the syringe is correct.
- Replace the protective cap securely on the needle of the syringe.
- Place the prepared syringe in front of the vial.
Additive to be taken from another vial: repeat steps 6 and 7 with a new syringe and a new needle.
Additive to be taken from an ampoule: go to the next step.
No other additives needed: go to step 13.
Why ? This step is necessary to remove excess air from the syringe.
Placing the prepared syringe in front of the vial makes it possible to keep track of each syringe and know which additive is in each one.
|
|
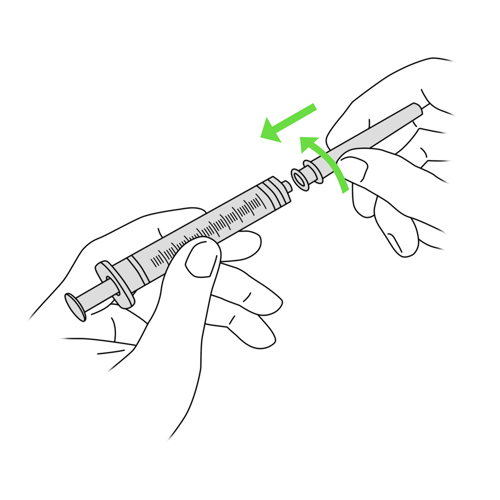
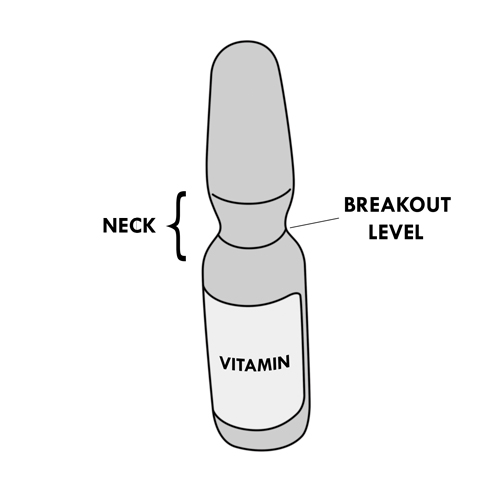
Step 8: Disinfect the ampoule neck
|
If you do not have an additive to add from a ampoule, go to step 13.
- Holding the ampoule upright, gently move it in a circular motion on the table top surface so that any liquid in the top of the ampoule collects in the lower portion.
- Using a disinfectant swab, thoroughly clean the narrow portion of the ampoule (neck) including the breakout level which is where the ampoule is designed to break open. Keep the empty envelope of the disinfectant swab for the next step. Let the ampoule dry completely.
Why ? Disinfection is necessary to prevent bacteria or particles on the ampoule neck from entering the additive solution.
|
|
Step 9: Break the neck of the ampoule
|
- Using the inside of the empty envelope which previously contained the disinfectant swab, hold the top of the ampoule and break the neck of the ampoule at the breakout level by pointing it away from you.
- Throw the top of the ampoule into the sharps container.
Why ? This prevents you from cutting yourself accidentally and prevents small pieces of glass from injuring your eyes.
|
|
Step 10: Remove the additive from the ampoule
|
- Remove the protective cap from the filter needle of a syringe, taking care not to touch the needle tip.
- Hold the ampoule with one hand flat on the table.
- Insert the tip of the filter needle into the ampoule
- Keeping the bevel (open portion of the needle tip) inside the centre of the ampoule, pull back on the plunger of the syringe to withdraw the additive into the syringe. Make sure that you have withdrawn all of the contents of the ampoule.
- Once all of the additive has been withdrawn from the ampoule, remove the needle from the ampoule.
- Replace the protective cap securely on the filter needle of the syringe.
Why ? When the ampoule is broken open, small particles of glass may fall into the additive solution. The use of the special filter needle ensures that no glass particles enter the syringe.
|
|
Step 11: Change the needle of the syringe
|
|
- Pull the plunger of the syringe down slightly so that all of the liquid in the filter needle collects in the syringe.
- Unscrew the needle from the syringe by turning it counterclockwise.
- Dispose of it in the sharps container.
- Without touching the tip, screw a new needle onto the syringe by turning clockwise about ¼ turn.
Why ? The filter needle may contain glass particles so must be discarded and exchanged for a clean regular needle in preparation for injection of the additive to the parenteral nutrition bag.
|
|
Step 12: Remove the air bubbles and the excess volume of the additive from the syringe, if any
|
- Hold the syringe vertically with the needle up.
- Tap the side of the syringe vigorously with your thumb and forefinger so that the air bubbles rise to the top.
- Gently press the plunger of the syringe to release the bubbles.
- Push gently on the plunger of the syringe until there is no air in the syringe and a drop of liquid appears on the tip of the needle.
- Continue to push gently on the plunger of the syringe until the correct amount of the additive remains in the syringe.
- Place the prepared syringe in front of the ampoule.
Additive to be taken from another ampoule: repeat steps 9 to 12 with a new syringe and a new filter needle.
Why ? This step is necessary for the to avoid the injection of air and to prepare the correct amount of additive safely.
By keeping the prepared syringe in front of the ampoule in question, you can keep track of which additive is in each syringe.
|
|
Step 13: Disinfect the injection port of the bag

|
- Use a disinfectant swab to vigorously scrub the injection port of the lower chamber of the parenteral nutrition bag.
- Let it dry completely.
- Make sure that nothing touches the injection port to avoid contamination.
Why ? Disinfection is necessary to prevent bacteria or particles present on the injection site of the bag from entering the bag during injection of the additives.
|
|
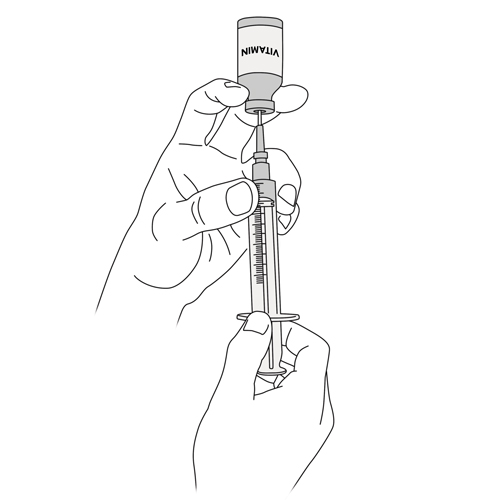
Step 14: Inject the additives into the bag

|
- Place the bag flat on the table.
- Remove the protective cap from the needle of the syringe.
- Insert the entire needle into the centre of the bag injection port carefully.
- Inject the additive by pushing on the plunger of the syringe.
- Remove the needle from the injection port.
- Replace the protective cap securely on the needle of the syringe.
- Unscrew the needle from the syringe by turning it counterclockwise and place it in the sharps container.
- Repeat steps 13 and 14 for each additive syringe to be injected into the bag.
- Throw all used needles and ampoule bulbs into the sharps container.
- Dispose of syringes and vials in the trash.
Why ? This step allows you to add the elements necessary to complete the content of your child’s parenteral nutrient solution.
|
|
Step 15: Mix the bag solution

|
- Mix the contents of the lower chamber of the bag by gently massaging it.
- Remove the bar (partition device) between the upper and lower chambers of the bag.
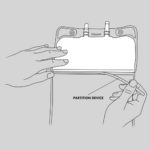
- Gently massage the entire bag.
- Check the appearance and consistency of the solution; it should be homogeneous, milky and free of particles. It is yellowish in color if vitamins have been added.
- If the solution does not have the usual color and appearance, do not administer it and contact your pharmacy or healthcare team.
Why ? This stage finalizes the preparation of the solution and ensures the safety before its administration.
|
|
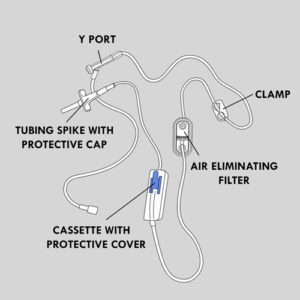
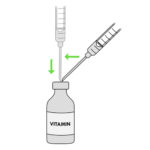
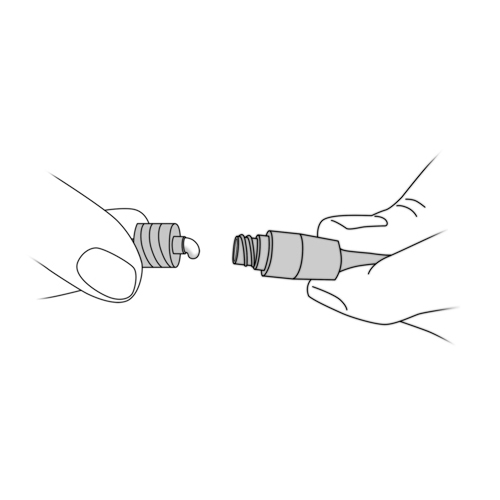
Step 16: Connect the tubing to the bag
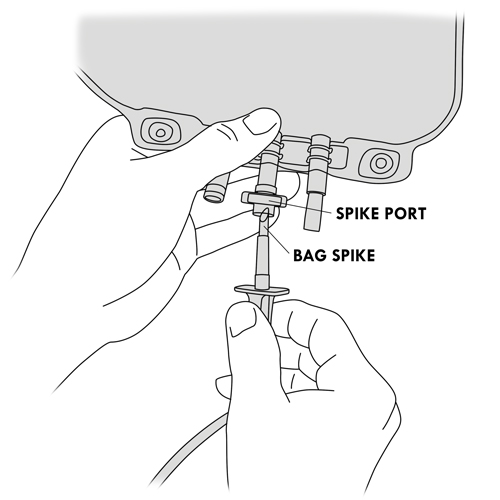
|
- Make sure the tubing clamp is securely closed.
- Use a disinfectant swab to vigorously scrub the bag insertion port.
- Let dry completely.
- Open the insertion port by unscrewing the protective cap.
- Remove the protective cap from the tubing spike with a rotating motion, as explained by your healthcare team.
- Holding the bag insertion port with one hand, insert the spike with the other hand by turning it about a quarter turn clockwise until the connection is tight.
Why ? Once the bag is spiked, the tubing can be connected to the pump which will be connected to the catheter.
|
|
Step 17: Turn on the pump
|
- Press and hold the “Power switch” on the right side of the pump.
- The pump does various self-tests and beeps six times after the tests are completed.
- After the beeps, the home screen should appear.
Why ? This step allows the rest of the procedure.
|
|
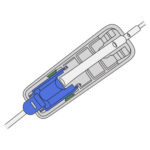
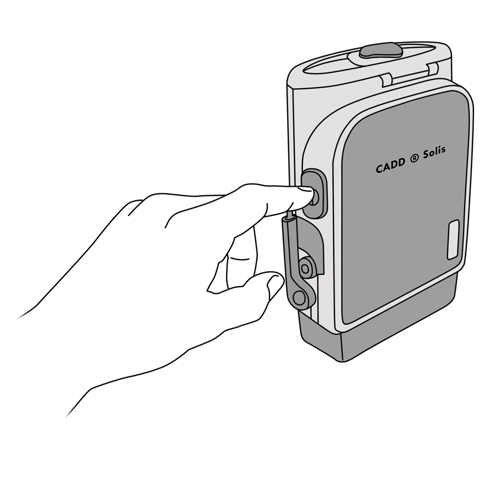
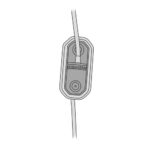
Step 18: Attach the cassette to the pump
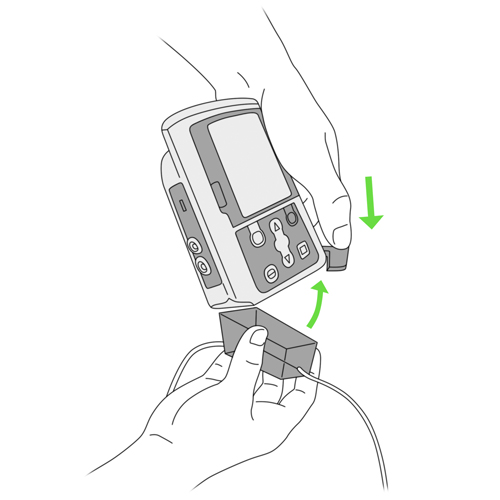
|
- Remove the small protective cover over the cassette (often blue in colour).
- Attach the cassette to the bottom of the pump by first inserting the two hooks at one end of the cassette into the pump. This creates a lever.
- Pull the entire cassette up towards the pump until it snaps into place.
Why ? This step ensures the safe holding of the cassette at the pump and ensures the precision of the perfusion.
|
|
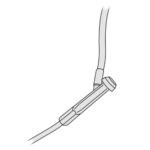
Step 19: Secure the cassette
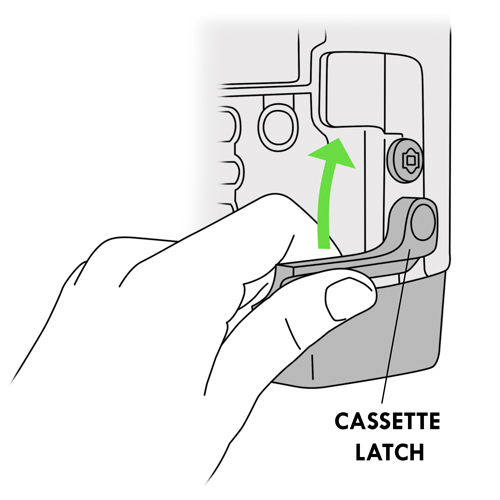
|
- Lift the cassette latch lever in the closed position.
- If you have strong resistance when fixing the cassette, it means that it is misplaced; try again.
Why ? This step ensures that the cassette is securely attached to the pump.
|
|
Step 20: Reset the reservoir volume of the pump
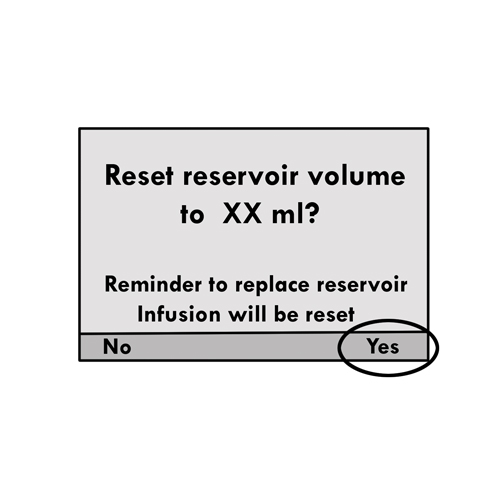
|
- The pump displays a question “Reset reservoir to XX ml?” (XX ml is the total volume of solution prescribed for your child and that must be received).
- Select YES to reset the volume.
Why ? This step allows the rest of the procedure.
|
|
Step 21: Empty the air from the tubing
|
- Place the bag on the work table.
- Raise the top of the bag about 30° or hang the bag.
- Open the bag clamp.
- Keep the protective cap on the end of the tubing to prevent contamination.
- Let the tubing hang vertically with the filter perpendicular to the ground.
- The pump display displays the message “Prime tubing?“.
- Select Yes.
- Select Prime.
- Continue purging as required by selecting Yes or selecting No to complete the purge.
- Ensure air bubbles are released from the filter by tilting or tapping it before continuing priming.
- Do the same with the Y-port when the liquid is being returned to this level.
- You must stop the priming after removing air from the tubing.
- Check that a drop appears at the end of the tubing.
- When the air is removed, close the tubing clamp.
Why ? This step ensures the security of the administration of the solution.
The high position of the top of the bag allows the air bubbles present in the solution not to drop and to interfere with the proper functioning of the filter. It must first be moistened with the solution to do its job well (prevent air and particles from accessing your child’s catheter).
|
|
Step 22: Administer the nutrient solution

|
If you administer the solution immediately:
If you administer the solution later:
- Press and hold the “Power switch” on the right side of the pump.
- When the message “Power down?” appears on the display, select “Yes“. The pump will then go out.
- Keep the bag away from bright light until it is used (eg, put it in its black envelope or in the backpack).
|
|