Step 1: Anticipation

|
See the full description here
Summary:
Collaborate and form a team with your child. When you invest the time to form a strong team, children feel more comfortable and less anxious – this will help you complete the care with less stress – for you and your child.
Use these tips, from the start, to set the stage for a positive care procedure:
- Create the right moment: integrate the care in a routine.
- Alert your child to the needed care and communicate together.
- Form a team with your child: Encourage autonomy by offering realistic choices such as the method of distraction. Stay tuned to your child. Manage pain and anxiety, using distraction and positioning for comfort.
|
|
Step 2: Preparation

|
See the full description here
Summary:
- Prepare the environment: Identify a routine place for care. Close windows, doors and fans. Wash and dry the work surface and gather the needed materials for the care and to distract your child.
- Prepare your child: Get help if needed. Position your child for comfort to receive the care and start to use the selected distraction method.
- Prepare yourself: Find the right time when you are ready to provide the care safely. Review the list of care steps. Wash your hands.
Now that you are ready to start the care procedure, take the opportunity to encourage and praise your child.
|
|
Step 3: Procedure

|
See the full description here
Summary 3 key concepts:
- Safety: Carefully follow the care practice steps as you have been taught.
- Flexibility: Be ready to adjust according to your child’s reactions during the procedure. As needed, reposition or select an alternative distraction strategy. Follow your child’s pace and rhythm.
- Collaboration: Reassure your child, verbally and non-verbally. Acknowledge your child’s emotions and reactions. Help your child differentiate between the different sensations during a procedure.
|
|
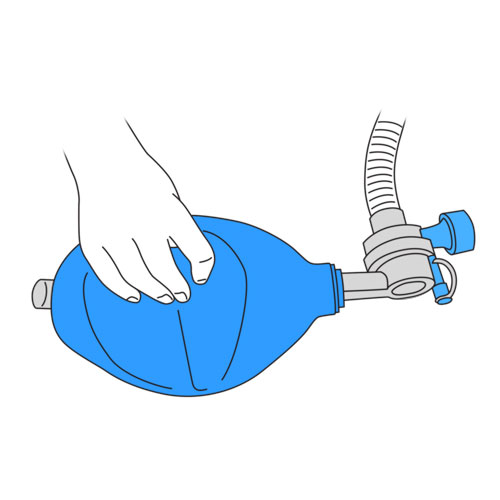
Step 4: Prepare the equipment
|
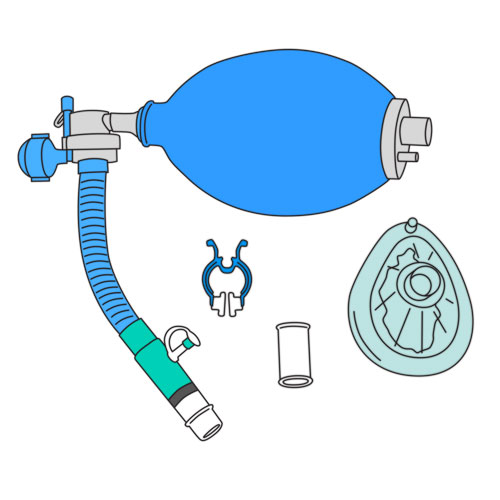
- Use a properly cleaned table.
- Gather the necessary supplies.
- Make sure that the equipment is clean and correctly assembled: the connecting tubing, one way valves (one with, the other without the latex flap valve), and the interface adapter should all be assembled on the self-inflating manual resuscitator.
- Make sure that the latex flap valve has been removed from the second one way valve used as a connecting adapter, next to the interface adapter.
- Verify the state of the interface (mask or mouthpiece).
- Connect the interface to the adapter.
- Verify that all parts are properly assembled and adjusted.
Why ? This step ensures proper assembly of the equipment.
|
|
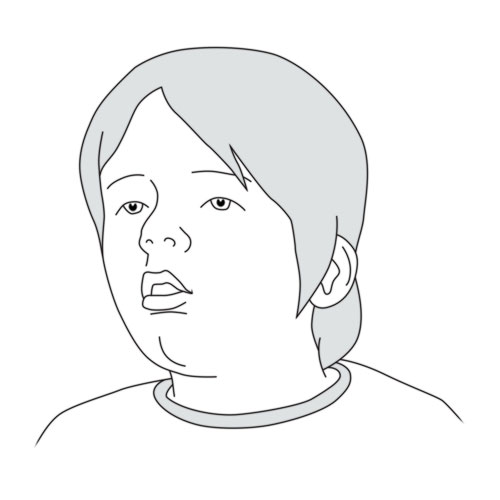
Step 5: Position your child
|
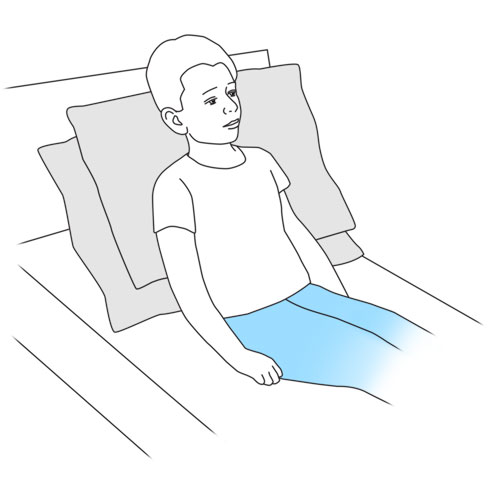
- Place your child, if possible, in a sitting or semi sitting position.
- Make sure that your child’s head is well positioned and supported by using either rolled up towels, pillows, or cushions, as discussed with the healthcare team.
- If your child cannot be placed in a sitting position, place on his back, with the head of the bed slightly raised.
- If your child is in a wheelchair and abdominal thrusts or thoracic compressions are also applied during the cough assist technique, be sure to secure the wheelchair against a wall and apply the brakes.
Why ? A sitting position optimizes coughing.
|
|
Step 6: If possible, establish a signal with your child

|
- If your child’s capacity permits collaboration, establish a signal with your child to indicate when your child feels that his lungs are filled to full capacity and that he is ready to exhale and cough (eg, a wink, bending of head to one side, raising a hand).
- Respect this signal at all times during the technique.
Why ? This step ensures that the technique will be safely applied and encourages teamwork with your child.
|
|
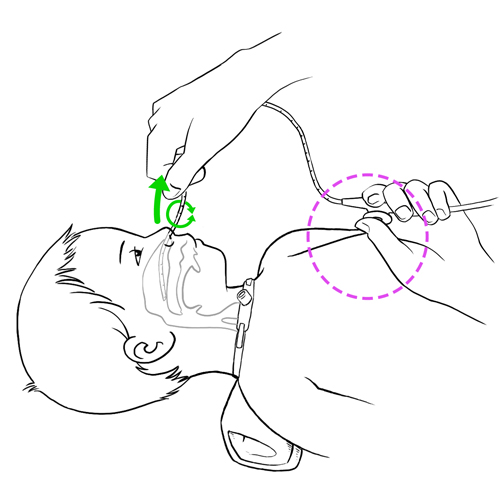
Step 7: Place the interface on your child’s face
|
If your child has a tracheostomy, consult with the healthcare team as to the adjustments required in applying the following steps.
- Mouthpiece:
- insert the mouthpiece into your child’s mouth, making sure that he firmly seals his lips around it;
- use a nose clip if recommended by the healthcare team.
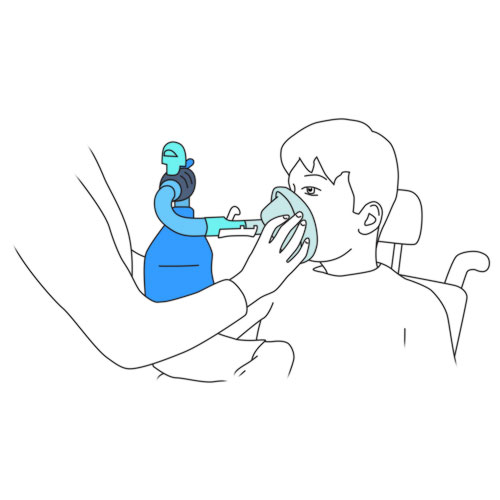
- Mask:
- place the mask over your child’s face, making sure to form a good seal with no leaks.
Why ? This step permits connection of your child to the equipment.
The nose clip prevents air leaks through the nose when using a mouthpiece.
|
|
Step 8: Squeeze the modified ventilatory bag
|
- Ask your child to relax and let the air enter his lungs without resistance, as your child takes the deepest breath possible.
- At the same time your child takes in a deep breath, gently squeeze the modified ventilatory bag as you coordinate with each inspiratory effort made by your child. The number of breaths you give via the manual resuscitator must respect the volume of air to be given that is recommended by the healthcare team.
- It is important that your child does NOT exhale during this phase of the technique.
- Observe for rising of your child’s chest during this maneuver.
- Repeat this maneuver until you have given a certain volume of air and your child signals you that his lungs are full.
- Pay attention to the signal given by your child once he is ready to exhale.
Why ? This step permits the filling of your child’s lungs with a certain volume of air.
|
|
Step 9: Encourage your child to cough
|
Why ? This step permits your child to clear his secretions from his lungs.
|
|
Step 10: Suction secretions as needed
|
- If your child has difficulty clearing secretions from the nose, mouth or the back of the throat, suction as needed.
- For your child’s comfort, remove the nose clip when suctioning.
Why ? This step helps your child clear his secretions completely from the respiratory tract.
|
|
Step 11: Repeat as needed
|
|
- Complete the session by repeating the maneuver (1 inspiration/1 exhalation/cough/1 abdominal thrust or lateral thoracic compression or thoracic compressions) until your child has coughed effectively enough to clear the lungs of secretions.
- Repeat the session 5 to 8 times if the secretions are difficult to clear.
- Wait at least 10 minutes before starting another session.
Why ? This step helps your child clear his secretions completely from his respiratory tract.
A delay of 10 minutes between each session will prevent your child from getting too tired or dizzy.
|
|
Step 12: Clean and store the equipment
|
Cleaning tips
- Mask, mouthpiece and nose clip, if needed:
- clean with soapy water,
- rinse in warm water
- let dry.
- Modified ventilatory bag:
- clean the exterior with a damp cloth and mild soap if required.
- Store the equipment in a clean container protected from dust until next use.
Why ? This step is required to prevent infections and maintain equipment.
|
|
Step 13: Recovery

|
See the full description here
Summary:
The treatment is finished. Wash your hands again.
Be prepared to recognize the challenges faced and to provide positive feedback. Help your child recognize his/her strengths. Acknowledge the collaborative teamwork.
- Listen to what your child says about the parts of the procedure that were difficult or painful.
- Comfort your child and recognize your child’s collaboration with positive feedback.
- Highlight your child’s specific strengths that helped make the procedure positive.
- Discuss with your child what might be done the same or differently the next time the care is needed.
- Keep your promises if you have promised a reward, follow through.
- Reward yourself too.
|
|