Step 1: Anticipation
|
See the full description here
Summary:
Collaborate and form a team with your child. When you invest the time to form a strong team, children feel more comfortable and less anxious – this will help you complete the care with less stress – for you and your child.
Use these tips, from the start, to set the stage for a positive care procedure:
- Create the right moment: integrate the care in a routine.
- Alert your child to the needed care and communicate together.
- Form a team with your child: Encourage autonomy by offering realistic choices such as the method of distraction. Stay tuned to your child. Manage pain and anxiety, using distraction and positioning for comfort.
|
|
Step 2: Preparation

|
See the full description here
Summary:
- Prepare the environment: Identify a routine place for care. Close windows, doors and fans. Wash and dry the work surface and gather the needed materials for the care and to distract your child.
- Prepare your child: Get help if needed. Position your child for comfort to receive the care and start to use the selected distraction method.
- Prepare yourself: Find the right time when you are ready to provide the care safely. Review the list of care steps. Wash your hands.
Now that you are ready to start the care procedure, take the opportunity to encourage and praise your child.
|
|
Step 3: Procedure

|
See the full description here
Summary 3 key concepts:
- Safety: Carefully follow the care practice steps as you have been taught.
- Flexibility: Be ready to adjust according to your child’s reactions during the procedure. As needed, reposition or select an alternative distraction strategy. Follow your child’s pace and rhythm.
- Collaboration: Reassure your child, verbally and non-verbally. Acknowledge your child’s emotions and reactions. Help your child differentiate between the different sensations during a procedure.
|
|
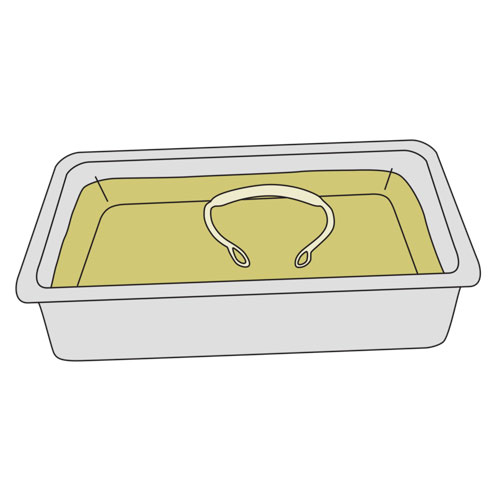
Step 4: Prepare the materials
|
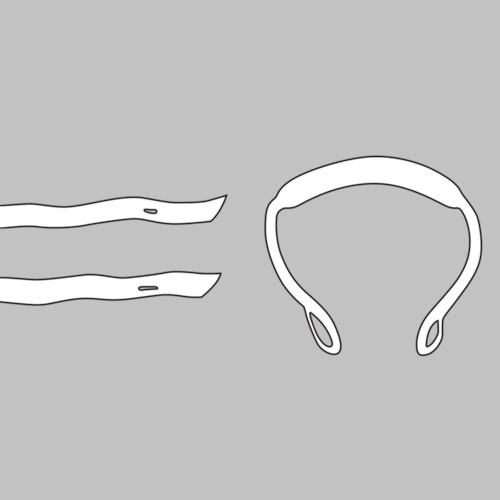
- Have the type of tracheostomy tie to be used close at hand (Velco® band or cotton ties).
- Verify the condition of the tie: make sure that it is safe to use.
- Velcro® band: make sure that the velcro sticks well to the cushioned fabric.
- Cotton ribbons:
- make sure that the edges are not frayed;
- if using technique with one ribbon:
- cut the ribbon long enough to go around the circumference of your child’s neck <strong>twice</strong>;
- cut the ends of the ribbon at a slant;
- if using technique with two ribbons:
- cut two ribbons long enough for each to go around the circumference of your child’s neck <strong>once</strong>;
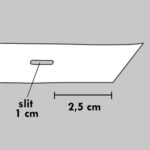
- cut the ends of the ribbon at a slant;
- fold the ends at about 2.5 cm;
- pierce a 1 cm slit in the middle of the ribbon with a pointy object (eg, tip of a pencil) lengthwise.
Why ? This step ensures that the materials are prepared correctly.
Cutting the ribbon on a slant helps when threading through the opening of the flanges opening; it also prevents fraying of the fabric.
Piercing a slit in the ribbon with a pointy object instead of cutting with scissors prevents pieces of fabric fibres from being aspirated into the trachea.
|
|
Step 5: Position your child
|
- The sitting position is favored.
- If your child is on his back, place the rolled towel under the shoulders (not under the neck), so that the head tilts slightly backwards, exposing the neck and allowing better access to the cannula.
Why ? The sitting position is favored in order to allow better visualisation and access to the cannula.
|
|
Step 6: Suction the tracheobronchial secretions, if needed

|
Why ? The suctioning of secretions decreases the chances that your child will cough during the tie change.
Movement of the cannula during the procedure can also cause your child to cough and expel secretions.
|
|
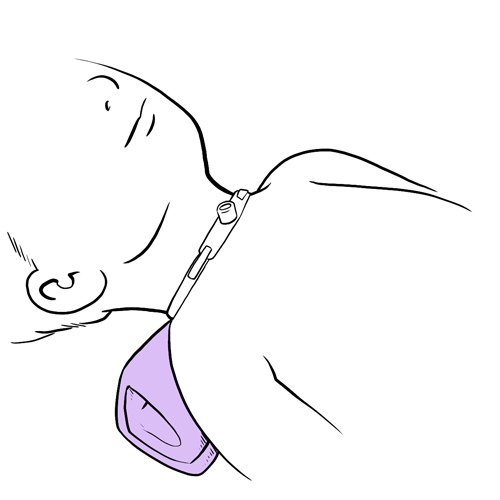
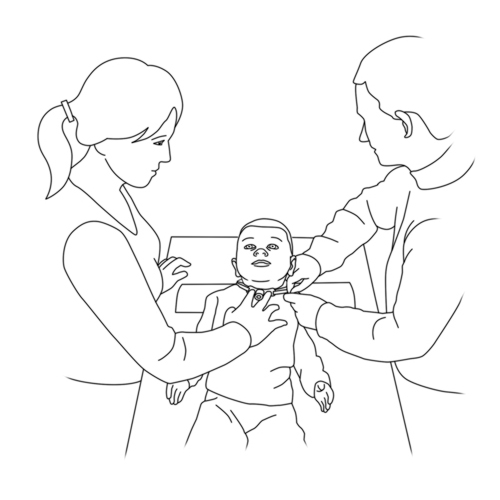
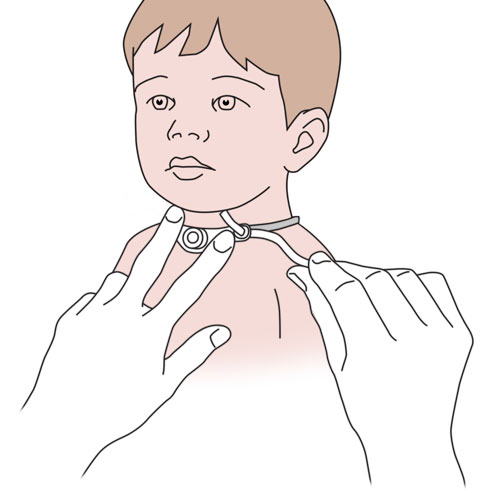
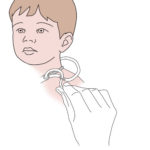
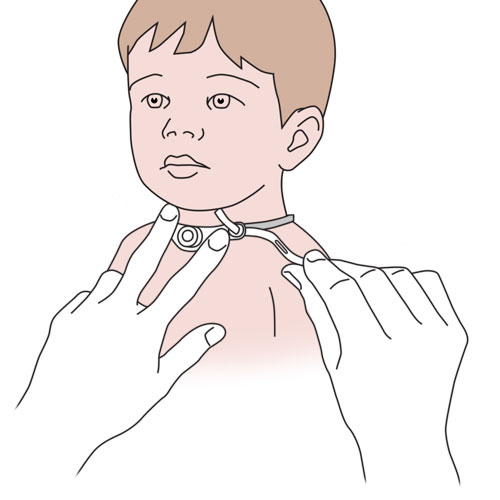
Step 7: Secure the cannula in place
|
- Ask the person assisting you to stabilize the tracheal cannula throughout the procedure by placing his/her fingers on the flanges.
- If your child moves his head a lot, comfort him and stabilize his head with one hand on the top of the head.
- Avoid movement of the tracheal cannula as much as possible during the procedure.
If your child’s tracheal cannula is held in place with a Velcro® band, go directly to the next step.
If your child’s tracheal cannula is held in place with cotton ribbons, go directly to step 14.
Why ? This step helps make the procedure safer. Minimizing movement of the tracheal cannula reduces the risk of accidental decannulation and other complications.
|
|
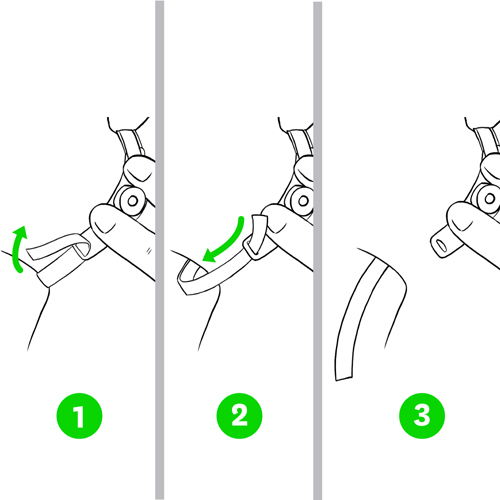
Step 8: Detach one side of the Velcro® band (if this is the type of tie in place)
|
- Remove the tracheostomy dressing (if in place).
- While the person helping you is keeping the tracheal cannula stable, detach one end of the soiled Velcro® band.
- Pull the end of the Velcro® band out of the opening on the flange.
Why ? This step allows you to safely remove the used Velcro® band.
|
|
Step 9: Examine the skin on the neck
|
- Examine the condition of the skin under the tracheostomy tie; the skin should have the same appearance as the rest of the neck.
- Verify the skin around the tracheostomy site for redness, swelling, irritation, small red pimples, small sores or bleeding.
- If any of the above conditions are present, contact your child’s healthcare team for recommendations.
Why ? This step allows you to identify skin irritation, if present.
|
|
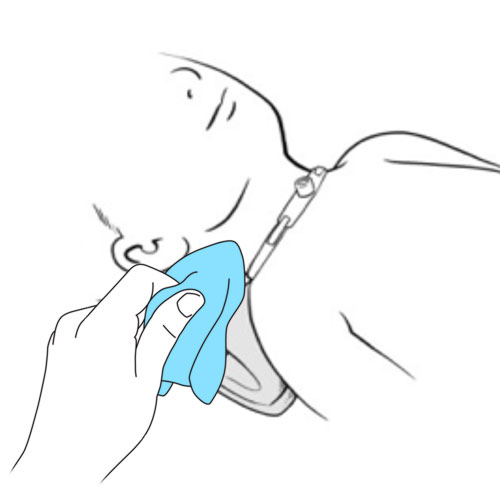
Step 10: Clean and dry the skin on the neck
|
- While the person helping you is keeping the tracheal cannula stable, wash the neck with a washcloth using tap water or a mild, non-perfumed, non-oily soap (eg, “Dove”).
- Clean all the folds of skin on the neck.
- Rinse with a clean washcloth.
- Make sure that the skin is completely dry before proceeding to the next step.
Why ? This step helps keep the skin in good condition.
Thorough drying of the skin prevents dampness that can cause irritation or an infection.
|
|
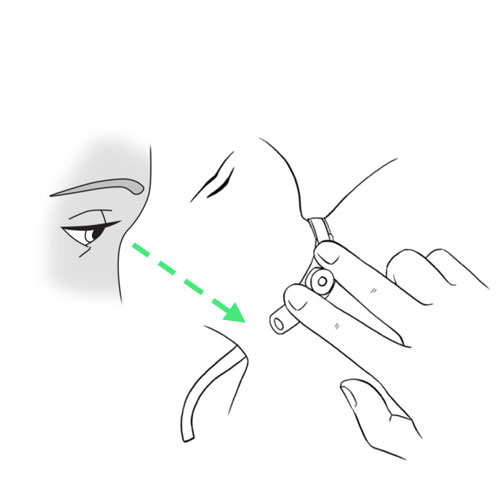
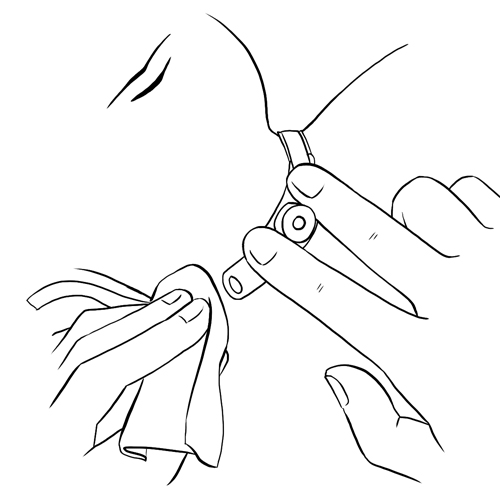
Step 11: Insert a new Velcro® band

|
- While the person helping you is keeping the tracheal cannula stable, insert one end of the new Velcro® band into the flange opening that is free, threading from back to front; use tweezers if necessary.
- Gently pull this end of the band while holding the flanges in place and preventing movement of the cannula.
- Apply the Velcro® onto the cushion fabric and press into place.
- Pass the band behind your child’s neck.
- Remove the other end of the soiled band from the flange opening.
- Put the soiled band aside.
- Insert the other end of the new Velcro® band into the second flange opening; use tweezers if necessary.
- Gently pull this end of the band while holding the flanges in place and adjust to the appropriate tightness.
- Apply the Velcro® onto the cushion fabric and press into place.
- Make sure that the Velcro® band holds the cannula in place securely.
Why ? This step allows for replacement of the Velcro® band while minimizing the risk of accidental decannulation.
|
|
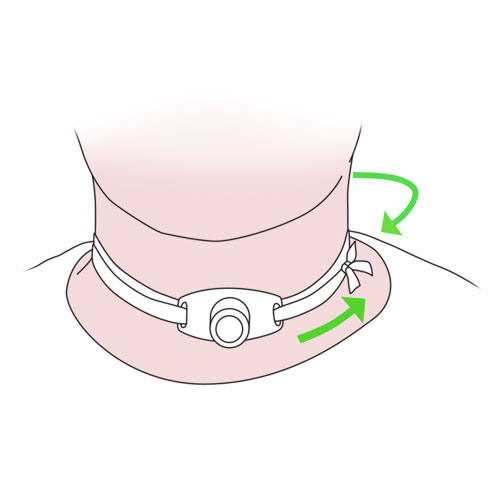
Step 12: Adjust the tension of the new Velcro® band
|
- If required, place a new dressing around the tracheostomy and under the tracheal cannula flanges.
- Verify the tension of the band by inserting the tip of a finger between the tracheostomy tie and the skin.
- Adjust, as needed, to ensure appropriate tension to secure the tracheal cannula.
- Check the tension and condition of the Velcro® band and the appearance of the skin under the band at least once a day.
Why ? A tracheostomy tie that is too tight can:
- cause irritation of the skin;
- can cause discomfort to your child when he cries, moves, laughs, eats;
- impede effective cough.
A tracheostomy tie that is too loose can:
- allow the tracheal cannula to move and possibly damage the trachea;
- cause accidental decannulation.
|
|
Step 13: Clean and store the soiled Velcro® band
|
- Wash the soiled Velcro® band in warm soapy water, rinse thoroughly and air dry flat.
- Store the clean Velcro® band in a cotton bag or in a clean, dry container with a lid to protect from dust and dirt.
Go to step 22.
Why ? Proper cleaning of the Velcro® band allows reuse.
The Velcro® band will degrade over time especially after washing with hot water; verify regularly that the Velcro® adheres securely to the fabric before using.
Rinsing the band thoroughly prevents any soap residue from irritating your child’s skin.
|
|
Step 14: Examine the skin of the neck under the soiled ribbons (if in place)

|
Some parents prefer examining, cleaning and drying the skin on the neck after having removed the soiled tracheostomy ties. In this case, refer to your child’s healthcare team for adjustments to this step and onwards.
If your child’s tracheal cannula is held in place with a single or double ribbons:
- Remove the tracheostomy dressing if in place.
- Slightly lift the ribbons to visualize the condition of the skin underneath.
- Examine the condition of the skin under the ribbons; the skin should have the same appearance as the rest of the neck.
- Verify the skin for redness, heat, swelling, irritation, small red pimples, small sores or bleeding. If any of these signs are present, contact your child’s healthcare team for recommendations appropriate to your child’s condition.
Why ? This step allows you to identify skin irritation, if present.
|
|
Step 15: Clean and dry the skin of the neck
|
- Wash the neck with a washcloth using tap water or a mild, non-oily, non-perfumed soap (eg, “Dove”).
- Clean all the folds of the skin on the neck.
- Rinse with a clean wash cloth.
- Make sure that the skin is completely dry before proceeding to the next step.
If your child’s tracheal cannula is held in place with a single ribbon, go directly to step 18.
If your child’s tracheal cannula is held in place with double ribbons, go directly to the next step.
Why ? This step allows you to examine the condition of the skin on the neck.
Thorough drying of the skin prevents dampness that can cause irritation or an infection.
|
|
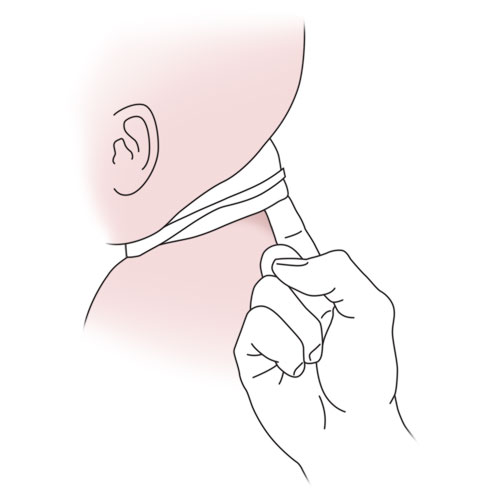
Step 16: Double ribbon technique: insert the new ribbons
|
- Leave the soiled ribbons in place.
- While the person helping you is keeping the tracheal cannula stable, slide the soiled ribbons to the top of the opening of the flanges to make room for the clean new ribbons.
- Below the soiled ribbons, insert the slanted end of the <span style="text-decoration: underline;">first new ribbon</span> into the opening of one flange and pull it upwards from the back.
- Insert the other end into the slit that was previously made in the new ribbon and pull the ribbon through to firmly attach to the flange.
- Pass the new ribbon around the back of the neck ready to be attached to the second ribbon.
- Repeat the same step for the second ribbon in the other flange.
- Use some tape to secure each ribbon near the flange as you were taught by your child’s healthcare team.
Why ? This step allows safe replacement of the tracheostomy ties.
Keeping the soiled ribbons in place decreases the risk of accidental decannulation.
Securing the ties near the flange helps to maintain the tracheal cannula in place.
|
|
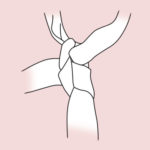
Step 17: Double ribbon technique: attach the new ribbons together

|
- While the person helping you is keeping the tracheal cannula stable, gently pull on the two new ribbons behind the child’s neck so that they are flat and snug.
- Make a first knot with the two new ribbons on the side of the neck making sure that the knot falls flatly on the skin.
- Change the position of the knot if it pushes on the neck each time you change the ribbons.
Go to step 20.
Why ? This step allows to stabilize and secure the tracheal cannula in place.
Changing the position of the knot prevents irritation of the skin around the neck.
|
|
Step 18: Single ribbon technique: insert the new ribbon
|
- Leave the soiled ribbon in place.
- While the person helping you is keeping the tracheal cannula stable, slide the soiled ribbon to the top of the opening of the flanges to make room for the clean ribbon.
- Insert the slanted end of the <span style="text-decoration: underline;">new ribbon</span> into the opening of one flange and pull it upwards from the back.
- Pull on the clean ribbon behind the neck to reach the other flange.
- Insert the other end into the opening of the other flange and pull it upwards from the back.
Why ? This step allows safe replacement of ribbon.
Keeping the soiled ribbon in place decreases the risk of accidental decannulation.
|
|
Step 19: Single ribbon technique: attach the new clean ribbon
|
- While the person helping you is keeping the tracheal cannula stable, gently pull on the two ends behind the child’s neck so that it is flat and snug.
- Make a first knot with the ends of the ribbon on the side of the neck making sure that the knot falls flatly on the skin.
- Change the position of the knot each time you change the tracheostomy ties.
Why ? This step allows to stabilize and secure the tracheal cannula in place.
Changing the position of the knot prevents irritation of the skin around the neck.
|
|
Step 20: Adjust the tension of the new ribbon
|
- If required, replace the dressing around the tracheostomy and under the tracheal cannula flanges.
- Tighten the knot enough for insertion of the tip of a finger between the tie and the neck.
- Adjust, as needed, to ensure appropriate tension to secure the tracheal cannula.
- Make a second knot.
- Cut any excess ribbon (tie) at 2.5 to 5 cms from the knots.
- Solidify the knot with tape.
- Check the tension and condition of the ribbon and the appearance of the skin under the ribbon at least once a day.
Why ? A tracheostomy tie that is too tight can:
- cause irritation of the skin,
- can cause discomfort to your child when he cries, moves, laughs, eats,
- impede effective cough.
A tracheostomy tie that is too loose can:
- allow the tracheal cannula to move and possibly damage the trachea,
- cause accidental decannulation.
Two knots prevent the sliding or the loosening of the tracheostomy ties.
|
|
Step 21: Remove the soiled ribbon
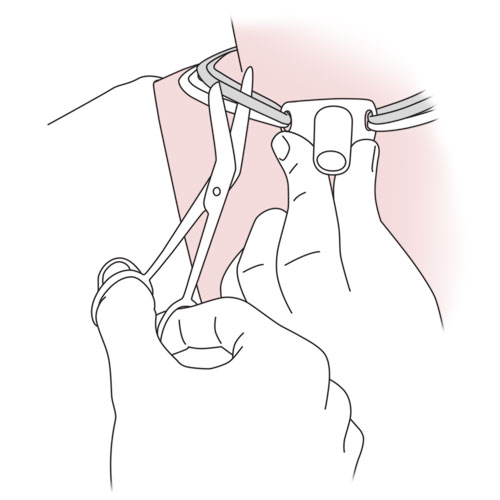
|
- While the person helping you is keeping the the tracheal cannula stable, cut the soiled ribbon with scissors being careful NOT to accidentally cut the new ribbons.
- If your child has a cuffed tracheal cannula, be careful NOT to cut the pilot balloon.
- Remove and discard the soiled ribbon.
Why ? This step finalizes the placement of the new ribbon.
The use of round-ended scissors to cut the soiled tracheostomy ties avoids injury to the skin around the neck of your child.
|
|
Step 22: Recovery

|
See the full description here
Summary:
The treatment is finished. Wash your hands again.
Be prepared to recognize the challenges faced and to provide positive feedback. Help your child recognize his/her strengths. Acknowledge the collaborative teamwork.
- Listen to what your child says about the parts of the procedure that were difficult or painful.
- Comfort your child and recognize your child’s collaboration with positive feedback.
- Highlight your child’s specific strengths that helped make the procedure positive.
- Discuss with your child what might be done the same or differently the next time the care is needed.
- Keep your promises if you have promised a reward, follow through.
- Reward yourself too.
|
|