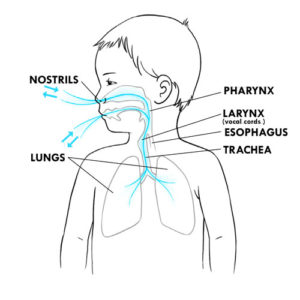
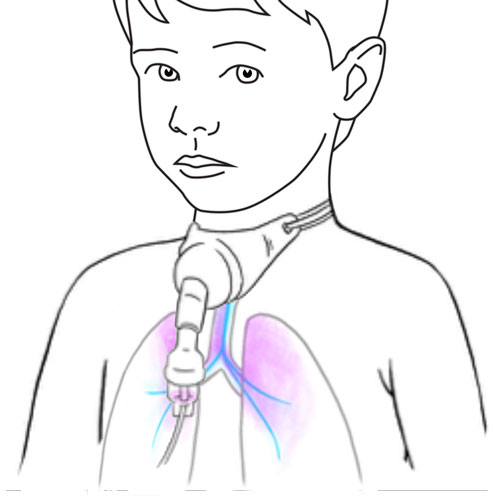
The air we breathe enters through the nose or the mouth, descends down the throat (pharynx) and is directed to the voicebox (larynx) where the vocal cords are located. Once past the vocal cords, the air descends down the trachea to the lungs.
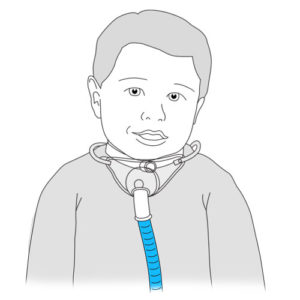
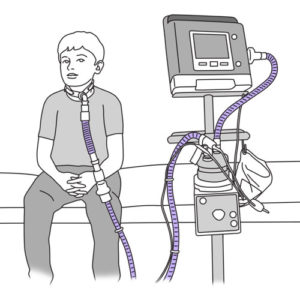
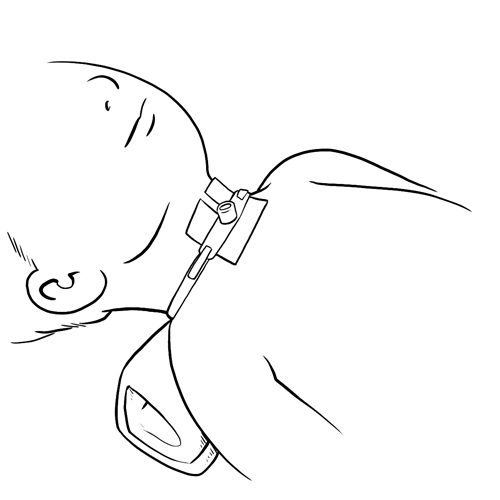
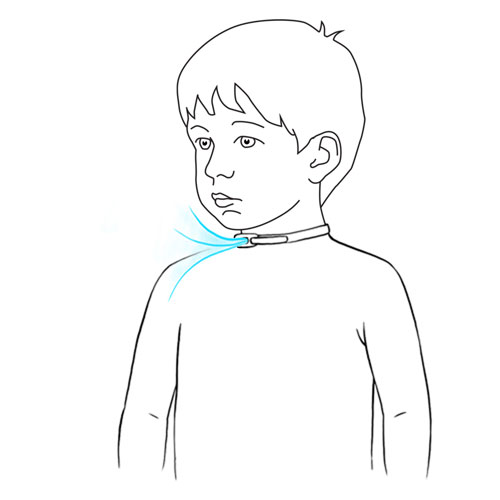
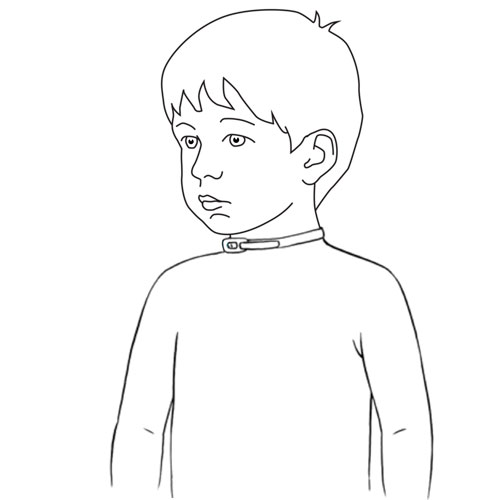
A tracheostomy is a small opening (surgical incision), made at the front of the neck and into the trachea, that allows air to go directly into the lungs rather than passing through the nose and mouth.
When we swallow, a small valve (epiglottis), blocks the trachea so that foods and liquids go towards the digestive system (esophagus and stomach) rather than into the lungs.
Certain medical conditions require that a tracheostomy be in place, for example to:
facilitate the passage of air: allows air to get to the lungs even in situations of partial or complete blockage of the upper airway,
facilitate the suctioning of secretions in children who are unable to cough and/or clear secretions effectively,
prevent foods, liquids and saliva from getting into the lungs (aspiration) and to prevent lung infections (pneumonia) caused by aspiration,
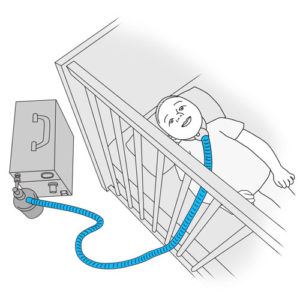
connect to a respirator for children that require this type of support.
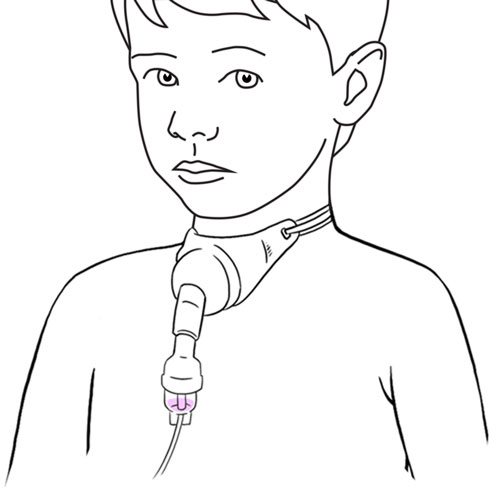
A small tube (tracheal cannula), is placed into the tracheostomy in order to keep it open (patent).
Depending on the child’s condition, the tracheostomy can be temporary or permanent.
How does it work?
Three different types of tracheal cannulas exist (ex: Bivona®, Shiley®, Portex®). The type of cannula selected depends upon the age, size and medical conditions of the child. Your child’s healthcare team will provide you with information regarding the type of tracheal cannula best suited to your child’s condition.
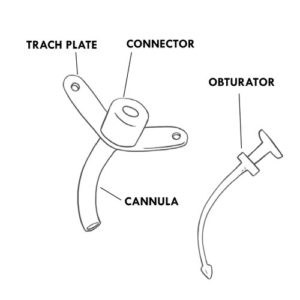
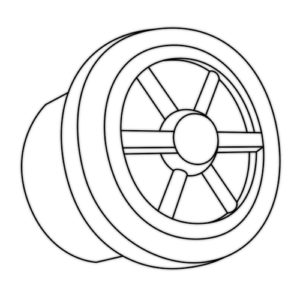
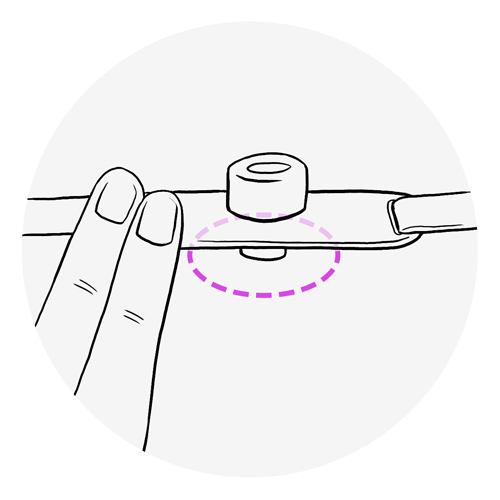
A simple tracheal cannula is most frequently recommended in children. It is composed of one single tube (cannula) that is inserted into the trachea.
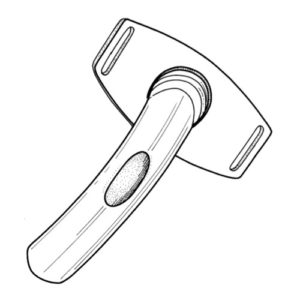
SIMPLE TRACHEAL CANNULA AND COMPONENTS
Body of the tracheal tube, commonly called “cannula”
Portion of the cannula inserted internally into the trachea and therefore invisible externally.
Helps to keep the tracheostomy open (patent).
Helps the passage of air in and out of the lungs and facilitates the suctioning of secretions.
Flanges or neck collar or trach plate
External, visible portion of the tracheal cannula that rests on the neck.
Openings on each side of the flanges are present to allow for insertion of ties (a Velcro® band or ribbons) that wrap around the back of the neck to hold the tracheal cannula in place.
Serves as a point of anchor on which to place the fingers and stabilize the cannula when providing care.
Connector
External, visible portion of the cannula.
Opening through which air can pass into the lungs.
Opening through which suction catheters can be inserted into the tracheal cannula.
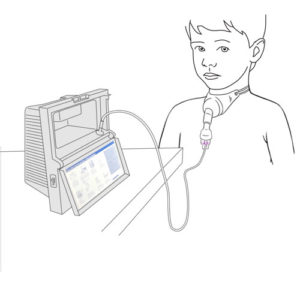
Permits the connection of the tracheal cannula to an artificial nose (heat and moisture exchanger), a speaking valve, a ventilatory bag and/or a respirator.
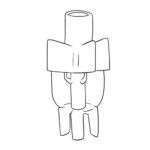
Obturator
Used when changing a tracheal cannula.
Serves as a guide during the introduction and proper placement of the tracheal cannula in the trachea.
The rounded tip allows for a smooth insertion and minimal irritation to the tracheal walls.
Must be removed immediately once the tracheal cannula is in place because it completely blocks the passage of air.
Other types of tracheal cannula’s can be used in children.
OTHER TYPES OF TRACHEAL CANNULAS
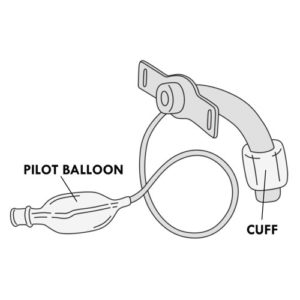
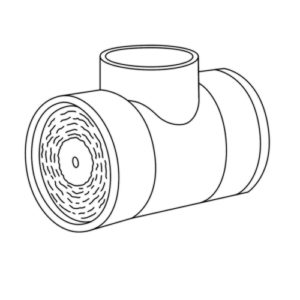
Cuffed cannula
This type of tracheal cannula includes a soft cuff (invisible on the outside) that goes completely around the end of the simple tracheal cannula or the outer cannula (see the two-piece cannula below). This cuff can be filled with air.
Included is a pilot balloon, visible on the outside, that indicates if the cuff is filled with air or not.
When the cuff is inflated with air, it creates a seal between the tracheal wall and the tracheal cannula, blocking (partially or completely) air from leaking through the mouth or the nose.
When the cuff is deflated, air escapes around the vocal cords allowing the child to speak and in some cases for the child to eat and drink more easily.
Cuffed cannulas are used mainly in children that require invasive ventilation or to prevent secretions from the nose and mouth from entering the lungs of children at risk for aspiration.
The pilot balloon allows you to know if the cuff is inflated or not and whether it is properly functioning.
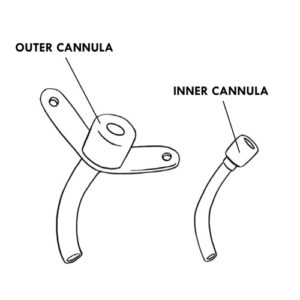
Two piece cannula: inner cannula and outer cannula
This larger type of cannula is used mainly in adolescents and adults.
Composed of an outer cannula (placed within the trachea) and an inner cannula (placed within the external cannula).
The inner cannula can be locked into the external cannula.
The inner cannula must be removed and cleaned (if reusable) or changed (if disposable), every day or according to your child’s healthcare team.
Fenestrated tracheal cannula
2 piece cannula where the external cannula has an opening (fenestration) that allows air to escape through the vocal cords.
The inner cannula may have a fenestration or not:
– the inner fenestrated cannula allows the child to speak;
– the inner non-fenestrated cannula allows suctioning of secretions and ventilation via a respirator.
Due to their larger size, fenestrated cannulas are rarely used in small children. They may be used in some adolescents.
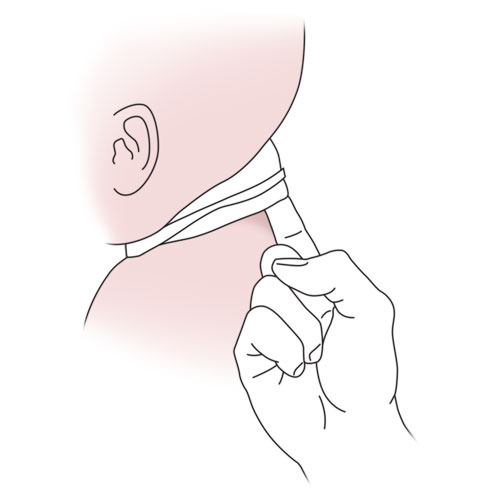
The tracheal cannula is held in place by tracheostomy ties (cotton ribbons or Velcro® band) that circle to the back of the neck.
Specific care must be provided to children with a tracheostomy:
Depending on your child’s condition, different types of equipment can be used to increase the level of ambient humidity in order to allow your child to make sounds or speak, to deliver solutions and medications to his tracheostomy or to manually assist his breathing.
ADDITIONAL EQUIPMENT
Artificial nose (orfilter exchangerorheat and moisture exchanger)
A device that serves to humidify, warm and filter the air inhaled by capturing the end portion of exhaled air that was humidified and warmed by the lungs.
Used in children whose condition permits.
Filters the air inhaled of any particles that may irritate the lungs.
Some artificial nose models connect to the tracheal cannula while others can be placed in the respirator circuit.
Can be used at any time but mainly used during the day to facilitate outings particularly in cold temperatures and in areas where there is a lot of dust.
Useful in protecting the tracheal cannula opening in certain situations (bathing or to protect against the aspiration of small objects).
Certain models allow connection to oxygen.
Not to be used with a heated humidifier or nebuliser as this may cause an over-accumulation of humidity which can cause breathing problems.
An artificial nose is not recommended for nighttime use in children who are on a ventilator; instead an integrated heated humidifier is recommended.
Must be discarded and replaced every day, or more often, when filled with secretions or water.
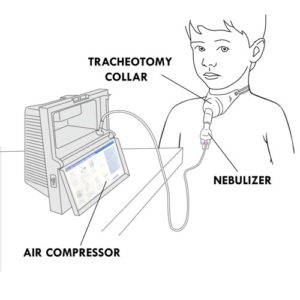
Tracheal collar
A device that serves to humidify inhaled air.
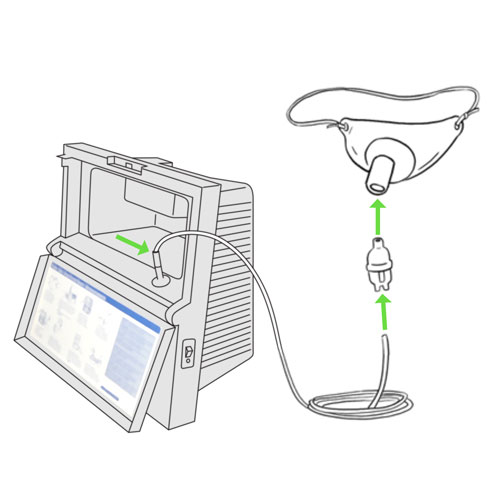
Connected to a large volume nebulizer and an air compressor.
Used primarily during naps and at night.
It can also be used to deliver medication or oxygen via a small volume nebulizer.
Installed over the tracheal cannula and attached around the neck.
Clean once a week (or more often if needed) with warm non-perfumed soapy water; rinse in warm tap water and let air dry completely before storing in a clean, closed container.
Replace the tracheal collar every three months or more often if required according to the manufacturer’s recommendations or your child’s healthcare team.
Air compressor for humidity delivery
A machine that allows for the delivery of humidity via a tracheal collar and aids in the prevention of mucus plugs.
Requires the use of demineralized water in order to avoid harmful calcium deposits that may accumulate when boiled water is used.
Since this equipment can limit your child’s movements, it is often used at night and during naps.
The equipment must be well maintained in order to avoid the growth of bacteria or mold. Follow the manufacturer’s recommendations or that of your child’s healthcare team.
Heated humidifier (orheated humidifier plate)
A device that is integrated into a ventilatory assistance device in order to deliver heated humidity.
Generates a higher humidity level than an artificial nose, and so is usually recommended at night, during naps and as much as possible during the day.
Can be used with a tracheal collar or a ventilatory interface.
Speaking valves (ex: Passy-Muir®, Shiley®)
A device that attaches to the tracheal cannula connector and helps the child to speak, while allowing the continuous passage of air.
Used in children whose condition permits.
The one way valve opens during inspiration (air taken in through the tracheostomy) and closes during expiration (air expelled out through the tracheostomy); this causes the exhaled air to be directed past the vocal cords so that the child can speak.
Increases the ability to swallow.
Improves the capacity to taste and to smell odors.
Remove the valve before providing all aerosol therapy treatments.
If a cuffed tracheal cannula is in place, the cuff must always be deflated before using a speaking valve.
Clean the valve every day with warm water and a mild non perfumed soap; rinse thoroughly with warm tap water and let air dry completely before storing in a clean, closed container.
Change the valve if it becomes sticky, noisy, has black residue or if it vibrates even when cleaned regularly.
Refer to the manufacturer’s recommendations for the duration of use. A well maintained speaking valve should last at least 2 months (Passy-Muir®) or 28 or 30 days (Shiley®).
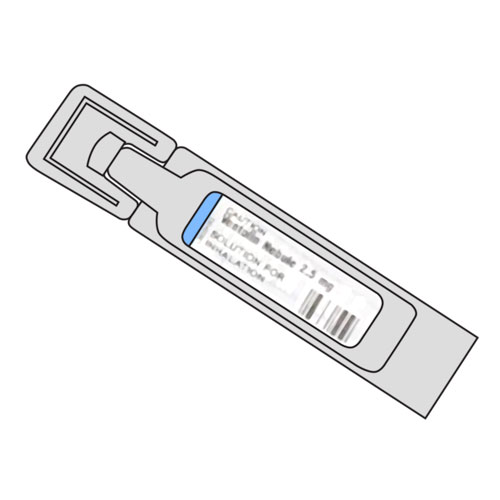
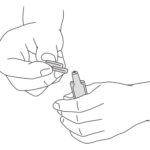
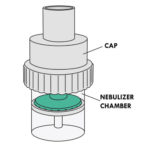
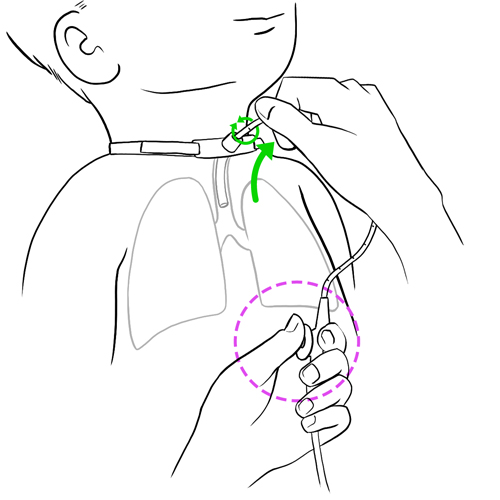
The nebulizer, when connected to an air compressor, aerosolizes medication so that it can easily be inhaled and reach the lungs.
The nebulizer is attached directly to the tracheal collar or a T piece added to the respiratory circuit that allows the child to inhale the medication.
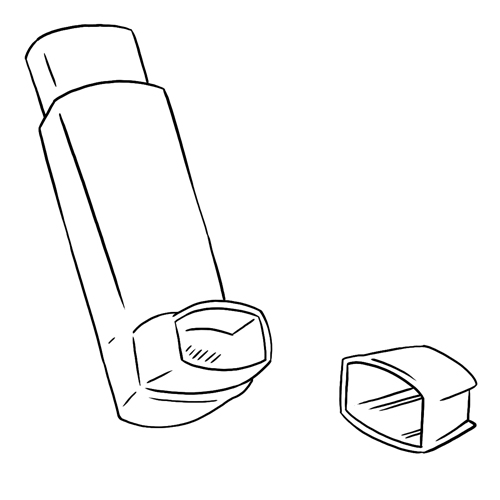
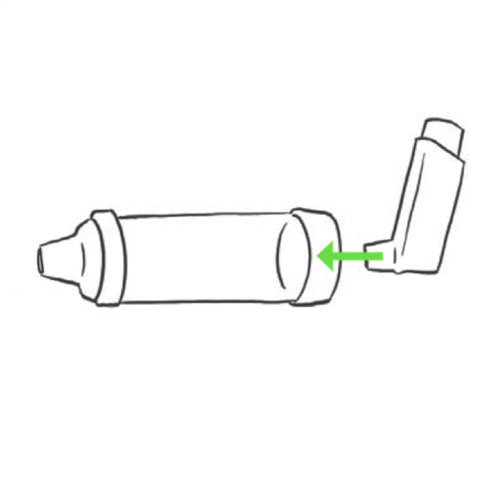
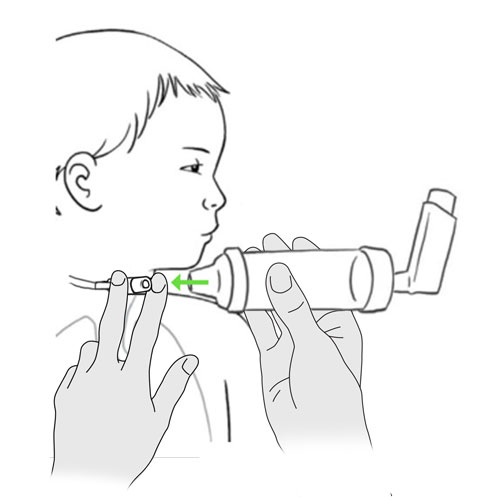
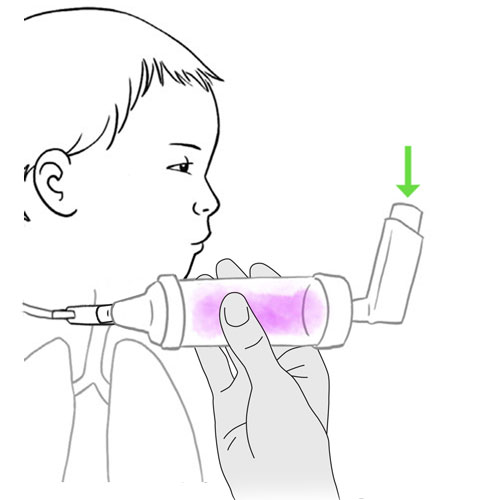
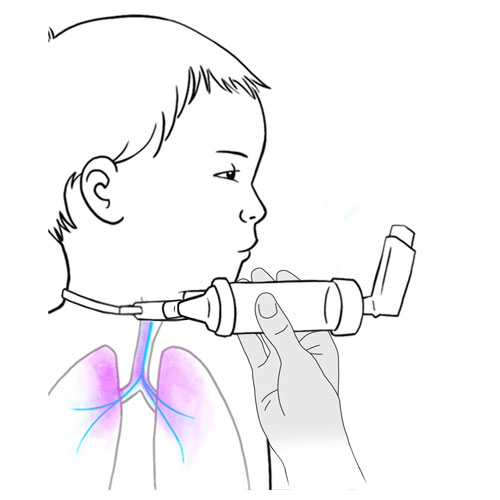
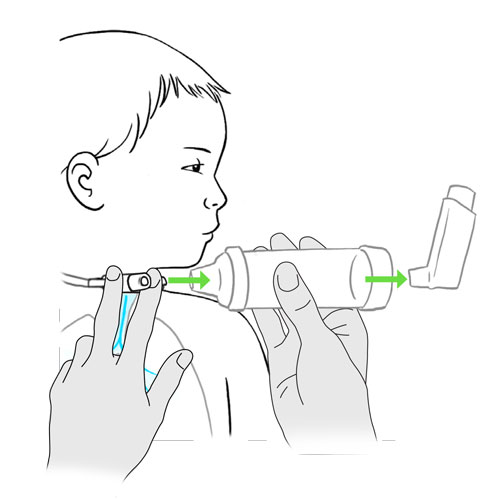
A metered dose inhaler is a device that delivers medication in the form of an aerosol; it delivers very small particles of medication to the lungs.
A metered dose inhaler is a metal cartridge inserted into a plastic casing; the medication is contained under pressure in the metal cartridge.
When the cartridge is pushed downwards, a puff of aerosolized medication is released.
The use of an in line air chamber, allows for the fine mist of particles (puff) to slow down and accumulate after the cartridge is pushed downwards, so that the aerosolized medication can then be inhaled in a more coordinated, controlled fashion at your child’s own pace.
Treatment with a metered dose inhaler can be delivered via the tracheal cannula connector or via an in-line ventilator circuit metered dose inhaler adapter.
The connection and disconnection of these medical devices to the tracheal cannula must be performed with care so as to avoid unnecessary pull or tension on the cannula itself.
With adequate observation and good daily care, breathing through a tracheostomy is comfortable and safe for your child. Do not hesitate to ask your child’s healthcare team any questions you may have regarding your child’s care needs.
FAQ – Tracheostomy
When to consult your healthcare team
General state of health
When your child has any of the following symptoms:
Fever (≥ 38⁰C rectal or ≥ 37.5⁰C oral or ≥ 37.5⁰C armpit).
General irritability, poor appetite, fatigue or wanting to sleep more than usual (lethargy).
Signs and/or symptoms of breathing difficulties:
Short of breath, trouble breathing or noisy breathing,
Breathes more quickly,
Chest pain,
Coughs more than usual or weaker cough,
Heart rate faster than usual,
Chest retraction and/or nasal flaring,
Oxygen saturation monitor indicates that your child has a decreased oxygen saturation compared to their normal values,
Purple or gray lips, tongue or fingertips (cyanosis),
Clammy skin\cold extremities,
Changes to behavior either fatigue or irritability,
More comfortable breathing when sitting up,
Extends their neck and head backwards to take in a breath.
Signs and/or symptoms of dehydration:
Decreased urination,
Increased thirst,
Dry lips and mouth,
Faster heart rate than usual.
Secretions
The secretions:
have different colour (yellow, green, pink or blood-tinged secretions) or contain blood.
are thicker.
are more than usual and need to be suctioned more frequently.
are foul smelling.
have presence of traces of food when suctioned.
are more during or after meals.
look like recently ingested liquids or foods.
Tracheal cannula
Insertion of a new cannula is difficult or impossible.
The cannula is partially or completely out.
Tracheostomy
Bleeding in or around the tracheostomy.
Water has entered the tracheostomy.
Skin around the tracheostomy is irritated.
Dressing is wet or soiled with blood.
The skin on the neck is irritated.
Feedings
Your child:
coughs or chokes often when eating.
has trouble eating or drinking.
has a poor appetite and refuses to eat.
vomits during or right after meals.
Your child’s healthcare team will take the opportunity during your child’s follow-up appointments to review your child’s care and equipment. Adjustments will be made as required.
Do not hesitate to refer to your child’s healthcare team for any questions or for specific advice related to your child’s condition.
WARNING: The information in this section is meant as a general guide for parents and caregivers with certain problems related to children with tracheostomy using a simple non-fenestrated, cuffless tracheal cannula. It is not intended to replace the recommendations of your child’s healthcare team.
Discuss your child’s unique needs with the healthcare team, including WHO and WHEN to contact when problems arise.
Fever with or without general malaise: ≥ 38⁰C rectal or ≥ 37.5⁰C buccal or ≥ 37.5⁰C armpit
Possible cause(s)
Infection at the tracheostomy site
Respiratory infection
Other infection
What to do?
Contact your healthcare team quickly.
General irritability, poor appetite, fatigue or wanting to sleep more than usual (lethargy)
Possible cause(s)
Change in baseline health of the child may indicate new infection or other problem
What to do?
Note any other changes or symptoms that your child may have.
Contact your healthcare team quickly.
One or more of these symptoms of breathing difficulties: shortness of breath, trouble breathing or noisy breathing; breathing more quickly; chest pain; coughing more than usual or has a weaker cough; faster heart rate than usual; chest retractions and/or nasal flaring; decreased oxygen saturation compared to their normal values; purple or gray lips, tongue or fingertips (cyanosis); clammy skin\cold extremities; changes to behavior either fatigue or irritability; more comfortable breathing when sitting up; extends their neck and head backwards to take in a breath
Possible cause(s)
Obstruction of the tracheal cannula by a foreign object or by secretions (mucus plug)
Accumulation of secretions or water in the artificial nose
Verify your child’s breathing to detect any signs of respiratory distress.
Inform your child’s healthcare team.
If the problem persists: Re-evaluate the cause of the obstruction.
If your child has difficulty breathing that is not related to the issues above:
Contact your child’s healthcare team immediately.
If your child has medications that have been previously prescribed for these symptoms (eg, Ventolin), administer them as prescribed or according to your child’s healthcare team.
One or more of these symptoms: decreased urination; increased thirst; dry lips and mouth; faster heart rate than usual; weight loss
Possible cause(s)
Dehydration
What to do?
Contact your healthcare team quickly.
Give oral rehydration solutions to your child (eg Pedialyte™, Gastrolyte™), if recommended by your healthcare team.
One or more of these symptoms: coughing more frequently - yellow, green, pink or blood tinged secretions - secretions are thicker - secretions are more than usual - secretions have a bad odor - labored breathing - breathing more quickly - chest pain - fever (≥ 38⁰C rectal or ≥ 37.5⁰C oral or ≥ 37.5⁰C underarm) - irritability - loss of energy - loss of appetite/refusal to eat
Resistance or impossibility of tracheal cannula reinsertion
Possible cause(s)
Spasm, irritation or inflammation of the trachea
Complete or partial obstruction of the trachea (eg, laryngospasm)
Incorrect positioning of your child’s head
Granulation tissue around the tracheal cannula site
What to do?
Do not force insertion of the cannula into the trachea.
Remain calm and reassure your child, he may still be able to breathe through his tracheostomy.
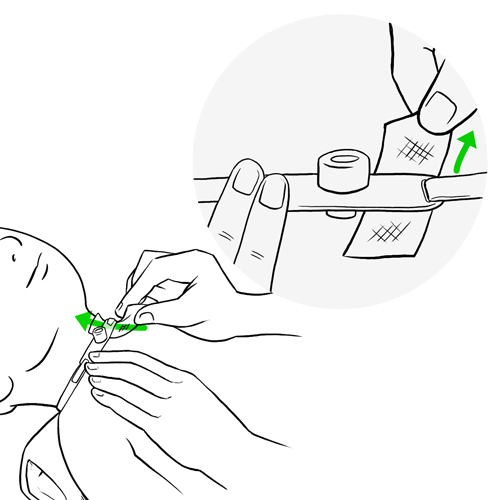
If the new cannula is partially inserted:
Hold the cannula in place and remove the obturator.
Allow your child to calm down and breathe through the cannula.
Reposition your child’s head so that it is slightly tilted backwards by replacing the rolled towel under the shoulders.
Try again to insert the rest of the cannula without forcing, as your child takes a breath in, while gently pulling on the neck skin just below the tracheostomy.
If you are able to insert the cannula completely, secure it with ties and immediately contact your child’s healthcare team to inform them of the situation.
If the cannula is impossible to insert:
Remove the cannula and lubricate it again.
Try re-inserting the cannula with the obturator in place.
If this does not work: Try again with a smaller size cannula with the obturator.
If this also does not work: Try again by replacing the obturator with a suction catheter to serve as an insertion guide.
Observe your child’s breathing to detect any signs of respiratory distress.
If you are able to insert the cannula completely, secure it with ties and immediately contact your child’s healthcare team to inform them of the situation.
If you are unable to insert the new cannula call 911 immediately.
While waiting for help, if your child is not breathing on his own, begin manual ventilation and CPR as instructed.
While waiting for help, if your child is breathing on his own through the tracheostomy and if you have been trained to do so by your child’s healthcare team:
Insert a suction catheter into the tracheostomy to maintain an open airway.
Hold on to the catheter so that it does not slide into the trachea.
Verify if your child is in respiratory distress.
If your child is in respiratory distress, remove the suction catheter and begin manual ventilation and CPR as instructed.
Accidential decannulation: cuffless tracheal cannula partially or completely out
Possible cause(s)
Accident
Incorrect manipulation of the cannula
Tracheostomy ties (ribbons or Velcro® band) are too loose or poorly secured around the neck
Excessive cough
What to do?
Remain calm and reassure your child, he may still be able to breathe through his tracheostomy.
If the cannula has come out partially:
Gently push it back down even if the conditions are not ideal.
Immediately contact your child’s healthcare team to inform them of the situation.
Once the cannula has been inserted, contact your child’s healthcare team to inform them of the situation.
If the cannula is impossible to insert:
Remove the cannula and lubricate it again.
Try re-inserting the cannula with the obturator in place.
If this does not work: Try again with a smaller size cannula with the obturator.
If this also does not work: Try again by replacing the obturator with a suction catheter to serve as an insertion guide.
Observe your child’s breathing to detect any signs of respiratory distress.
If you are able to insert the cannula completely: Secure it with ties and immediately contact your child’s healthcare team to inform them of the situation.
If you are unable to insert the new cannula: call 911 immediately.
While waiting for help, if your child is not breathing on his own: Begin manual ventilation and CPR as instructed.
While waiting for help, if your child is breathing on his own through the tracheostomyand if you have been trained to do so by your child’s healthcare team:
Insert a suction catheter into the tracheostomy to maintain an open airway.
Hold on to the catheter so that it does not slide into the trachea.
Verify if your child is in respiratory distress.
If your child is in respiratory distress, remove the suction catheter and begin manual ventilation and CPR as instructed.
Bleeding from inside the tracheostomy or around the tracheostomy
Possible cause(s)
Irritation of the trachea
Ulceration of the trachea
Granulation tissue around the tracheal cannula site
Observe your child’s breathing to detect any signs of respiratory distress.
Skin around the tracheostomy site irritated (redness, edema, itchiness, burns, bad odor, oozing, presence of red pimples, small sores or bleeding and/or tracheostomy dressing is wet and soiled)
Possible cause(s)
Infection
Dampness of the skin (from secretions, or a soiled tracheostomy dressing)
Use of products that irritate the skin
What to do?
The skin around the tracheostomy site should look the same as the skin on the rest of your child’s neck.
Keep the tracheostomy site clean and dry by increasing the frequency of cleaning around the tracheostomy and by changing the tracheostomy dressing.
There are many types of products that can be used to protect the skin such as foam dressings and liquid skin protectors; speak with your child’s healthcare team.
Contact your child’s healthcare team for more recommendations if the skin is irritated (eg, application of an antibiotic cream).
Skin around the neck irritated (redness, edema, itchiness, burns, bad odor, oozing, presence of red pimples, small sores or bleeding)
Possible cause(s)
Tracheostomy ties are too tight
What to do?
The space between the skin of your child’s neck and the tracheostomy ties (Velcro® or cotton ribbons) should be the thickness of the tip of a finger. Individuals with large fingers should use their small finger. This space can sometimes be reduced particularly when the child is overweight.
Verify the space between the neck and the tracheostomy tie and adjust, if needed.
Contact your child’s healthcare team for more recommendations regarding skin protection under the tracheostomy ties.
One or more of these symptoms: coughs and/or choking during meals - saliva more abundant than usual - secretions are more abundant after meals - secretions resemble the liquids or food that was recently ingested - traces of food are found during suctioning of tracheal secretions - eating difficulties or refusal to eat - vomiting during or right after a meal
Possible cause(s)
Dysphagia (difficulty in swallowing)
Gastric reflux (stomach contents rise up through esophagus)
What to do?
Stop feeding your child food and liquids immediately.
Observe your child’s breathing to detect any signs of respiratory distress.
Rapidly contact your child’s healthcare team.
Do not hesitate to refer to your child’s healthcare team for any questions or for specific advice related to your child’s condition.
Everyday tips
Clothing
To maintain safe and easy breathing, your child’s clothes must not cover the tracheostomy. Clothing that allows easy access to the tracheal cannula should be used (eg, V-neck, button down shirts, sweaters and low cut round necked pyjamas).
Do not use bibs that attach with ribbons because they may get tangled up with the tracheal cannula ties.
Avoid clothing in fluffy fabrics or fabrics with ornaments or fibers that may become dislodged and enter the tracheal cannula (eg, small sequins or beads).
Do not put any kind of necklaces around your child’s neck.
Mittens used on babies and very small children can prevent them from accidentally pulling on the tracheal cannula.
Outings:
The use of an artificial nose, a respirator, or other types of protection (a thin scarf or cotton bib) prevents insects or other particles swept up by the wind, from penetrating into the tracheal cannula.
Avoid using plastic bibs to cover the tracheostomy because they may block the entry of air.
Winter/cold weather outings:
In some children, breathing cold air causes narrowing of the airways (bronchospasm) which makes it harder for the child to breathe. If your child is very sensitive to cold air, minimize the time spent outdoors during the coldest times of the year.
If an outing is necessary, keep your infant’s head and neck wrapped loosely in a blanket.
If your child is older, place a scarf loosely around the neck.
Leave the top coat buttons open so that the tracheostomy site is readily accessible.
Bathing and swimming
Always keep the tracheostomy site dry and clean, making sure that no water penetrates the tracheostomy.
Clean the skin surrounding the tracheostomy with warm sterile or boiled cooled water.
You can used a mild, non-perfumed, non-oily soap (eg, “Dove”), if recommended by your child’s healthcare team.
Never use:
perfumed products with additives (they can irritate and damage the skin surrounding the tracheostomy),
antibacterial soaps, antiseptics or disinfectants (they decrease the skin’s natural protection barrier against infection),
bar soaps (they leave a residue on the skin which may be irritating),
baby wipes, baby oil, powder, balm or lotion.
Use cotton tips (Q-tips®) or clean compresses dampened with the warm solution recommended by your child’s healthcare team.
To remove any encrusted secretions stuck around the tracheostomy site:
Clean the skin with a 3% hydrogen peroxide solution diluted half/half with sterile or boiled water.
Immediately rinse with a clean compress or cotton tip (Q-tip®) dampened with sterile or boiled water; thoroughly dry the skin.
If any redness or bleeding occurs, stop using the hydrogen peroxide solution and consult your child’s healthcare team.
Bathing:
It is much safer to give infants sponge baths.
You may bathe older babies in a bathtub using a small amount of water; place a non-slip pad at the bottom of the basin to prevent your child from slipping and water from entering the tracheostomy.
Keep a towel close at hand to sponge up any water that may be splashed in and around the neck and tracheostomy.
Never leave your child unattended in a bath until your child clearly demonstrates the capacity to reliably keep water from entering his tracheostomy. If water accidentally enters the tracheostomy, suctionthe tracheostomy immediately to prevent infection.
If your child has trouble staying in a seated position, use a non-slip pad or a small bath chair.
The use of an artificial nose or a cotton bib can prevent water that is splashed from entering the tracheostomy. Tip: Avoid using plastic bibs because they can accidentally block the passage of air to the tracheostomy.
Change the cotton ribbons or Velcro® bands, if wet, after the bath.
A shower is not recommended except in older children who can take the necessary precautions to prevent water from entering the tracheostomy (ex, direct the water jet away from the neck area, wear a shower tracheostomy protector); discuss options with your child’s healthcare team.
Washing of the hair:
Consider having another adult available to help you with this task, especially if your child is very active.
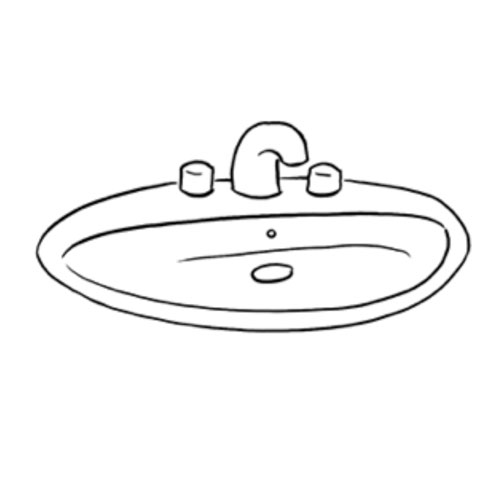
Lay your child down on his back on top of a sink or a hair basin designed for use in a bed.
If your child can collaborate, sit him in the bath with his head tilted backwards.
Carefully pour water on his head using a small container, making sure to prevent water from entering his tracheal cannula. If water accidentally enters the tracheostomy, suctionthe tracheostomy immediately to prevent infection.
Always rinse the hair with extreme caution.
Mouth care:
Your child’s mouth should be cleaned at least twice a day.
If your child has no teeth, use a small face cloth or a gauze dampened with water and rolled around your index finger, to gently rub your child’s gums front to back.
Once teeth start to appear, brush your child’s teeth after each meal and at bedtime. Since young children have a tendency to swallow toothpaste instead of spitting it out, use only the size of a small grain of rice in children under 2 years old and the size of a small pea in children up to 6 years old. Use this time to also gently massage their gums with the toothbrush.
As your child matures, teach and supervise brushing of the teeth.
Have your child rinse their mouth with warm water or use a low alcohol content mouthwash if recommended by your child’s healthcare team
Apply, if required, a hydrating lip balm.
Nasal hygiene:
In all children, secretions, along with bacteria and viruses collect in the nose. Keeping your child’s nose clean helps prevent lung infections.
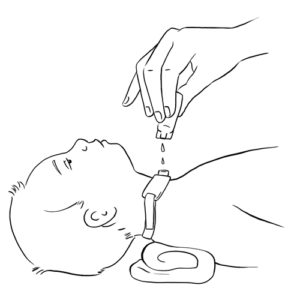
In infants and children who are unable to blow their noses, saline drops are often used to clean the nose.
Refer to your child’s healthcare team for the technique and the frequency of nasal care recommended for your child, including the procedure for the preparation of homemade saline solution and safe storage.
Swimming:
Aquatic sports and swimming are not recommended.
Sleeping
Use pillows cases, sheets, and blankets made of washable synthetic material (hypo-allergenic).
Sheets that are very soft and fluffy with fibers (eg, flannel sheets) are not recommended: they attract dust and may shed fibers that can enter your child’s tracheal cannula.
Make sure that the relative humidity in your child’s room is at an adequate level; this prevents the airway from drying out and becoming irritated.
Nutrition and hydration
A child with a tracheostomy should always be supervised when eating or drinking by a person trained in emergency CPR measures. Discuss these measures with your child’s healthcare team.
If required, always suction your child’s secretions before meals. If you suction after a meal, coughing may cause your child to vomit.
A cloth bib is useful to prevent liquids from accidentally entering your child’s tracheostomy. Avoid plastic bibs that may accidentally block the passage of air through your child’s tracheostomy.
Certain children may have difficulty swallowing and may aspirate food and liquids into their trachea instead of normal passage of food through the esophagus to the stomach. To minimize the risk of aspiration:
verify your child’s capacity to safely drink and eat with your child’s healthcare team,
never leave your child unsupervised during meals,
never leave your infant alone with a baby bottle, even if your child is capable of holding the bottle,
if possible, place your child in an upright, sitting position when eating and drinking,
instruct your child to eat and drink slowly,
avoid using straws,
ask your child to chew his food well before swallowing,
if needed, provide small meals more frequently,
if your child chokes, coughs or seems to have difficulty breathing while eating or drinking, stop feeding and contact your child’s healthcare team for further recommendations.
Be aware that young children can mistakenly put food in their tracheostomy instead of their mouths, especially when they are beginning to learn to eat finger foods.
Avoid foods that are small in size (eg, nuts, candies) as these are a choking hazard. Wearing a bib cover is a good way to prevent your child from introducing food into the tracheal cannula.
Because a child with a tracheostomy does not breathe through their nose, they often have a diminished sense of smell and taste. Their appetite and interest in food may therefore be altered. Discuss with your child’s healthcare team.
Burp your infant regularly during drinking to avoid regurgitation which can increase the risk of tracheal aspiration. Position your infant on the side after meals.
Dehydration can cause your child’s secretions to become thicker and more difficult to clear. To avoid dehydration, ensure adequate fluid intake daily, especially during warmer weather and when your child is more physically active (eg, playing sports). Increase your child’s fluid intake when your child is ill, has fever, diarrhea or vomiting. Talk to your child’s healthcare team for specific recommendations.
Confirm the recommended daily amounts of fluids and nutrition for your child with your child’s healthcare team.
Advise your child’s healthcare team if these feeding difficulties are present:
difficulty or refusal to eat,
presence of food in the secretions coming from the tracheostomy,
coughing or frequent episodes of choking during meals,
vomiting during or immediately following meals,
excessive drooling or difficulty in swallowing saliva,
excessive quantity of secretions during or after meals,
secretions that resemble the liquids or food that were recently consumed,
weight loss or no weight gain.
Activities
Your child can participate in most regular activities as long as certain safety issues are respected. Discuss with your child’s healthcare team.
Always supervise young children during play.
Place your child in the most comfortable position to facilitate breathing, according to your child’s condition.
To protect your child’s tracheostomy and airway, the following activities should be avoided:
contact sports,
swimming,
playing with small toys or objects that can easily get lodged in the tracheal cannula,
playing with objects that easily break up into small fragments (eg, fuzzy toys) or that emit dust (eg, chalk, aerosolized paints),
playing in sand or crawling on dirty floors,
playing with latex balloons; small bits of the plastic from burst balloons are a choking hazard,
playing in close contact with a household pet; medical equipment and devices may be damaged or soiled (chewing, piercing of tubing with claws, etc),
playing with, pulling or removing the tracheostomy ties; explain to your child and your child’s playmates that the tracheostomy is not a toy.
Travel and transportation
Always have on hand a “travel kit” when leaving your home containing at least:
Emergency material:
a replacement cannula the same size as the one in use
a tracheal cannula one size smaller than the one in use
one obturator the same size as the cannula in use and one smaller than the cannula in use
a water soluble lubricant
an inner cannula, if your child has a 2 piece cannula
tracheal cannula ties (Velcro® band or cotton ribbons)
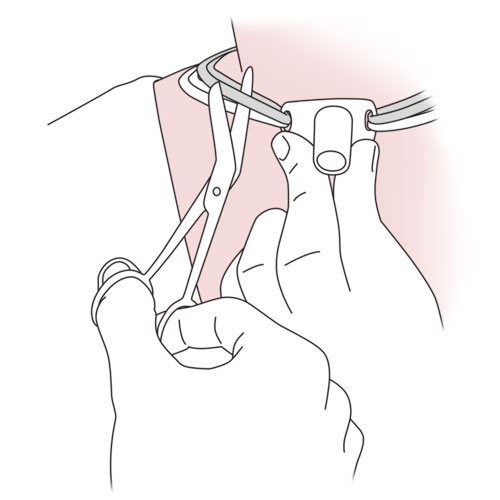
scissors with rounded tips (if during an emergency, the ties or Velcro® band needs to be cut)
suction catheters
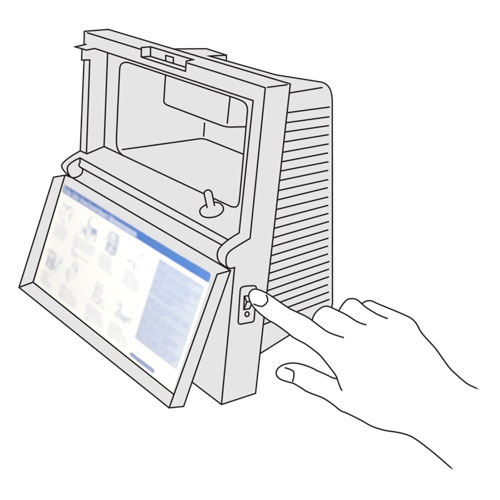
a fully charged portable suction device with connecting tubing and power cable
an extra connecting tube in the event that the one previously used becomes too saturated with secretions
a manual mouth suction catheter with mucus trap in the event that a suction device is not available
a ventilatory bag with a tracheostomy adapter
non sterile gloves (if you cannot wash your hands or if you have cuts)
Material required for daily care outside the home:
– tracheostomy compresses
– cotton tips
– saline solution if needed
– half and half water/hydrogen peroxide solution
– boiled cooled water
– scarf (in case of wind and cold weather to protect the tracheostomy)
– artificial nose
– humidity device for naps or sleeping overnight (for long term outings)
– respirator, if required
– extra batteries, if required (respirator, suction device)
– appropriate electric cables required
– oxygen cylinders, cylinder key, oxygen tubing, if required
– oxygen conserving device with extra batteries, if required
– second respiratory circuit, if required
– products required for the cleaning of medical equipment (depending on the duration of the outing or trip)
Have a list on hand of the contents of this kit so it can be easily restocked. Confirm with your healthcare team how often you should verify supply and status, including expiry dates, of equipment, materials, medications and solution.
Keep a resource list close at hand with the names and telephone numbers of hospital, doctors, other members of your child’s healthcare team and equipment providers. Make sure you know how to contact these resources outside of regular hours and during vacations.
During the winter months, always heat up the car interior before placing your child in the vehicle.
Before leaving on a trip:
make sure you have a document from the healthcare team describing your child’s condition and tracheostomy care needs and a complete list of medication,
bring enough supplies to last for the duration of the trip and add a bit extra as a reserve,
make sure to ask if equipment providers and other resources are available in the event of equipment failure or other healthcare needs,
take the climate of your destination into consideration because the relative humidity of the ambient air could modify the quantity and the consistency of your child’s secretions.
For travel by airplane:
contact the airline company to inquire about their policy concerning the transport of medical equipment,
keep all medical equipment, supplies and medication with you in the cabin.
Others
Cardio Pulmonary Resuscitation (CPR): make sure that you and all persons responsible for your child’s care are trained. Consult your child’s healthcare team regarding referral to pertinent resources and the frequency of training renewal required.
Emergencies:
All caregivers should be knowledgable and skilled in trachestomy care including suctioning, emergency cannula removal and replacement.
Always have a telephone nearby in case of an emergency. Make sure your cell phone is charged at all times. When you go out, bring what you need to charge the phone, when necessary (cable with charger and portable Power Bank charger).
Make sure that the company providing your home electricity is aware that a child with special (medical) needs resides in the home.
Also inform your local fire station.
Always keep emergency equipment required close at hand. This equipment must always be in your child’s room (eg, at his bedside) and brought along with your child to EVERY outing:
a replacement cannula the same size as the one in use
a tracheal cannula one size smaller than the one in use
one obturator the same size as the cannula in use and one smaller than the cannula in use
a water soluble lubricant
an inner cannula, if your child has a 2 piece cannula
tracheal cannula ties (Velcro® band or cotton ribbons)
scissors with rounded ends (if during an emergency, the ties or Velcro® band needs to be cut)
suction catheters
a fully charged portable suction device with connecting tubing and power cable
an extra connecting tube in the event that the one previously used becomes too saturated with secretions
a manual mouth suction catheter with mucus trap in the event that a suction device is not available
a self-inflating manual resuscitator with a tracheal cannula connector.
Discuss with your child’s healthcare team whether your child requires monitoring by a trained and competent individual capable of intervening, as needed; during the day, night or at all times.
With your child’s healthcare team, determine if a medical alert bracelet (eg, MedicAlert bracelet) containing key medical information such as is recommended.
Humidity:
The air that enters the nose and passes through the throat (pharynx) is naturally filtered, heated and humidified before reaching the lungs. Since your child breathes through a tracheostomy, and these natural processes are bypassed, dry, cold, non-filtered air inhaled directly through the trachea to the lungs can cause irriation, couth, mucus plugs and thick, sticky secretions. Without proper humidification of the air your child breathes, secretions are more difficult to clear, increasing the risk of blocked airways and increasing the risk of lung infection.
Avoid overheating the home in the winter and using an air conditioner in the summer to prevent excessively dry air.
The recommended relative humidity in the home, measured with a hygrometer, should be between 40 to 50%.
If your home air is too humid (55% and more), install a dehumidifier and clean it every week in order to prevent the presence of mold in the air that your child breathes.
If your home air is too dry (less than 40%), the following daily habits can help increase the moisture in your home:
do not activate the exhaust fan when you cook or boil water,
avoid using an air conditioner in the summer,
keep the bathroom door open when you shower,
minimize the use of electric heaters, wood burning stoves and fireplaces during the winter,
eliminate carpeting and rugs in the home.
During the day, extra humidity is generally not required unless the air in your house is very dry, in which case a portable humidifier filled with tap water can be used in the day, during naps and overnight. You must change the water and clean the humidifier regularly according to the manufacturer’s recommendations to prevent the proliferation of bacteria and mold in the air that your child breathes.
The use of an artificial nose promotes inspiration of more humidified air and can be beneficial in some children with a tracheostomy, day or night.
Delivery of humidity directly to the tracheostomy is possible by using a tracheal collar connected to a nebuliser powered by an air compressor. Since the equipment can limit the child’s movement, it is preferable to use it at night and during naps. This equipment must be well maintained and cleaned in order to prevent the proliferation of bacteria and mold that could cause your child to develop a lung infection. Refer to your child’s healthcare team and to the manufacturer’s recommendations regarding the frequency and the methods of cleaning the equipment.
With your child’s healthcare team, discuss ways in which the level of humidity can be optimised in the air your child breathes for comfort and to aid in secretion mobilisation and clearance.
Air quality:
Air filtration protects the lungs from dust and other impurities.
The air that enters the nose and passes through the throat (pharnyx) is naturally filtered, heated and humidified before reaching the lungs. Since the air that your child breathes goes directly to the lungs without being filtered, dust and other particles in the air can easily irritate your child’s lungs and affect breathing.
Avoid all exposure to traditional or electronic cigarette smoke or vapour, especially at home.
Clean and regularly change filters on air conditioners.
In your child’s proximity, avoid:
use of products containing powder (eg, cleaning products, deodorants) or in aerosol form (eg, air fresheners, room fragrances),
presence of chemical products (eg, bleach, ammonia) or substances that give off strong odors (eg, paint remover, paint, nail polish, perfume).
To prevent irritating particles from entering your child’s airways, avoid areas where there is:
accumulation of dust, presence of rugs, upholstered furniture and home accessories that are difficult to clean (eg, heavy drapery),
dust from renovations,
wood burning heating systems (stove or fireplace),
excessive pollution (eg, smog, heavy traffic, strong winds),
pets that shed fur or feathers (pieces can enter the tracheal cannula),
insects, leaves, etc.
In your child’s room:
Avoid the presence of toys and stuffed animals in your child’s bed.
Use pillows cases, sheets, and blankets made of washable synthetic material (hypo-allergenic).
Sheets that are very soft and fluffy with fibres (eg, flannel sheets) are not recommended: they attract dust and may release fine fibres that can enter your child’s tracheal cannula.
Wash bedding in hot water every week in order to destroy dust mites.
Dry bedding in a dryer if your child is allergic to pollen.
Contact your child’s healthcare team for other suggestions regarding protecting and filtering the air your child breathes via tracheostomy (eg, using a scarf, artificial nose, etc).
Prevention of infections:
A tracheostomy is an open door for entry of bacteria that may be present in the environment. Since the air that your child breathes bypasses the natural protective structures such as the nose, mouth and pharynx, the risk of your child contracting a lung infection is increased. It is important that you do everything possible to reduce this risk like controlling the humidity, the temperature and the quality of air that your child breathes.
Always wash your hands before providing care to your child and have your child wash his hands before and after all meals and frequently during the day.
Prevention of respiratory infections:
If you have a cold, the flu or another respiratory infection, use non sterile gloves and wear a mask when providing care to your child.
Avoid exposing your child to anyone that has a cold, the flu or other respiratory infection with or without a cough.
In accordance with your child’s healthcare team’s recommendations and depending on your child’s condition, avoid high traffic areas (eg, shopping centres, daycares) to reduce the risk of exposure to bacteria and viruses.
The annual flu vaccine and vaccines which provide protection for pneumonia are also good prevention methods for the child and family members; discuss this with the healthcare team.
Disinfection of working surfaces:
Table and counter tops used as working surfaces during the care of your child must be disinfected before each procedure.
Here are some solutions recommended for disinfection of working surfaces:
rubbing alcohol 70%,
household chlorine bleach diluted ½ tsp bleach (the less concentrated) in 1 cup of tap water,
acetic acid household white vinegar diluted to a 1.25% solution: mix 1/3 cup of vinegar 5% with 1 cup of tap water,
other home cleaning products (check with your child’s healthcare team for specific products).
Do not use sprays because the aerosol particles dispersed in the air can affect your child’s breathing.
Rinse and dry all surfaces thoroughly before using.
If you decide to use a clean towel for the workspace, make sure to regularly clean all working surfaces at least once a week.
Maintenance and cleaning of medical supplies and equipment:
Equipment should generally be cleaned once per week or more frequently if soiled.
Clean according to the manufacturer or your healthcare team’s recommendations specific to your child’s condition, comfort, safety, and environment.
Below is a suggested method that can serve as a guide:
Prepare the sink: wash it, disinfect it with bleach and then rinse thoroughly with running tap water or use a large dishwater bowl reserved only for the cleaning of your child’s medical equipment.
Disassemble all the equipment (according to the manufacturer’s recommendations) so that all the parts can be cleaned thoroughly.
Rinse all the parts under warm tap water so as to remove any debris (eg, secretions, blood).
Soak all parts in a sink or in a dishwashing bin filled with warm water and non-perfumed, non-antibacterial dish soap (eg, Sunlight), for 10 to 15 minutes.
Follow the manufacturer recommendations for the soaking of certain parts, if required.
Never use bleach, alcohol or non-diluted hydrogen peroxide to clean equipment; these products may damage the equipment.
If needed, brush the interior and exterior of the parts that remain soiled with a soft baby bottle brush.
Rinse all parts with warm/hot water. Tip: Hot water may damage certain equipment.
Allow all parts to dry on a clean towel placing them in such a fashion that will allow water to drain away from them.
Reassemble all components once thoroughly dry.
Store the equipment that is not in use in a bag used only for this purpose (eg, cotton pillowcase) or in a clean container with a lid that will protect the equipment from dust and dirt, according to your child’s healthcare team recommendations.
Communication:
Sounds and voice are products of the passage of air coming from the lungs as it passes through the larynx where the vocal cords are found. Since a tracheostomy is just below the vocal cords, your child exhales the air from his lungs without it passing through the vocal cords.
The capacity of a child with tracheostomy to produce sounds will vary depending on the child’s condition. It is therefore possible that your child may be unable to speak, make sounds or cry.
Learn to observe your child’s non verbal behaviors and facial expressions to better understand what your child is trying to communicate.
Depending upon the abilities and capacities of your child, alternate forms of communication may be used, including: hand signals, symbols on a card or screen, communication board, writing, sign language, etc. A speech-language specialist can help identify the methods that suit your child best.
During your child’s naps or at night, different methods of communication can be used to alert you rapidly to a problem:
a bell attached to your child’s foot or wrist can tell you that your child is moving (if young and not independent),
an infant monitor, with or without a camera, at the bedside,
a bell next to the bed, if your child is capable of activating it independently.
Depending on the underlying medical condition, some children may benefit from a type of tracheal cannula or equipment that will allow them to make sounds or speak:
a smaller size cannula in younger children that allows leakage of air around the vocal cords when the child exhales.
Communication with your child is essential; discuss the best strategies to optimize your child’s language skills and capacities with the healthcare team.
Daycare and school:
Your child’s healthcare team will evaluate your child’s needs and will support you in the planning of integration to daycare or to school.
Advise school staff of the treatment and care that your child requires.
Living with a tracheostomy: As with other types of complex care, living with a tracheostomy is an adjustment for both the child and the family. Review the topics in Prepare your child, Prepare yourself and Prepare your home for many more suggestions to help you, your child and your family cope and thrive.
Methods of care
Methods of care : Tracheostomy skin care, changing the tracheostomy dressing, changing the inner cannula of a tracheostomy (if present)
Indications
Since the tracheal cannula flanges rest directly on the skin, humidity and secretions can accumulate behind them. Skin that is constantly damp can be easily irritated and become less resistant to infection. In order to prevent irritation of the skin causing discomfort and possible infection, it is very important that the skin around the tracheostomy and the skin under the tracheostomy ties (Velcro®, cotton ribbons), be cleaned and dried regularly.
The 2 piece tracheal cannula, used primarily in adolescents and adults, is composed of an inner cannula that fits into the outer cannula. Once locked into the tracheal cannula, the inner cannula stays in place but it must be changed and cleaned (if reusable) or changed (if disposable).
The placement of a dressing helps protect the skin against irritation, by preventing the rubbing of the tracheal cannula flanges directly against the skin and by absorbing dampness and excess secretions.
Below is a suggested method that can serve as a guide; discuss the specific type of medical supplies and equipment used for your child with the healthcare team.
Considerations:
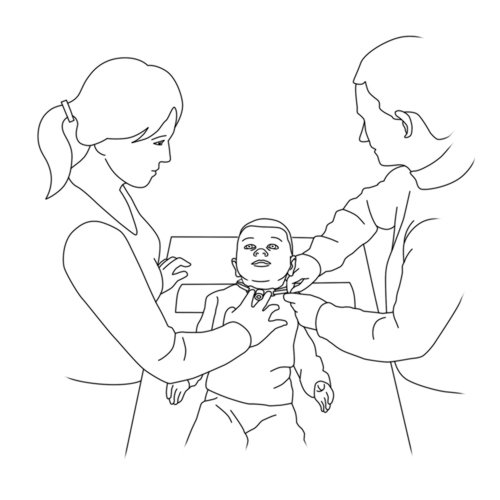
Another adult should always be present when you provide tracheostomy care in order to assist in the event of an emergency.
It is recommended to wash the skin around the tracheostomy with warm, sterile or boiled cooled water. Use a mild, oil and perfume free soap (eg, Dove), if recommended by your child’s healthcare team.
Never use:
perfumed products with additives (they can irritate and damage the skin surrounding the tracheostomy),
antibacterial soaps, antiseptics or disinfectants (they decrease the skin’s natural protection barrier against infection),
bar soaps (they leave a residue on the skin which may be irritating),
baby wipes, baby oil, powder, balm or lotion.
Encrusted secretions around the tracheostomy can be dislodged with a diluted 1.5% hydrogen peroxide solution.
Never use spray-on skin protectors near the tracheal cannula, the aerosolized particles may accidentally enter the tracheostomy.
Good handwashing is essential before and after providing care.
To prevent irritation and infection, the skin around the tracheostomy must be cleaned 1 to 2 times a day and as needed.
Cleaning must be done more often if the skin is red, sensitive, has a foul odour or if secretions are seeping out around the tracheostomy.
If your child is on a respirator, he/she may need more frequent cleaning of the skin around the tracheostomy.
If a tracheostomy dressing is used, it must be changed after each cleaning procedure or when it becomes wet or soiled.
Cleaning of the reusable inner cannula or the replacement of a disposable inner cannula, must be done 1 to 2 times a day or more often, depending on the recommendations made by the healthcare team.
Required materials
Cleaning/soaking solution: boiled cooled water (homemade sterile water) or sterile water as recommended by your child’s healthcare team
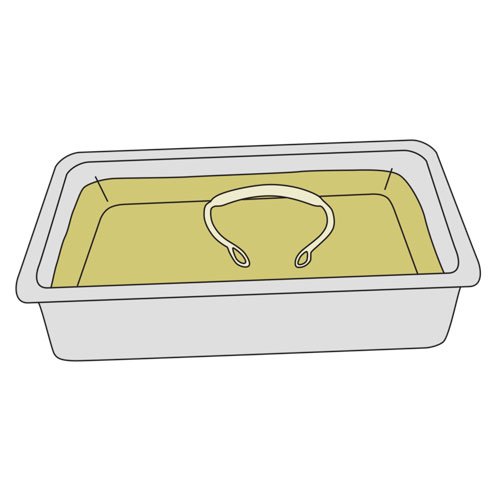
Preparation of boiled water solution: – Clean the containers (pickling jars or jars with plastic lids) in the dishwasher and let dry. – If you don’t have a dishwasher, wash containers in hot soapy water, rinse and then dry in the oven set at 250⁰F for 15 min (metal lids only). – Boil tap water in a pot for 10 min at a rolling boil and let cool. – Fill the clean containers with boiled cooled water, write the date prepared on the container.
Shelf life: – Closed container: 5 days in fridge or 2 days at ambient temperature. – Container, once opened: 2 days in fridge, 1 day at ambient temperature.
Discard of the solution used after providing care.
Small container used to hold a small amount of cleaning/soaking solution)
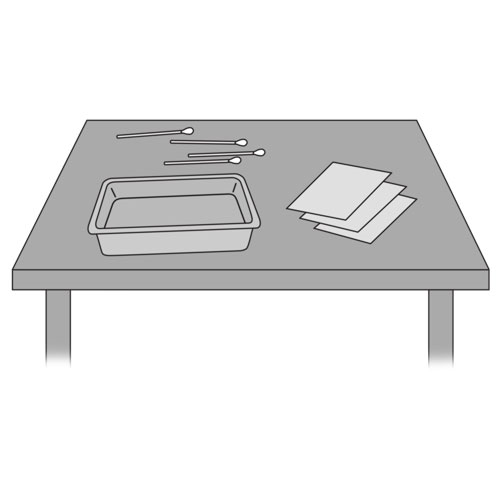
Cotton tips or clean dressings (gauze compresses)
Rolled towel to place under the child’s shoulders
If needed:
Mask and non-sterile gloves (if the person providing the care has a cold or the flu)
Mild, non-perfumed, non-oily soap (eg, “Dove”)
Hydrogen peroxide solution 1. 5% if your child is less than 3 years old
Preparation of 1.5% hydrogen peroxide solution: – For 15 ml of solution: mix 7.5 ml of 3% hydrogen peroxide and 7.5 ml boiled water solution and store in a resistant container.
Shelf life: – Closed container: 5 days in fridge.
– Container, once opened: 2 days in fridge.
The solution should produce a white foam when applied to the skin. If this is not the case, discard and prepare a fresh solution.
Discard of the solution used after providing care.
Small container used to hold a small amount of hydrogen peroxide solution
1 tracheostomy dressing, if needed
Tracheostomy ties (Velcro® or cotton ribbons)
Round-ended scissors (to cut the tracheoostomy ties)
Suction device and catheters
If using a reusable inner cannula:
clean inner cannula replacement
soapy water (for cleaning of the reusable inner cannula)
containers to soak the inner cannula (hydrogen peroxide and soaking solution)
brush to clean the inside of the inner cannula
clean, dry container with lid (to store the inner cannula once cleaned)
Keep all medical supplies and equipment required for emergency purposes close at hand.
The following method is for care of a simple cuffless and non-fenestrated tracheal cannula.
Refer to your child’s healthcare team if the material or the sequence of steps you have been taught is different than those described.
Collaborate and form a team with your child. When you invest the time to form a strong team, children feel more comfortable and less anxious – this will help you complete the care with less stress – for you and your child.
Use these tips, from the start, to set the stage for a positive care procedure:
Create the right moment: integrate the care in a routine.
Alert your child to the needed care and communicate together.
Form a team with your child: Encourage autonomy by offering realistic choices such as the method of distraction. Stay tuned to your child. Manage pain and anxiety, using distraction and positioning for comfort.
Prepare the environment: Identify a routine place for care. Close windows, doors and fans. Wash and dry the work surface and gather the needed materials for the care and to distract your child.
Prepare your child: Get help if needed. Position your child for comfort to receive the care and start to use the selected distraction method.
Prepare yourself: Find the right time when you are ready to provide the care safely. Review the list of care steps. Wash your hands.
Now that you are ready to start the care procedure, take the opportunity to encourage and praise your child.
Safety: Carefully follow the care practice steps as you have been taught.
Flexibility: Be ready to adjust according to your child’s reactions during the procedure. As needed, reposition or select an alternative distraction strategy. Follow your child’s pace and rhythm.
Collaboration: Reassure your child, verbally and non-verbally. Acknowledge your child’s emotions and reactions. Help your child differentiate between the different sensations during a procedure.
Pour the cleaning solution into a small container.
Open the compress and cotton tip packets.
Why ?
This step ensures the safety and the continuity of the procedure.
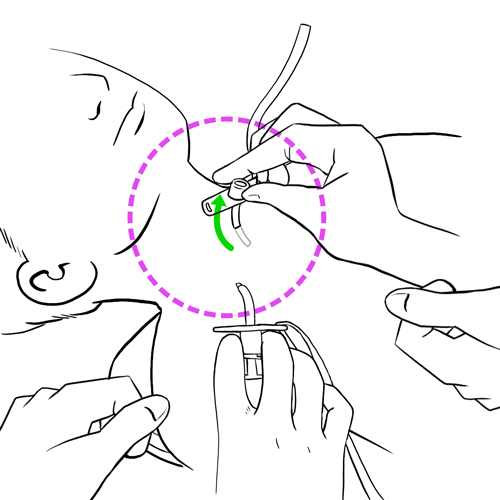
Step 5: Position your child
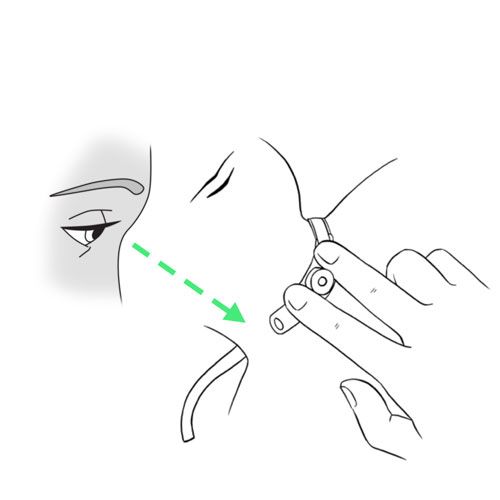
If your child is on his back, place the rolled towel under his shoulders (not under his neck), so that his head tilts slightly backwards, exposing his neck and allowing better access to the cannula.
The procedure can also be done with your child in the sitting position.
Why ?
The lying down on the back position is favored in order to allow better visualisation and access to the cannula.
Step 6: Suction the tracheobronchial secretions, if needed
Wash your hands again after the procedure and before moving to the next step.
Why ?
This step helps to clear secretions from the airways.
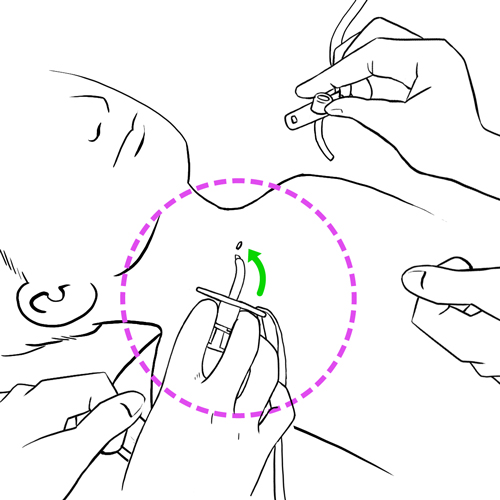
Step 7: Untie or loosen the tracheostomy ties, if needed
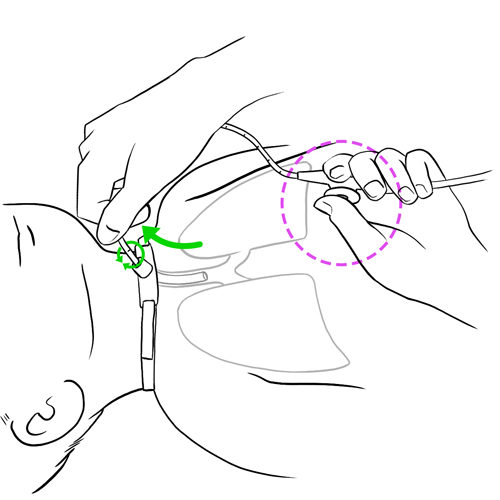
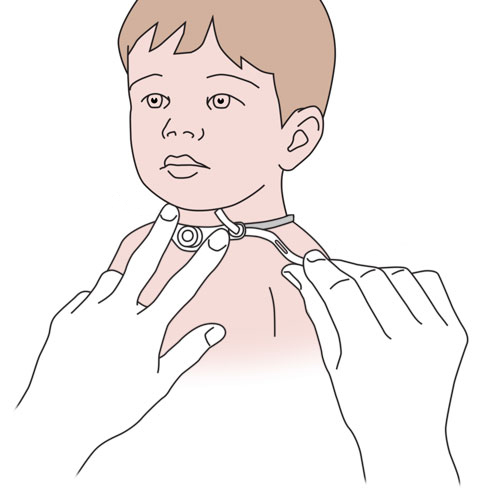
Ask the person assisting you to secure the cannula by placing their fingers on the flanges.
If your child moves his head a lot, comfort him and stabilize his head with one hand on the top of the head.
If using a Velcro® band, detach one side of the Velcro® band or loosen the tension around the neck.
If using cotton ribbon: untie/cut with scissors.
If the tracheostomy ties must be changed, secure the tracheal cannula and follow the steps outlined in the method of care “Changing the tracheostomy ties”:
This step helps to visualize the condition of the skin under the retaining ties.
Assistance from a second person makes the procedure safer and decreases the risk of decannulation.
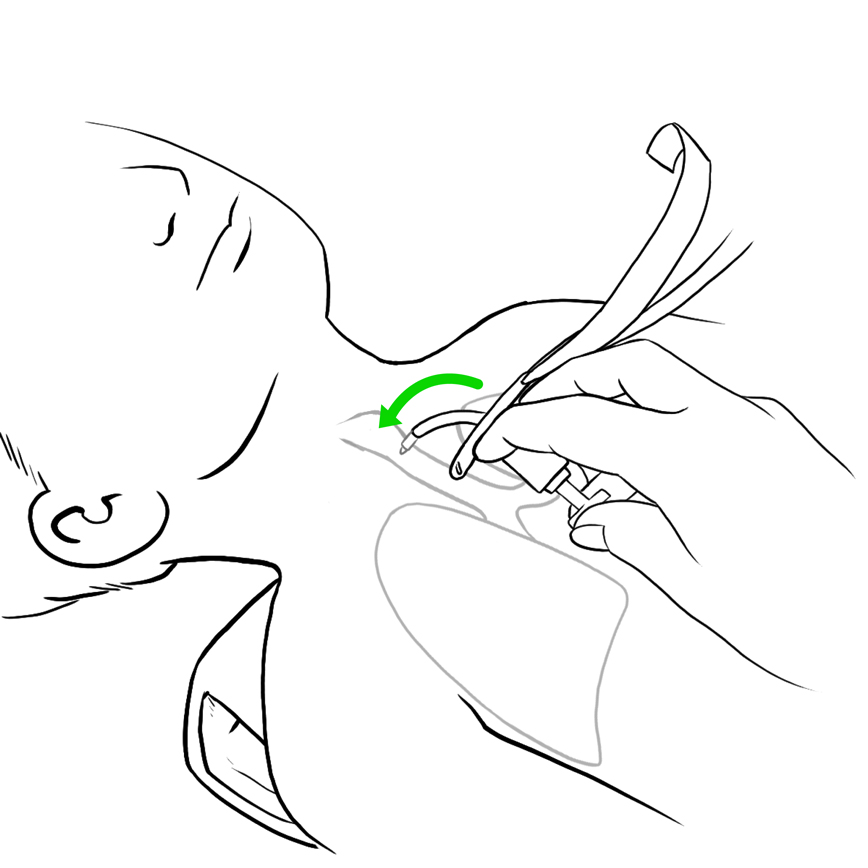
Step 8: Remove the dressing, if in place
Remove the dressing that is in place.
Check to see if it is damp, soiled with blood or secretions, then discard it.
If the dressing is encrusted and stuck to the skin, dampen the dressing with the cleaning solution recommended by your child’s healthcare team and then gently remove it and discard it.
Why ?
This step allows you to verify the skin around the tracheostomy.
Step 9: Examine the skin around the tracheostomy and under the tracheal cannula flanges
Examine the skin around the tracheostomy; it should resemble the skin on the rest of the neck.
Check for redness, warmth, swelling, itchiness, small pimples, oozing or bleeding from the tracheostomy site.
Check to see if the skin has a foul odour.
Your child should not have any pain or sensitivity from the skin around the tracheostomy site.
If any of the above signs are present, contact your child’s healthcare team for recommendations appropriate to your child’s condition.
Why ?
This step helps you detect if any skin irritation is present.
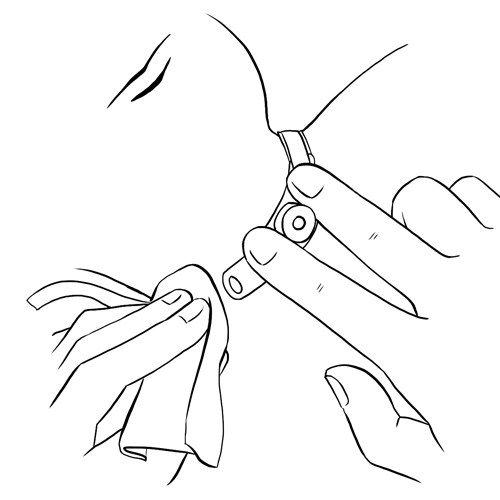
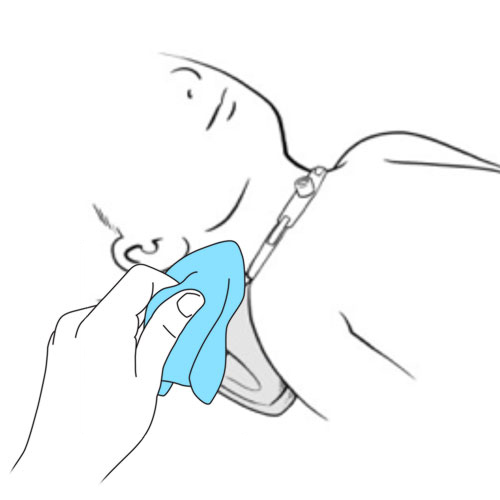
Step 10: Clean the skin around the tracheostomy
Use cotton tips or compresses damped with the solution recommended by your child’s healthcare team (sterile or boiled water).
A mild, non-prefumed, non-oily soap (eg, “Dove”) can also be used if recommended by your child’s healthcare team.
Always clean the skin from the centre (closest to the tracheostomy) moving outwards towards the exterior; clean until there are no more secretions left.
Discard cotton tip or compress after each single use.
Make sure that no water enters the tracheostomy.
Be sure to properly clean under and on the tracheal cannula flanges.
If secretions are encrusted and stuck to the skin, dampen the dressing with the cleaning solution recommended by your child’s healthcare team.
If encrusted secretions are difficult to remove, use a hydrogen peroxide solution, if recommended by your child’s healthcare team. Tip: This solution should cause a foam to appear when applied to the skin. If this is not the case, change the solution.
Rinse immediately with a clean compress or cotton tip dampened with the cleaning solution (sterile or boiled water).
Be sure to properly clean the skin under the tracheostomy ties and the folds in the neck.
Why ?
This step helps to keep the skin around the site clean and healthy.
It also helps prevent any bacteria that may be present on the neck to be transferred to the inside of the tracheostomy where an infection could develop.
Cleaning the site from the centre towards the outside borders prevents the solution from dripping into the tracheostomy.
Hydrogen peroxide can irritate the skin if it is not rinsed off properly.
Step 11: Dry the skin around the tracheostomy
Gently insert a dry compress under the two flanges.
Dry the skin thoroughly from the centre (closest to the tracheostomy) moving outwards towards the exterior.
Discard compress after each single use.
Be sure to dry the skin thoroughly before moving to the next step.
Why ?
Thorough drying of the skin prevents dampness that can cause irritation or infection.
Step 12: Place a dressing around the tracheostomy, if required
If recommended by your child’s healthcare team, insert a drain dressing around the tracheostomy sliding it under the two flanges.
Place the drain opening towards the top, under your child’s chin.
Gently push the compress in place with your fingers or with the help of tweezers.
Make sure that there are no folds under the flanges.
Change the dressing during the day if wet or soiled.
Why ?
A dressing can help protect the skin from dampness, irritation and infection.
Step 13: Adjust the tension of the tracheostomy ties
Verify the tension by inserting the tip of a finger between the tracheostomy tie and the skin. Tip: Individuals with large fingers should use the tip of their small finger.
Adjust, as needed, to ensure appropriate tension to secure the tracheal cannula in place.
If your child uses a simple tracheal cannula, proceed directly to step 16.
Why ?
Proper placement and tightness of the tracheostomy ties prevent irritation of the skin and accidental decannulation of the tracheal cannula.
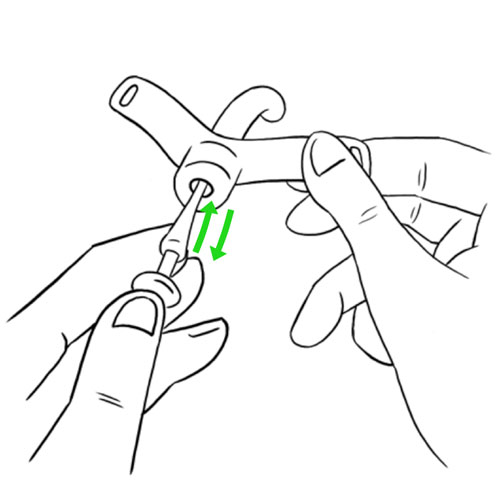
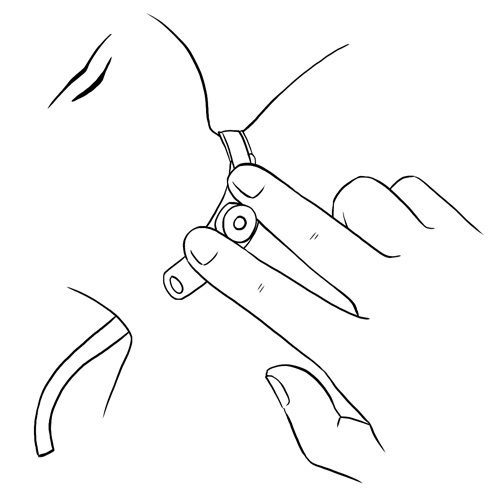
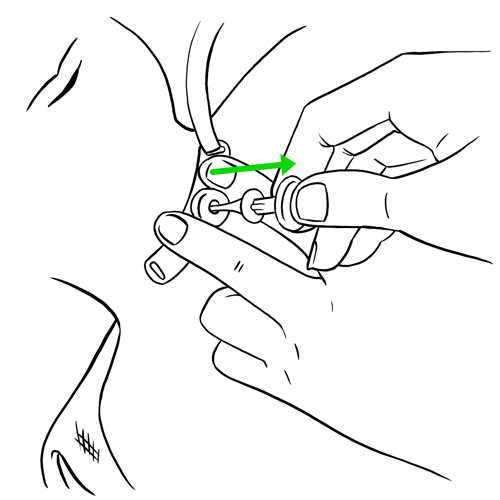
Step 14: Replace the inner cannula (if tracheal cannula with 2 parts)
Re-wash your hands before proceeding.
While holding the flanges in place with one hand, unlock the soiled inner cannula according to the manufacturer’s specifications.
Remove the inner cannula by gently pulling it in a downward direction following the natural curve of the cannula; place it on the working surface.
Immediately insert the clean inner cannula into the external cannula without contaminating it.
Lock the inner cannula in place according to the manufacturer’s specification.
Reusable inner cannula: go to the following step for cleaning procedure.
Single use inner cannula: discard the inner cannula and proceed to step 16.
Why ?
This step is necessary in order to ensure the patency of the cannula; prevent mucus plugs and infections.
It is best to change the inner cannula last to avoid re-soiling the area while suctioning, cleaning the skin and changing the dressing.
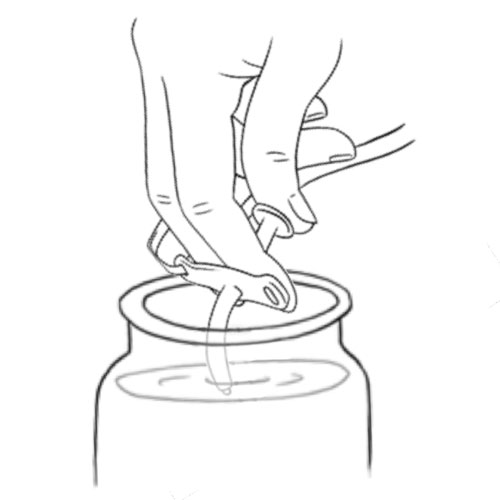
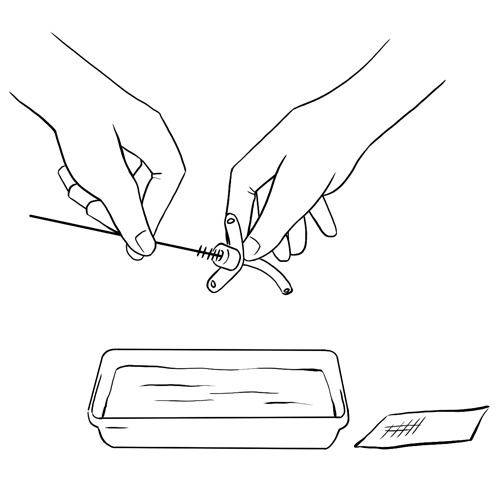
Step 15: Clean and store the re-usable inner cannula
The method below is a general guideline. Always follow the manufacturer’s specifications or your child’s healthcare team’s recommendations.
Handle the cannula by the connector or by using a clean compress.
Rinse the soiled inner cannula under warm tap water.
Clean the interior and exterior of the inner cannula with warm soapy water and a small brush or cotton tip.
Once cleaned, rinse the inner cannula under warm tap water to remove all traces of soap.
If the inner cannula is still soiled after cleaning with soapy water, soak it in a hydrogen peroxide solution for 5 minutes or more if necessary; then rinse in warm tap water.
Soak the cleaned inner cannula in a soaking solution (sterile water or boiled water) for about 5 minutes to remove any hydrogen peroxide residue.
Once cleaned, remove from solution; always handle the inner cannula by the connector.
Shake off any excess water.
Dry the inner cannula with a clean compress without touching the body of the cannula with your fingers or let it air dry on a clean towel.
Once completely dry, store the cleaned inner cannula in a clean, dry container with a lid until next use.
Discard any leftover solutions.
Follow the manufacturer or your child’s healthcare team’s recommendations regarding the frequency with which the reusable inner cannula can be cleaned and reused.
Why ?
This step is necessary in order to avoid any contamination that may cause infections.
Be prepared to recognize the challenges faced and to provide positive feedback. Help your child recognize his/her strengths. Acknowledge the collaborative teamwork.
Listen to what your child says about the parts of the procedure that were difficult or painful.
Comfort your child and recognize your child’s collaboration with positive feedback.
Highlight your child’s specific strengths that helped make the procedure positive.
Discuss with your child what might be done the same or differently the next time the care is needed.
Keep your promises if you have promised a reward, follow through.
Reward yourself too.
Methods of care : Changing the tracheostomy ties
Indications
Tracheostomy ties help stabilize and keep the tracheal cannula securely in place. They are inserted in the openings found on each flange on the tracheal cannula.
Below is a suggested method that can serve as a guide; discuss the care and equipment required specifically by your child with your child’s healthcare team.
Considerations:
METHOD FOR SECURING THE TRACHEAL CANNULA
Types of tracheostomy ties
Advantages
Disadvantages
Cotton ribbons
Very economical
Not reusable
More frequently irritates the skin: the knots made to tie the two ribbons may cause friction against the neck
May cause possible skin breakdown in children that are overweight or who have a small neck
Velcro® band (cushioned band that attaches with velcro)
Comfortable
Less irritating to the skin
Easy to use
Easily adjustable
Can be reused after washing as long as the velcro fastens securely
Can be detached by young children
More expensive
A Velcro® band is usually the first choice, but cotton ribbons can also be used.
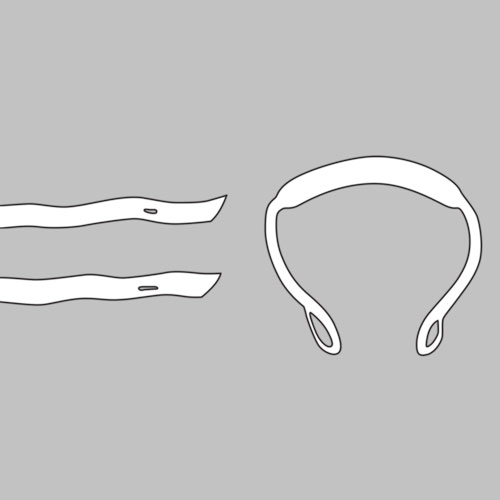
The Velcro® band is composed of a piece of material that rests on the child’s neck; this piece of fabric has 2 thin bands at each end that can be inserted into the openings of each flange.
The most important thing to consider when of choosing tracheostomy ties is not the material that they are made of, but the safety of maintaining the cannula in the tracheostomy.
In order to prevent irritation of the skin, the tracheostomy ties must remain clean at all times.
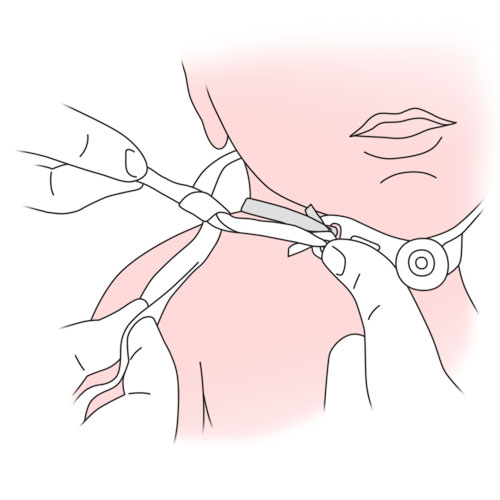
Changing the tracheostomy ties is simple but to prevent accidental decannulation, it is recommended that it be done with 2 people. The first person stabilizes the tracheal cannula by placing their fingers on the flanges, while the second person changes the tracheal ties.
Good handwashing is essential before and after providing care.
To prevent skin irritation, the tracheostomy ties must be changed 2 times per week or more often if needed.
The tracheostomy ties must also be changed:
if wet,
if soiled,
if no longer in good condition,
if there is a bad odour,
if too tight or too loose (cotton ribbons),
if the velcro no longer holds (sticks) properly,
when changing the tracheal cannula.
The best time to change the tracheostomy ties is during bath time; allows you to examine and wash the neck.
The tension and condition of the tracheostomy ties along with the appearance of the skin under the ties must be verified at least once a day; look for redness, irritation or presence of pressure points.
Required materials
Washcloth
Mild, non-perfumed, non-oily soap (eg, “Dove”)
Clean, dry towel
Rolled towel to be placed under the child’s shoulders, if needed
For Velcro® band:
Tweezers to help in threading the ends into the flange opening (if needed)
For cotton ribbons:
1 or 2 ribbons, depending on the technique used
Pointy object (eg, tip of a pencil) that can be used to pierce fastening holes, if using double ribbon technique. Do not use scissors because they may cause the ribbon to fray and fine threads may be aspirated into the tracheal cannula
Tweezers to help in threading of the ties into the opening of the flange, if needed
Round-ended scissors to cut the soiled tracheostomy ties
Tape, if using double ribbon technique: aids in securing the first knot near the flanges. It is helpful to have extra pre-cut ties of the appropriate length to serve as a guide for ties to be used in the future.
Refer to your child’s healthcare team if the care, material or the sequence of steps taught are different than those described.
Some parents may prefer examining, cleaning and drying the skin on the neck after having removed the soiled tracheostomy ties. If this is the case, refer to your child’s healthcare team for adjustments to step 14 and onwards.
Collaborate and form a team with your child. When you invest the time to form a strong team, children feel more comfortable and less anxious – this will help you complete the care with less stress – for you and your child.
Use these tips, from the start, to set the stage for a positive care procedure:
Create the right moment: integrate the care in a routine.
Alert your child to the needed care and communicate together.
Form a team with your child: Encourage autonomy by offering realistic choices such as the method of distraction. Stay tuned to your child. Manage pain and anxiety, using distraction and positioning for comfort.
Prepare the environment: Identify a routine place for care. Close windows, doors and fans. Wash and dry the work surface and gather the needed materials for the care and to distract your child.
Prepare your child: Get help if needed. Position your child for comfort to receive the care and start to use the selected distraction method.
Prepare yourself: Find the right time when you are ready to provide the care safely. Review the list of care steps. Wash your hands.
Now that you are ready to start the care procedure, take the opportunity to encourage and praise your child.
Safety: Carefully follow the care practice steps as you have been taught.
Flexibility: Be ready to adjust according to your child’s reactions during the procedure. As needed, reposition or select an alternative distraction strategy. Follow your child’s pace and rhythm.
Collaboration: Reassure your child, verbally and non-verbally. Acknowledge your child’s emotions and reactions. Help your child differentiate between the different sensations during a procedure.
Step 4: Prepare the materials
Have the type of tracheostomy tie to be used close at hand (Velco® band or cotton ties).
Verify the condition of the tie: make sure that it is safe to use.
Velcro® band: make sure that the velcro sticks well to the cushioned fabric.
Cotton ribbons:
make sure that the edges are not frayed;
if using technique with one ribbon:
cut the ribbon long enough to go around the circumference of your child’s neck twice. Tip: It is helpful to have extra pre-cut ties of the appropriate length to serve as a guide for ties to be used in the future;
cut the ends of the ribbon at a slant;
if using technique with two ribbons:
cut two ribbons long enough for each to go around the circumference of your child’s neck once. Tip: It is helpful to have extra pre-cut ties of the appropriate length to serve as a guide for ties to be used in the future;
cut the ends of the ribbon at a slant;
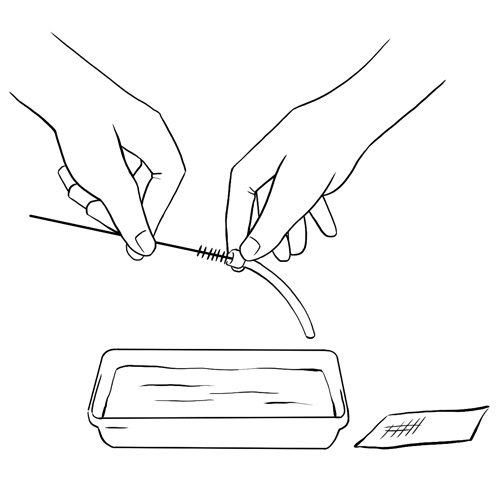
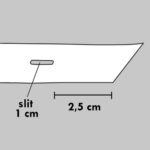
fold the ends at about 2.5 cm;
pierce a 1 cm slit in the middle of the ribbon with a pointy object (eg, tip of a pencil) lengthwise.
Why ?
This step ensures that the materials are prepared correctly.
Cutting the ribbon on a slant helps when threading through the opening of the flanges opening; it also prevents fraying of the fabric.
Piercing a slit in the ribbon with a pointy object instead of cutting with scissors prevents pieces of fabric fibres from being aspirated into the trachea.
If your child is on his back, place the rolled towel under the shoulders (not under the neck), so that the head tilts slightly backwards, exposing the neck and allowing better access to the cannula.
Why ?
The sitting position is favored in order to allow better visualisation and access to the cannula.
Step 6: Suction the tracheobronchial secretions, if needed
Wash your hands after suctioning and before moving to the next step.
Why ?
The suctioning of secretions decreases the chances that your child will cough during the tie change.
Movement of the cannula during the procedure can also cause your child to cough and expel secretions.
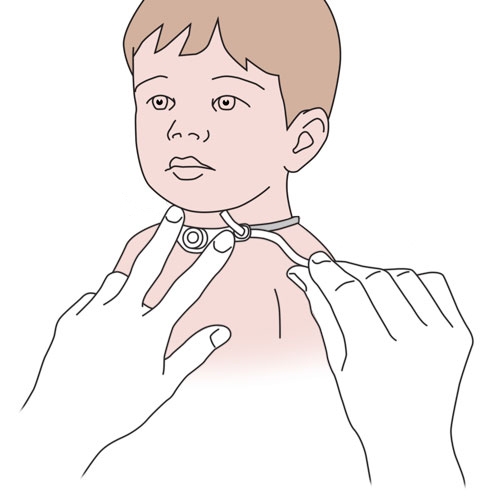
Step 7: Secure the cannula in place
Ask the person assisting you to stabilize the tracheal cannula throughout the procedure by placing his/her fingers on the flanges.
If your child moves his head a lot, comfort him and stabilize his head with one hand on the top of the head.
Avoid movement of the tracheal cannula as much as possible during the procedure.
If your child’s tracheal cannula is held in place with a Velcro® band, go directly to the next step.
If your child’s tracheal cannula is held in place with cotton ribbons, go directly to step 14.
Why ?
This step helps make the procedure safer. Minimizing movement of the tracheal cannula reduces the risk of accidental decannulation and other complications.
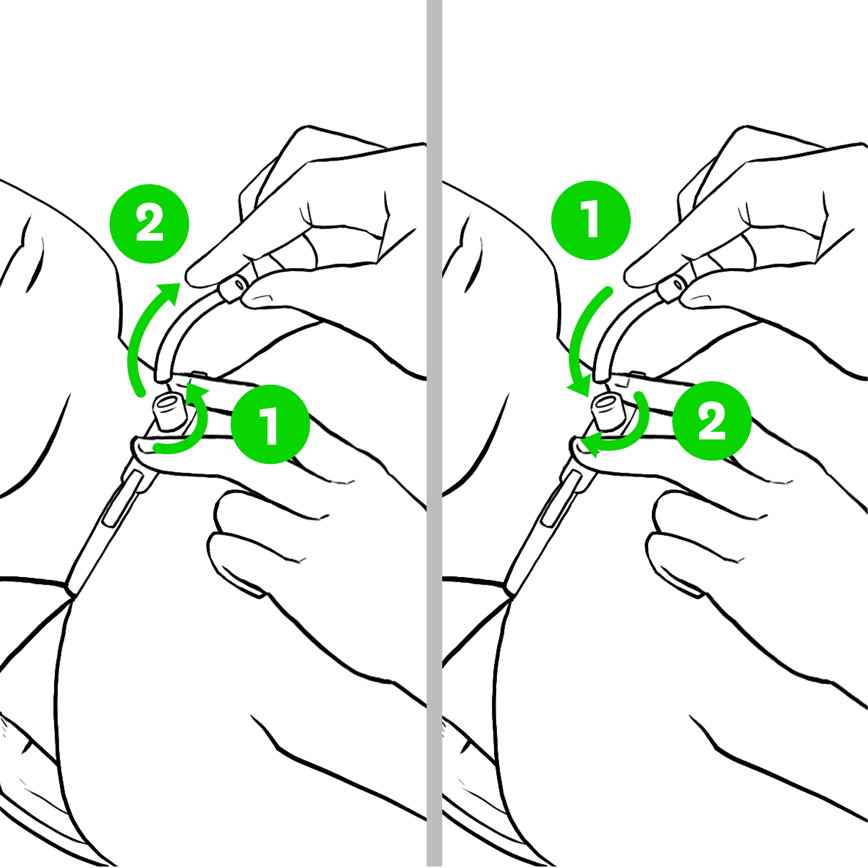
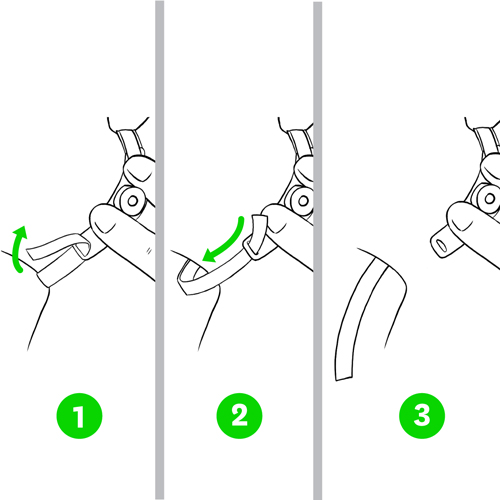
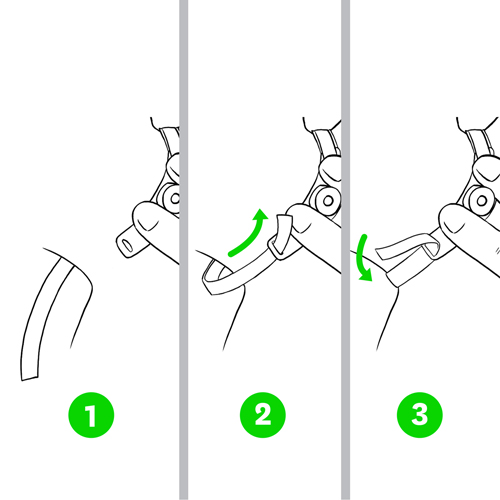
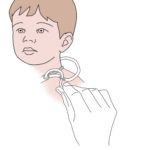
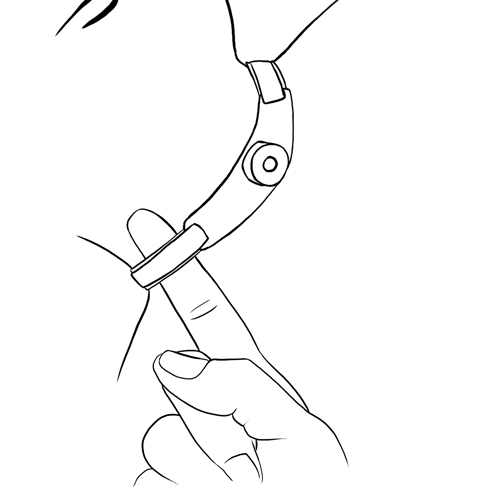
Step 8: Detach one side of the Velcro® band (if this is the type of tie in place)
Remove the tracheostomy dressing (if in place).
While the person helping you is keeping the tracheal cannula stable, detach one end of the soiled Velcro® band.
Pull the end of the Velcro® band out of the opening on the flange.
Why ?
This step allows you to safely remove the used Velcro® band.
Step 9: Examine the skin on the neck
Examine the condition of the skin under the tracheostomy tie; the skin should have the same appearance as the rest of the neck.
Verify the skin around the tracheostomy site for redness, swelling, irritation, small red pimples, small sores or bleeding.
If any of the above conditions are present, contact your child’s healthcare team for recommendations.
Why ?
This step allows you to identify skin irritation, if present.
Step 10: Clean and dry the skin on the neck
While the person helping you is keeping the tracheal cannula stable, wash the neck with a washcloth using tap water or a mild, non-perfumed, non-oily soap (eg, “Dove”).
Clean all the folds of skin on the neck.
Rinse with a clean washcloth.
Make sure that the skin is completely dry before proceeding to the next step.
Why ?
This step helps keep the skin in good condition.
Thorough drying of the skin prevents dampness that can cause irritation or an infection.
Step 11: Insert a new Velcro® band
While the person helping you is keeping the tracheal cannula stable, insert one end of the new Velcro® band into the flange opening that is free, threading from back to front; use tweezers if necessary.
Gently pull this end of the band while holding the flanges in place and preventing movement of the cannula.
Apply the Velcro® onto the cushion fabric and press into place.
Pass the band behind your child’s neck.
Remove the other end of the soiled band from the flange opening.
Put the soiled band aside.
Insert the other end of the new Velcro® band into the second flange opening; use tweezers if necessary.
Gently pull this end of the band while holding the flanges in place and adjust to the appropriate tightness.
Apply the Velcro® onto the cushion fabric and press into place.
Make sure that the Velcro® band holds the cannula in place securely.
Why ?
This step allows for replacement of the Velcro® band while minimizing the risk of accidental decannulation.
Step 12: Adjust the tension of the new Velcro® band
Verify the tension of the band by inserting the tip of a finger between the tracheostomy tie and the skin. Tip: Individuals with large fingers should use the tip of their small finger.
Adjust, as needed, to ensure appropriate tension to secure the tracheal cannula.
Check the tension and condition of the Velcro® band and the appearance of the skin under the band at least once a day.
Why ?
A tracheostomy tie that is too tight can:
cause irritation of the skin;
can cause discomfort to your child when he cries, moves, laughs, eats;
impede effective cough.
A tracheostomy tie that is too loose can:
allow the tracheal cannula to move and possibly damage the trachea;
cause accidental decannulation.
Step 13: Clean and store the soiled Velcro® band
Wash the soiled Velcro® band in warm soapy water, rinse thoroughly and air dry flat.
Store the clean Velcro® band in a cotton bag or in a clean, dry container with a lid to protect from dust and dirt.
Go to step 22.
Why ?
Proper cleaning of the Velcro® band allows reuse.
The Velcro® band will degrade over time especially after washing with hot water; verify regularly that the Velcro® adheres securely to the fabric before using.
Rinsing the band thoroughly prevents any soap residue from irritating your child’s skin.
Step 14: Examine the skin of the neck under the soiled ribbons (if in place)
Some parents prefer examining, cleaning and drying the skin on the neck after having removed the soiled tracheostomy ties. In this case, refer to your child’s healthcare team for adjustments to this step and onwards.
If your child’s tracheal cannula is held in place with a single or double ribbons:
Remove the tracheostomy dressing if in place.
Slightly lift the ribbons to visualize the condition of the skin underneath.
Examine the condition of the skin under the ribbons; the skin should have the same appearance as the rest of the neck.
Verify the skin for redness, heat, swelling, irritation, small red pimples, small sores or bleeding. If any of these signs are present, contact your child’s healthcare team for recommendations appropriate to your child’s condition.
Why ?
This step allows you to identify skin irritation, if present.
Step 15: Clean and dry the skin of the neck
Wash the neck with a washcloth using tap water or a mild, non-oily, non-perfumed soap (eg, “Dove”).
Clean all the folds of the skin on the neck.
Rinse with a clean wash cloth.
Make sure that the skin is completely dry before proceeding to the next step.
If your child’s tracheal cannula is held in place with a single ribbon, go directly to step 18.
If your child’s tracheal cannula is held in place with double ribbons, go directly to the next step.
Why ?
This step allows you to examine the condition of the skin on the neck.
Thorough drying of the skin prevents dampness that can cause irritation or an infection.
Step 16: Double ribbon technique: insert the new ribbons
Leave the soiled ribbons in place.
While the person helping you is keeping the tracheal cannula stable, slide the soiled ribbons to the top of the opening of the flanges to make room for the clean new ribbons.
Below the soiled ribbons, insert the slanted end of the first new ribbon into the opening of one flange and pull it upwards from the back. Tip: Use tweezers if necessary.
Insert the other end into the slit that was previously made in the new ribbon and pull the ribbon through to firmly attach to the flange.
Pass the new ribbon around the back of the neck ready to be attached to the second ribbon.
Repeat the same step for the second ribbon in the other flange.
Use some tape to secure each ribbon near the flange as you were taught by your child’s healthcare team.
Why ?
This step allows safe replacement of the tracheostomy ties.
Keeping the soiled ribbons in place decreases the risk of accidental decannulation.
Securing the ties near the flange helps to maintain the tracheal cannula in place.
Step 17: Double ribbon technique: attach the new ribbons together
While the person helping you is keeping the tracheal cannula stable, gently pull on the two new ribbons behind the child’s neck so that they are flat and snug.
Make a first knot with the two new ribbons on the side of the neck making sure that the knot falls flatly on the skin.
Change the position of the knot if it pushes on the neck each time you change the ribbons.
Go to step 20.
Why ?
This step allows to stabilize and secure the tracheal cannula in place.
Changing the position of the knot prevents irritation of the skin around the neck.
Step 18: Single ribbon technique: insert the new ribbon
Leave the soiled ribbon in place.
While the person helping you is keeping the tracheal cannula stable, slide the soiled ribbon to the top of the opening of the flanges to make room for the clean ribbon.
Insert the slanted end of the new ribbon into the opening of one flange and pull it upwards from the back. Tip: Use tweezers, if needed.
Pull on the clean ribbon behind the neck to reach the other flange.
Insert the other end into the opening of the other flange and pull it upwards from the back. Tip: Use tweezers, if needed.
Why ?
This step allows safe replacement of ribbon.
Keeping the soiled ribbon in place decreases the risk of accidental decannulation.
Step 19: Single ribbon technique: attach the new clean ribbon
While the person helping you is keeping the tracheal cannula stable, gently pull on the two ends behind the child’s neck so that it is flat and snug.
Make a first knot with the ends of the ribbon on the side of the neck making sure that the knot falls flatly on the skin.
Change the position of the knot each time you change the tracheostomy ties.
Why ?
This step allows to stabilize and secure the tracheal cannula in place.
Changing the position of the knot prevents irritation of the skin around the neck.
Tighten the knot enough for insertion of the tip of a finger between the tie and the neck. Tip: Individuals with large fingers should use the tip of their small finger.
Adjust, as needed, to ensure appropriate tension to secure the tracheal cannula.
Make a second knot. Tip: Never make a bow.
Cut any excess ribbon (tie) at 2.5 to 5 cms from the knots.
Solidify the knot with tape.
Check the tension and condition of the ribbon and the appearance of the skin under the ribbon at least once a day.
Why ?
A tracheostomy tie that is too tight can:
cause irritation of the skin,
can cause discomfort to your child when he cries, moves, laughs, eats,
impede effective cough.
A tracheostomy tie that is too loose can:
allow the tracheal cannula to move and possibly damage the trachea,
cause accidental decannulation.
Two knots prevent the sliding or the loosening of the tracheostomy ties.
Step 21: Remove the soiled ribbon
While the person helping you is keeping the the tracheal cannula stable, cut the soiled ribbon with scissors being careful NOT to accidentally cut the new ribbons.
If your child has a cuffed tracheal cannula, be careful NOT to cut the pilot balloon.
Remove and discard the soiled ribbon.
Why ?
This step finalizes the placement of the new ribbon.
The use of round-ended scissors to cut the soiled tracheostomy ties avoids injury to the skin around the neck of your child.
Be prepared to recognize the challenges faced and to provide positive feedback. Help your child recognize his/her strengths. Acknowledge the collaborative teamwork.
Listen to what your child says about the parts of the procedure that were difficult or painful.
Comfort your child and recognize your child’s collaboration with positive feedback.
Highlight your child’s specific strengths that helped make the procedure positive.
Discuss with your child what might be done the same or differently the next time the care is needed.
Keep your promises if you have promised a reward, follow through.
Reward yourself too.
Methods of care : Changing of a simple tracheal cannula
Indications
Regular changes of the tracheal cannula are required in order to maintain the patency and the effectiveness of the tracheostomy.
Below is a suggested method that can serve as a guide; discuss the specific type of medical supplies and equipment used for your child with your child’s healthcare team.
Considerations:
Changing tracheal cannula is simple but for safety reasons, it is recommended that it be performed by 2 adults. The first person stabilizes the tracheal cannula by placing their fingers on the flanges and removes the old cannula while the second person inserts the new one.
It is normal that that your child feels a bit of discomfort in their neck near the tracheostomy after changing the tracheal cannula.
Changing the tracheal cannula can also cause an increase in cough and secretions (that can be pink in color) for a few hours. If this persists, contact your child’s healthcare team.
Normally this procedure takes place easily; occasionally it may be difficult to reinsert the tracheal cannula due to swelling or irritation of the trachea. Refer to section “Frequently asked questions/ Resistance or impossibility of tracheal cannula reinsertion” if needed.
If the type of tracheal cannula used by your child is reusable, it is important to follow the manufacturer’s recommendations regarding the number of uses.
Good handwashing is essential before and after providing care.
The frequency of regular tracheal cannula changes is determined by your child’s healthcare team.
It is necessary to change the tracheal cannula if it is blocked (ex: accumulation of secretions, foreign object); these situations should be discussed with your child’s healthcare team.
Preferably, should be done before meals or two hours after meals to avoid vomiting or reflux.
Required materials
Tracheal cannula
Smaller size tracheal cannula then the one in place
Obturator for each size of tracheal cannula
Solution to lubricate the cannula, according the recommendations of your child’s healthcare team. Discard the solution after use
Towel roll for placement behind the child’s shoulders
Suction device
Suction catheters
Solution and material for cleaning of the simple reusable tracheal cannula, according the recommendations of the manufacturer and your child’s healthcare team
Tissue paper
If needed:
Mask and non-sterile gloves (if parent/caregiver has a cold, the flu or other lung infection)
One drainage compress
Tracheal tie (cotton ribbon or Velcro® band)
Scissors with rounded ends (to cut the ribbons)
Self-inflating manual resuscitator (ambu-bag) as needed
The method presented is for a simple non fenestrated, cuffless tracheal cannula. Refer to your child’s healthcare team for any adjustments required to the method if your child uses a 2 part tracheal cannula, fenestrated or a cuffed cannula.
Refer to your child’s healthcare team if the material, sequence and steps taught to you are different than those described.
Collaborate and form a team with your child. When you invest the time to form a strong team, children feel more comfortable and less anxious – this will help you complete the care with less stress – for you and your child.
Use these tips, from the start, to set the stage for a positive care procedure:
Create the right moment: integrate the care in a routine.
Alert your child to the needed care and communicate together.
Form a team with your child: Encourage autonomy by offering realistic choices such as the method of distraction. Stay tuned to your child. Manage pain and anxiety, using distraction and positioning for comfort.
Prepare the environment: Identify a routine place for care. Close windows, doors and fans. Wash and dry the work surface and gather the needed materials for the care and to distract your child.
Prepare your child: Get help if needed. Position your child for comfort to receive the care and start to use the selected distraction method.
Prepare yourself: Find the right time when you are ready to provide the care safely. Review the list of care steps. Wash your hands.
Now that you are ready to start the care procedure, take the opportunity to encourage and praise your child.
Safety: Carefully follow the care practice steps as you have been taught.
Flexibility: Be ready to adjust according to your child’s reactions during the procedure. As needed, reposition or select an alternative distraction strategy. Follow your child’s pace and rhythm.
Collaboration: Reassure your child, verbally and non-verbally. Acknowledge your child’s emotions and reactions. Help your child differentiate between the different sensations during a procedure.
Step 4: Inspect the new cannula
Hold the new cannula by the flanges.
Insert and then remove the obturator to make sure it fits properly.
Visually inspect the exterior and the interior of the cannula to make sure that it is not damaged or soiled.
Why ?
This step ensures that the new cannula is clean and safe to use.
Step 5: Prepare the new cannula if so desired
Leave the obturator in place in the cannula.
Prepare the tracheostomy ties. Depending on your preference, this action can be done right away or after the tracheal cannula has been changed at the beginning of step 15.
If your child uses a Velcro® band or one cotton ribbon: insert one end in the opening of one flange and secure in place.
If your child uses two cotton ribbons, insert each end into the opening of each flange openings and secure in place.
Lubricate the new cannula. Depending on your preference, this action can be done right away or at step 10.
Place the cannula in a clean container intended specifically for this purpose (eg, new cannula package) while waiting.
Why ?
The obturator aids in the insertion of the new tracheal cannula; the rounded tip protects the tracheostomy during insertion.
Placement of tracheostomy ties on the new cannula at this time facilitates manipulation and makes the procedure safer.
Place a rolled towel under the shoulders (not under the neck) so as to allow the head to tilt backwards allowing better visualisation and access to the tracheostomy.
This procedure can also be done in the sitting position if your child cooperates.
Why ?
The lying down on the back position is favored in order to allow better visualisation and access to the tracheostomy.
Step 7: Suction the tracheobronchial secretions, if needed
Wash your hands after the procedure and before moving to the next step.
Keep the suction device, catheters and a self-inflating manual resuscitator (ambu-bag) close at hand.
Why ?
This step clears the airway, allowing better visualization of the tracheostomy site and easier insertion of the cannula. It adds to your child’s comfort.
Step 8: Secure the tracheal cannula in place
Ask the person helping you to secure the tracheal cannula in place by placing their fingers on the flanges.
If your child moves his head a lot, comfort him and stabilize his head with one hand on the top of the head.
This step allows you to proceed to changing of the cannula.
Once the tracheostomy ties have been removed, holding the cannula securely in place avoids decannulation if your child coughs or moves.
Step 10: Lubricate the new cannula, if not already done
While the person helping you is keeping the tracheal cannula stable and in place, lubricate the tip of the new cannula, always holding the new cannula by its connector.
If using a water soluble lubricant:
add a bit of lubricant into the container of the new cannula (ex: original packaging) and,
spread a small quantity of lubricant (size of a small pea), onto the tip and the sides of the cannula.
If you use a liquid solution (sterile water, boiled water or saline solution):
dip the tip of the cannula in the solution and,
shake away any excess water.
Do not touch the body of the tracheal cannula with your fingers.
Why ?
This step is required to facilitate cannula insertion.
Shaking excess solution from the cannula decreases coughing during insertion.
Step 11: Remove the old cannula
If your child is on a respirator, disconnect him from the tracheostomy and press the alarm silence button to temporarily disarm the alarms.
Observe your child’s breathing.
During exhalation, the person assisting you gently removes the cannula by following its natural curve (upward arc motion).
This step allows safe removal of the cannula without harming your child.
Step 12: Start the insertion of the new cannula
Stand at your child’s side.
Slightly tilt your child’s head backwards to enlarge the tracheostomy opening (stoma) as needed.
Holding the cannula at 3 o’clock (or 9 o’clock) position, start inserting the cannula into the tracheostomy opening (stoma) turning it to 6 o’clock position always following the natural curve of the trachea.
It may be necessary to press down on the alarm silence button again to disarm the audible alarm.
Why ?
This step allows for safe insertion of the cannula.
Step 13: Continue the insertion of the new cannula
Continue inserting the cannula without forcing, always following the natural curve of the trachea.
If you have difficulty starting the insertion of the cannula: tilt your child’s head backwards a little more, place your two fingers on opposite sides of the tracheostomy opening (stoma) and gently spread the opening as you insert the cannula.
If the cannula does not glide in and you feel resistance: follow steps in section “Frequently asked questions/ Resistance or impossibility of tracheal cannula reinsertion”.
It may be necessary to press down on the alarm silence button again to disarm the audible alarm.
Why ?
This step allows safe insertion of the cannula.
Resistance encountered at the start of insertion is likely due to the cannula touching the trachea wall.
Step 14: Finish the insertion of the new cannula
Once the new cannula is completely inserted, hold it in place with one hand and immediately remove the obturator with the other hand.
It may be necessary to press down on the alarm silence button again to disarm the audible alarm.
Why ?
Your child cannot breathe with the obturator in place.
Step 15: Secure the cannula with the tracheostomy ties
Verify the tension by inserting the tip of a finger between the tracheostomy tie and the skin. Tip: Individuals with large fingers should use the tip of their small finger.
Adjust, as needed, to ensure appropriate tension to secure the tracheal cannula.
Why ?
A tracheostomy tie that is too tight can:
cause irritation of the skin,
can cause discomfort to your child when he cries, moves, laughs, eats,
impedes effective cough.
A tracheostomy tie that is too loose can:
allow the tracheal cannula to move and possibly damage the trachea,
cause accidental decannulation.
Step 18: Clean the reusable cannula or discard the disposable cannula
Reusable cannula:
Handle the cannula by its connector or by using a clean compress to avoid touching the body of the cannula with your fingers.
Always clean the cannula immediately after the procedure, following the manufacturer’s specifications or your child’s healthcare team’s recommendations.
Store the clean cannula in a bag used for this purpose (eg, cotton pouch) or in a clean and dry container with a lid.
Disposable cannula:
Discard in the garbage.
Why ?
This step is required to prevent infections during future uses of cannula.
Be prepared to recognize the challenges faced and to provide positive feedback. Help your child recognize his/her strengths. Acknowledge the collaborative teamwork.
Listen to what your child says about the parts of the procedure that were difficult or painful.
Comfort your child and recognize your child’s collaboration with positive feedback.
Highlight your child’s specific strengths that helped make the procedure positive.
Discuss with your child what might be done the same or differently the next time the care is needed.
Keep your promises if you have promised a reward, follow through.
Reward yourself too.
Methods of care : Administration of medication via tracheostomy
Indications
In cases of irritation, inflammation or infection of the respiratory tract, your child may be prescribed medications (eg, antibiotics, bronchodilators) or solutions to be given via the tracheal cannula either by inhalation or instillation.
Inhaled medications can be administered by nebulization. Nebulization (converting liquid medication into an aerosol) can be produced by a small volume nebulizer or a metered dose inhaler (MDI).
Instillation is a method of delivering a medication in the form of a liquid or by drops, directly into the tracheal cannula.
Receiving medication via tracheostomy by inhalation or instillation allows for more targeted therapy and reduces secondary effects to other organs.
Below is a suggested method that can serve as a guide. Discuss the specific type of medical supplies and equipment used for your child with your child’s healthcare team.
Considerations:
Some children need suctioning before and/or after the administration of an aerosol treatment. Speak to your child’s healthcare team to know what is appropriate for your child.
If your child wears a speaking valve or a artificial nose, these devices valve must be removed before administration of therapy (inhaled or by instillation) and replaced afterwards.
Evaluate the need for a second adult during this procedure to help keep your child in a safe position (eg, if child is young or moves a lot).
If your child cannot cooperate with the prescribed therapy, consult your child’s healthcare team.
Good handwashing is essential before and after providing care.
A nebulizer is a medical device that contains a medication in liquid form; it is connected to an air compressor that helps to convert the medication into an aerosol that can easily be inhaled into the lungs.
Different types of nebulizers exist; your child’s healthcare team will recommend the model most appropriate to your child’s needs.
The nebulizer is connected to the tracheal collar or a T-piece added to the respirator circuit that allows the child to inhale the medication.
Maintenance of the equipment
Below are suggested weekly maintenance methods that can serve as a guide.
Tracheal collar:
Wash in warm water with a non-perfumed soap; do not use a antibacterial soap.
Compressor and tubing:
Turn compressor off and disconnect from the electrical wall outlet;
Clean the exterior of the compressor and the tubing with a damp cloth;
Never immerse the compressor in water, it will cause damage.
Nebulizer:
Disassemble the nebulizer and wash the pieces in warm, soapy water;
Soak 60 minutes in a 1 part white vinegar to 3 parts water solution;
Rinse thoroughly in water and shake off excess water;
Let air dry on a clean paper or cloth towel; place the components so that any water will drain out;
Make sure all components are dry before reassembling;
Store the equipment in the space provided for this purpose in the air compressor or in a container until the next use.
Equipment replacement
Replace the tracheal collar and the nebulizer once a month or according to the manufacturer’s recommendations.
Replace the compressor filter every 6 months or according to the manufacturer’s recommendations.
Metered dose inhaler (puffer) with a spacer:
Allows delivery of aerosol treatment.
A metered dose inhaler is a device that allows administration of medication in the form of an aerosol to the lungs.
A metered dose inhaler is a metal cartridge inserted into a plastic casing; the medication is contained under pressure in the metal cartridge.
When the cartridge is pushed down, the medication in the cartridge is aerosolized into a puff that can be easily inhaled into the lungs.
The use of a spacer allows for the fine mist of particles (puff) to slow down and accumulate after the cartridge is pushed downwards, so that the aerosolized medication can then be inhaled in a more coordinated, controlled fashion at your child’s own pace.
Treatment with a metered dose inhaler is delivered using a specialized spacer adapted for a tracheostomy or via an in-line respirator circuit adapter.
Maintenance of the equipment
Below are general suggestions that can serve as a guide. The frequencies suggested may be different; follow the recommendations of your child’s healthcare team. Tip: For example, spacers must be cleaned as soon as a white powder deposit appears on the inside walls.
Metered dose inhaler (once a week):
Remove the medication cartridge (do not wash the medication cartridge);
Clean the plastic casing in warm water with non-oily, non-perfumed soap; do not use antibacterial soap; pay particular attention to the plastic casing opening where the medication is aerosolized and where white powder deposits may accumulate;
Rinse thoroughly in water, shake off excess water;
Let air dry on a clean paper or cloth towel; place the components so that any water will drain out; without wiping, make sure all components are dry before reassembling;
Reinsert the cartridge in the plastic casing and store in a clean dry container used solely for this purpose until next use.
Spacer (every 2 weeks):
Remove the rubber back piece from the spacer;
Clean all pieces in warm water with non-oily, non-perfumed soap; do not use antibacterial soap;
Rinse thoroughly in water, shake off excess water; let air dry on a clean paper or cloth towel; place the components in a vertical position so that any water will drain out; without wiping, make sure all components are dry before reassembling;
Reinsert the rubber back piece on the spacer by pressing firmly and store in a clean dry container used solely for this purpose until next use.
Equipment replacement
According to the manufacturer’s or your child’s healthcare team’s recommendations.
Instillation
Instillation is a method of delivering a medication in the form of a liquid or by drops, directly into the tracheal cannula.
Certain antibiotics can be prescribed and administered by this method.
In some children, it is sometimes necessary to introduce a small quantity of saline solution, given drop by drop before suctioning to help dislodge secretions that are thick and difficult to clear. Instillation of saline into a tracheal cannula should not be done routinely unless recommended by your child’s healthcare team as this can also flush bacteria further down into the lungs and increase the risk of lung infection.
Refer to your child’s healthcare team for more information on this method.
Medication storage
Keep medication in its original packaging, protected from light and at room temperature.
Metered dose inhalers must be kept at room temperature.
It is important to store medications according to manufacturer’s and pharmacist’s recommendations.
Frequency
As prescribed by your child’s healthcare team.
Required materials
For a small volume nebulizer treatment:
Small volume nebulizer (often referred to as a mini-nebulizer)
Air compressor
Connecting tubing
Tracheal collar
Medication (unidose nebule)
For a metered dose inhaler treatment:
Metered dose inhaler (with medication cartridge)
Spacer
If needed:
Non sterile gloves and mask (if the parents or caregiver has a cold, flu or other lung infection)
Suction device and suction catheters
Always have equipment close at hand in case of an emergency.
Refer to your child’s healthcare team if the material or the sequence of steps you have been shown is different than those described.
Collaborate and form a team with your child. When you invest the time to form a strong team, children feel more comfortable and less anxious – this will help you complete the care with less stress – for you and your child.
Use these tips, from the start, to set the stage for a positive care procedure:
Create the right moment: integrate the care in a routine.
Alert your child to the needed care and communicate together.
Form a team with your child: Encourage autonomy by offering realistic choices such as the method of distraction. Stay tuned to your child. Manage pain and anxiety, using distraction and positioning for comfort.
Prepare the environment: Identify a routine place for care. Close windows, doors and fans. Wash and dry the work surface and gather the needed materials for the care and to distract your child.
Prepare your child: Get help if needed. Position your child for comfort to receive the care and start to use the selected distraction method.
Prepare yourself: Find the right time when you are ready to provide the care safely. Review the list of care steps. Wash your hands.
Now that you are ready to start the care procedure, take the opportunity to encourage and praise your child.
Safety: Carefully follow the care practice steps as you have been taught.
Flexibility: Be ready to adjust according to your child’s reactions during the procedure. As needed, reposition or select an alternative distraction strategy. Follow your child’s pace and rhythm.
Collaboration: Reassure your child, verbally and non-verbally. Acknowledge your child’s emotions and reactions. Help your child differentiate between the different sensations during a procedure.
Step 4: Prepare the medication
Make sure that your child’s name appears on the box of nebules.
Verify that:
the medication is not expired,
it is the correct medication and dose prescribed for your child.
Why ?
This step allows for safe administration of medication to your child.
Step 5: Add the medication to the nebulizer
If the medication is pre mixed:
Open the nebule by twisting off the tip.
Point the opening of the nebule towards the top of the nebulizer and gently squeeze the medication out into the nebulizer chamber through the cap.
Always keep the nebulizer in an upright position.
Always empty the nebule completely.
Discard empty nebule into garbage bin.
If the medication must be mixed: follow your child’s healthcare team’s instructions.
Why ?
This step allows you to properly transfer the medication from the nebule to the nebuliser.
Always keep the nebulizer in an upright position so that the medication does not spill.
Step 6: Prepare the delivery system
Place the compressor on a clean table or counter in a well aerated, dust free room. Tip: Do not place the unit on any type of heating element.
Plug the unit into an electrical wall outlet. Avoid using an extension cord.
Connect the tracheal collar to the nebulizer connector.
Connect one end of the tubing to the nebulizer and the other to the compressor outlet.
Make sure to that the tubing is not twisted or kinked.
Make sure that all the connections are tight.
Why ?
This step must be performed before delivery of the medication.
Wash your hands after the procedure and before moving to the next step.
Why ?
This step removes secretions, allowing for better delivery of medication.
Step 9: Turn the compressor on
Depending on the training provided by your child’s healthcare team, you can complete step 10 before this one.
Press the ON/OFF button.
Observe for the production of a fine mist from the tracheal collar.
Why ?
This step allows for administration of medication to your child.
Step 10: Place the tracheal collar
Place the tracheal collar over your child’s tracheostomy.
Glide the elastic band behind his neck and pull on the elastic band for proper adjustment.
Make sure that the tracheal collar is placed in such a way so that the mist enters the tracheostomy.
Why ?
This step allows for the full dose of medication to be aerosolized.
Step 11: Administer the medication
Always keep the nebulizer in an upright position.
If possible, ask your child to take deep and regular breaths.
Gently tap the nebulizer during the treatment until the medication is completely gone and there is no more mist (about 10 to 30 mins). Tip: If there is no more mist coming out, this means the medication was completely delivered.
Remove the tracheal collar.
Turn the air compressor off by pressing on the ON/OFF button.
Why ?
The compressor produces very fine particles of medication.
The nebulizer must be kept in an upright position at all times in order to function properly.
Slow, deep breaths optimizes medication delivery.
Gently tapping the nebulizer allows any medication on the sides of the nebulizer chamber to be aerosolized.
Step 12: Suction the tracheobronchial secretions, if needed
If indicated, ask your child to cough after the treatment.
Suction secretions after the treatment if recommended by your child’s healthcare team.
Wash your hands after the procedure.
Why ?
This step clears the tracheal cannula and optimizes the child’s comfort.
Step 13: Clean and store the equipment
After the treatment, disassemble the equipment.
Disassemble the nebulizer.
Rinse both parts (cap and chamber) under warm tap water.
Shake off excess water.
Allow to air dry on a clean hand or paper towel.
Wipe the tracheal collar with a damp towel. It is not necessary to clean the tubing. Ensure that there is no water accumulated in the tubing. If there is water, turn ON the compressor to flush it out. Tubing must be dry prior to use. Never immerse the compressor in water; this will cause damage.
Store the equipment in the space provided for this purpose in the air compressor or in a container until the next use.
Why ?
This step is required to keep the equipment functioning properly and prevents contamination.
Be prepared to recognize the challenges faced and to provide positive feedback. Help your child recognize his/her strengths. Acknowledge the collaborative teamwork.
Listen to what your child says about the parts of the procedure that were difficult or painful.
Comfort your child and recognize your child’s collaboration with positive feedback.
Highlight your child’s specific strengths that helped make the procedure positive.
Discuss with your child what might be done the same or differently the next time the care is needed.
Keep your promises if you have promised a reward, follow through.
Collaborate and form a team with your child. When you invest the time to form a strong team, children feel more comfortable and less anxious – this will help you complete the care with less stress – for you and your child.
Use these tips, from the start, to set the stage for a positive care procedure:
Create the right moment: integrate the care in a routine.
Alert your child to the needed care and communicate together.
Form a team with your child: Encourage autonomy by offering realistic choices such as the method of distraction. Stay tuned to your child. Manage pain and anxiety, using distraction and positioning for comfort.
Prepare the environment: Identify a routine place for care. Close windows, doors and fans. Wash and dry the work surface and gather the needed materials for the care and to distract your child.
Prepare your child: Get help if needed. Position your child for comfort to receive the care and start to use the selected distraction method.
Prepare yourself: Find the right time when you are ready to provide the care safely. Review the list of care steps. Wash your hands.
Now that you are ready to start the care procedure, take the opportunity to encourage and praise your child.
Safety: Carefully follow the care practice steps as you have been taught.
Flexibility: Be ready to adjust according to your child’s reactions during the procedure. As needed, reposition or select an alternative distraction strategy. Follow your child’s pace and rhythm.
Collaboration: Reassure your child, verbally and non-verbally. Acknowledge your child’s emotions and reactions. Help your child differentiate between the different sensations during a procedure.
Step 4: Prepare the medication
Verify mediation label for:
your child’s name
medication expiry date,
it is the correct medication and dose prescribed for your child.
Make sure that the medication cartridge is not empty and that it is properly placed in the plastic casing.
Make sure that the spacer is clean and dry.
Remove the plastic casing cap covering the mouthpiece.
Why ?
This step allows for safe administration of medication to your child.
If the sitting position is not possible, place your child:
in the position recommended by your child’s healthcare team,
in a position that allows you to access his tracheostomy,
according to his comfort, age and ability to cooperate.
Why ?
This position favors delivery of medication to the lungs.
Step 6: Prepare the medication delivery system
Vigorously shake the metered dose inhaler for 10 seconds.
When using the metered dose inhaler for the first time, activate 2 to 4 puffs into the air to prime the inhaler, according to your child’s healthcare team.
Place the metered dose inhaler vertically into the spacer adapter. The metered dose inhaler should fit properly into this opening.
Why ?
This step is done before delivery of the medication.
Shaking the metered dose inhaler must be done before each treatment.
Step 7: Connect the spacer to the tracheal cannula connector
Remove the cap from the spacer if present.
Holding the tracheal cannula by the flanges, connect the spacer to the tracheal cannula connector.
Make sure your child stays still by comforting him and by gently holding his head.
Avoid any movement of the tracheal cannula as much as possible during the procedure.
Why ?
This step allows for safe administration of medication to your child.
Step 8: Administer the medication
Activate the metered dose inhaler by firmly pressing down once on the cartridge.
Why ?
This step delivers medication into the spacer.
Step 9: Optimize entry of the medication to the lungs
If your child can collaborate, ask him to take slow, deep breaths.
Count on average, 5 to 6 breaths (inspiration/expiration) through the tracheostomy.
If the spacer used has an integrated respiratory flow indicator, make sure that it doesn’t emit a whistling sound. If so, ask your child to breathe a bit slower.
Why ?
This step optimizes delivery of the medication to the lungs.
The spacer with integrated respiratory flow indicator will emit a whistling sound if your child breathes too quickly; in this situation, he will not inhale the medication optimally.
Step 10: Repeat according to the prescribed dosage
Wait one minute between each dose.
Shake the metered dose inhaler vigorously for 10 seconds before administering each dose.
If several doses must be administered, remove the spacer from the tracheal cannula in-between the doses, always remembering to stabilize the tracheal cannula by the flanges.
Reconnect the spacer to the tracheal cannula connector to continue the treatment.
Why ?
This step allows your child to receive the correct amount of medication.
Step 11: Remove and store the equipment
Remove the spacer from the tracheal cannula connector once the treatment is complete; always hold the tracheal cannula in place by the flanges.
Avoid movement of the tracheal cannula as much as possible during removal of the spacer.
Remove the metered dose inhaler from the spacer.
Put the cap back on the metered dose inhaler plastic casing and on the spacer, if present.
Store the metered dose inhaler, including the cartridge in a clean, dry container until further use.
Why ?
This step is required to keep the equipment functioning properly and prevents contamination.
Be prepared to recognize the challenges faced and to provide positive feedback. Help your child recognize his/her strengths. Acknowledge the collaborative teamwork.
Listen to what your child says about the parts of the procedure that were difficult or painful.
Comfort your child and recognize your child’s collaboration with positive feedback.
Highlight your child’s specific strengths that helped make the procedure positive.
Discuss with your child what might be done the same or differently the next time the care is needed.
Keep your promises if you have promised a reward, follow through.
Disclaimer of Liability: By using this site, you acknowledge that you have read this disclaimer
and agree to
all of its terms. Before making any decisions regarding your health or if you have any medical questions, you
should first consult a physician or qualified health care professional who can provide recommendations tailored
to your specific needs. The information published on this site does not constitute a recommendation for
treatment (preventive or curative), a prescription or a diagnosis and is not a substitute for the advice of a
physician or qualified health professional.
As medical and technical knowledge is constantly evolving, the content of this site is made available for
information purposes only. The contributors to this site, including clinical experts in pediatrics from across
Quebec, make every effort to ensure that the information made available on this site is as accurate and reliable
as possible, without guaranteeing the completeness or total absence of error of its content. The opinions
contained in this site are the sole responsibility of the author(s) and are not binding on the contributors to
this site. These opinions do not necessarily reflect the official viewpoint of the organizations mentioned, nor
that of their directors or representatives. The contributors to this site cannot and will not assume any
responsibility for the use of the published content or for the information otherwise accessible through any link
or reference source. Any quotation or reference to a source external to this site is for informational purposes
only and does not constitute an endorsement or claim, express or implied, regarding the content or validity of
the information obtained from that external source.
All rights reserved: The contents of this site may not be reproduced or disseminated, in whole
or in part, in any manner or by any means, electronic, mechanical, including photocopying, recording, or
otherwise, or stored in a retrieval system of any kind that is not limited to private use, without the prior
written permission of the copyright holder.