The kidneys are two bean-shaped organs located on either side of the spine, below the rib cage.
The kidneys are very important because they perform three essential functions:
they remove waste products from the blood;
they regulate the amount of water and certain minerals that the body needs to stay healthy;
they produce hormones that control other body functions.
In their elimination function, the kidneys “clean” the blood by removing waste products and excess water and mineral salts that form urine. The kidneys specifically eliminate:
waste products: Urea is a waste product produced by the breakdown of proteins absorbed from food and creatinine is a waste product produced by muscle use. Some drugs also produce waste products through their breakdown. The elimination of wastes products by the kidneys prevents the onset of many ailments.
excess water: The body must contain the right amount of fluids to function properly. The kidneys ensure the balance of liquids by keeping the necessary amount of water in the tissues and by removing the surplus. This balance stabilizes the blood pressure and prevents swelling.
excess mineral salts: Mineral salts (eg, sodium, potassium, calcium, phosphorus) must be present in adequate amounts in the blood and body fluids for the body to function properly. Excess minerals are eliminated by the kidneys to prevent complications (eg, irregular heartbeat, muscle cramps, brittle bones, etc.).
excess acids: The balance between the acidity and alkalinity of the body (or acid-base balance) is essential to maintain good health. The kidneys play an essential role in maintaining this balance by producing acidic urine (to remove excess acids in the urine) or basic urine (to keep the necessary acids in the blood). This balance contributes to the healthy growth and development of the. The pH of a solution (eg, urine) is a measure of whether it is acidic or basic.
The elimination function of the kidneys can be imagined as a “washing machine” for the body, where the blood enters “dirty” (with waste) and leaves “clean” (without waste).
In the production function, the kidneys make hormones. Hormones are substances that circulate in the bloodstream and act as “messengers” to influence certain body functions (eg, control of blood pressure, production of red blood cells and maintenance of adequate calcium levels in the body). More specifically, the kidneys make or help make theses important hormones:
renin: helps maintain normal blood pressure;
erythropoietin: stimulates the bone marrow to produce red blood cells and thus avoid anemia;
calcitriol (active vitamin D): helps to strengthen bones and maintain adequate levels of calcium in the blood. Calcium is necessary to keep bones healthy.
Let’s get back to the elimination function of the kidneys. The absorption of food through the stomach and intestines produces waste. These wastes end up in the bloodstream. Every minute, about 20% of the total volume of blood in the body flows through the kidneys via the renal arteries. After the kidney filters the blood, the cleaned (or purified) blood then returns to the circulation via renal veins.
The cleaning of the blood is done by filtration. Each kidney contains more than a million small units (nephrons). Each nephron consists of a tiny filter, the glomerulus, connected to a small tube (tubule).
Blood coming from the renal arteries is filtered through the glomeruli, which retain red blood cells and proteins and allow water to pass into the tubules. This is the beginning of urine formation. The good elements (eg, minerals, vitamins, amino acids, glucose, etc.) and most of the water return to the blood from the tubules while the waste products remain in the urine. If some of the good elements are in excess, they are eliminated in the urine.
The urine formed in the tubules flows into the funnel-like renal pelvis.
The renal pelvis extends outside the kidney into a long tube (ureter). Urine leaves the kidneys through both ureters and travels to the bladder, which is a pouch-like storage space. The urine stays in the bladder until the child urinates (pees). Urine leaves the bladder via a small tube (urethra) to the outside of the body.
When a child drinks a lot of liquids, the kidneys produce and eliminate a lot of urine. On the other hand, when a child loses fluid through vomiting, diarrhea or sweating, the kidneys produce less urine to keep the body’s fluids in balance.
When the kidneys are not functioning properly, there is a gradual build-up of waste products, minerals and water in the body. There is also a dysfunction in the production of hormones that control blood pressure, red blood cell production and calcium absorption. This is called kidney disease (orkidney failure).
Kidney disease can be temporary or permanent. It can range from mild to severe and can progress over time. There are two types of kidney disease:
acute kidney disease: sudden loss of kidney function that can be caused by decreased blood flow to the kidneys, severe dehydration, toxicity (adverse effects) of certain medications, inflammation, or kidney blockage; acute kidney disease is usually temporary and lasts only a few weeks if treated promptly.
chronic kidney disease (CKD): gradual loss of kidney function (decrease in kidney function for three months or more) caused by a chronic disease; CKD may be mild and remain so, develop very rapidly, or progress slowly over several years; it may also worsen to the point where the kidneys stop functioning completely.
The main causes of chronic kidney disease in children are:
congenital abnormalities of the kidneys or urinary tract; eg, malformations with obstruction (blockage of urine) or with reflux (urine that flows back up from the bladder to the kidneys),
kidney malformations (eg, dysplasia or hypoplasia of the kidneys),
As the kidneys deteriorate and chronic kidney disease progresses, symptoms vary depending on the severity of the disease:
fatigue, weakness,
vomiting, nausea,
loss of appetite, bad taste in the mouth,
weight loss,
swelling of the ankles, hands and eyelids,
shortness of breath,
insomnia at night and drowsiness during the day,
itching,
muscle cramps.
Chronic kidney disease (CKD) is divided into stages based on how much the kidneys are functioning and able to filter waste products. Kidney/renal function is assessed by measuring the GFR (Glomerular Filtration Rate). Measuring GFR involves checking the clearance of creatinine, which is the amount of this waste product eliminated by the kidneys.
STAGES OF CHRONIC KIDNEY DISEASE (CKD)
Stage 1: CKD with normal renal function
Renal function (GFR): >90%
Symptoms: None
Treatments:
Search for the cause
Medical follow-up
Stage 2: CKD with mild renal failure
Renal function (GFR): 60-89%
Symptoms: None
Treatments:
Medical follow-up
Evaluation of the progression of the CKD
Stage 3A: CKD with mild to moderate renal impairment
Renal function (GFR): 45-59%
Symptoms: First symptoms may appear
Treatments:
Same as stages 1 and 2
Tests to identify, prevent and treat complications (anemia, bone disorders)
Treatment of associated diseases
Stage 3B: CKD with moderate to severe renal impairment
Renal function (GFR): 30-44%
Symptoms: First symptoms may appear
Treatments:
Same as stages 1, 2 and 3A
Preservation of veins (keep veins n good condition for possible hemodialysis treatments)
Stage 4: CKD with severe renal failure
Renal function (GFR): 15-29%
Symptoms: Worsening of symptoms
Treatments:
Same as stages 1, 2 and 3
Discussion of future treatment options
Continued treatment and monitoring
Begin evaluation for renal transplantation
Stage 5: CKD with End-Stage Renal Disease (ESRD)
Renal function (GFR): <15%
Symptoms: Worsening of symptoms and appearance of new symptoms
Treatments:
Depending on the nature of the symptoms and the assessment of the renal function: start of treatment to replace the elimination function of the kidneys
Registration on the transplant list
The healthcare team uses a variety of factors to determine the most appropriate treatment for the child with chronic kidney disease:
assessment of kidney function,
the nature of the symptoms experienced,
general health,
other factors (eg, the amount of protein in the urine, which means the kidneys are not working well).
If chronic kidney disease is left untreated, it can lead to various complications:
anemia,
mineral and bone disorders,
fluid overload,
hypertension (high blood pressure),
neurological changes,
skin problems,
growth and development problems,
cardiovascular diseases (eg, left ventricular hypertrophy, calcium deposits in blood vessels),
dyslipidemia (increased cholesterol and triglycerides in the blood),
nutritional problems (eg, weight loss, weight gain, malnutrition),
etc.
TREATMENT OPTIONS FOR END-STAGE RENAL DISEASE (ESRD)
Dialysis
Dialysis is a treatment that replaces the elimination function of the kidneys. It cleans the blood of waste and excess by passing it through a filter, much like healthy kidneys would do. Dialysis does not replace the production function of the kidneys.
During dialysis, blood is on one side of the filter and a special solution (dialysate) is on the other side. The waste products from the blood pass through the filter and into the dialysate. Larger particles (eg, red blood cells) remain in the blood. The cleaned blood returns to the circulation and some of the waste is removed.
Dialysis does not cure kidney disease, but it reduces the discomfort and improves the quality and length of life.
In addition to dialysis, the child must take medication and follow a special diet to treat possible complications of kidney disease.
Dialysis is sometimes used temporarily in situations of acute kidney disease.
When the kidneys stop working permanently (as in end-stage renal disease), the child must have regular dialysis treatments. Unless the child has a kidney transplant or receives supportive care (see below), dialysis must be continued for life.
Kidney transplant
This surgical procedure allows for the transplantation of a kidney in good condition from a living or cadaveric donor. This kidney takes over and does the work that the child’s kidneys can no longer do.
The child must take anti-rejection medication for life.
The transplant does not cure the kidney disease, but the child can live a more normal life.
Supportive care other than dialysis (conservative/palliative care)
This treatment consists of medication and a special diet, which slows the deterioration of kidney function and reduces symptoms.
For some children, a kidney transplant or dialysis is not a good option. Supportive care aims to improve the quality of life while minimizing suffering.
Even though a child is receiving dialysis treatment, the kidney disease is still present. The child must still follow a special diet and take certain medications to avoid complications.
There are two kinds of dialysis. With the help of the healthcare team, the family chooses the type of dialysis that is best for the child based on their condition and lifestyle.
TYPES OF DIALYSIS
Hemodialysis
Hemodialysis filters and cleans blood outside the body using a machine and an artificial filter called a dialyzer (or artificial kidney).
This dialysis is made possible by placing a central venous catheter in a large vein at the base of the neck or by making an arteriovenous fistula (connecting a vein and an artery) in the arm. The machine removes blood through the catheter or fistula and passes it into the dialyzer. The dialyzer removes waste and excess water. The machine returns the cleaned blood to the circulation through the catheter or fistula.
The blood is cleaned in this way three times a week or more frequently in young children.
Each treatment usually takes four to five hours.
Hemodialysis for children is done in the hospital; it can also be done at home, but less frequently.
Peritoneal Dialysis (PD)
Peritoneal dialysis uses the peritoneum (thin membrane that lines the inside of the belly) to filter and clean the blood inside the body.
A special solution (dialysate) is injected into the peritoneal cavity through a catheter installed in the peritoneum. The blood surrounding the peritoneum is brought into contact with the dialysate. Excess water and blood waste pass into the dialysate. The soiled dialysate (effluent) is drained out of the body through the same catheter.
The exchange of solutions is mostly done at night with a machine (cycler) or can be done manually during the day.
Peritoneal dialysis is usually done at home.
Peritoneal dialysis has several advantages:
gives autonomy and control in the child’s care,
allows for a more flexible schedule,
facilitates travel because it can also be done outside the home,
requires fewer days away from school and fewer trips to the hospital,
allows for less fluid restriction,
allows for less dietary restriction,
allows for better blood pressure control,
maintains remaining kidney function longer.
With proper monitoring and daily care, peritoneal dialysis is effective and safe at home. It allows your child to continue to grow and develop well.
How does it work?
The peritoneum is the cavity inside of the abdomen that holds internal organs (eg, stomach, intestines, liver) and helps to hold these organs in place. The lining of the peritoneum is called the peritoneal membrane. The space between the organs is called the peritoneal cavity.
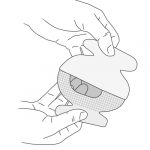
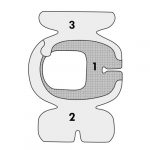
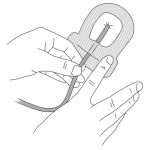
The peritoneum can be compared to an inflatable balloon. The interior of the balloon corresponds to the peritoneal cavity and the walls of the balloon to the peritoneal membrane. The “balloon” (peritoneum) is deformed to go around the internal organs. The peritoneal membrane contains millions of tiny blood vessels.
The peritoneal membrane has several characteristics that allow it to act as a filter:
it is porous (filled with small microscopic holes),
it is semi-permeable (lets water through but not large particles such as red blood cells),
it is bi-directional (liquids can pass on both sides),
it has a large surface area (0.5 to 2 square meters, depending on the child’s body surface).
The operation of peritoneal dialysis is simple. A special solution (dialysate or dialysis solution) is injected through a catheter into the peritoneal cavity. The blood is separated from the dialysate by the peritoneal membrane. The blood, containing waste products, excess water and mineral salts, comes into contact with the dialysate, which contains no waste products. The water and waste products pass through the peritoneal membrane from the blood to the dialysate. The dialysate absorbs the waste products and the surplus of mineral salts and water from the blood to the filtering capacity of the peritoneum. The good elements remain in the blood (eg,, red blood cells). The soiled dialysate (effluent or drainage fluid), filled with waste, is then drained through the same catheter outside the body into a drainage bag before being discarded. The effluent is yellow in color like urine.
Peritoneal dialysis is done through exchanges. Each exchange (or cycle) consists of three phases: 1. drainage phase: exit of the soiled dialysate (effluent) from the peritoneal cavity to the outside; 2. infusion phase: entry of the new dialysate into the peritoneal cavity; 3. dwell (or contact) phase: period of time during which the dialysate remains in the peritoneal cavity and the cleaning of the blood takes place; the waste products and the surplus of water and mineral salts of the blood pass through the peritoneal membrane and go into the dialysate, which becomes progressively soiled.
The volume of dialysate introduced during the infusion phase depends on the child’s weight or body surface area. Depending on the child’s specific needs, several exchanges must be performed to remove some of the waste products from the blood and make the child feel better. This treatment is not painful.
The filtration of blood by the peritoneum is done thanks to two natural processes which can last from several minutes to a few hours:
diffusion: movement of waste through a semi-permeable membrane (eg, the peritoneum). The waste passes from a medium where it is more concentrated (eg, blood) to a medium where it is less concentrated (eg, the dialysate) until there is a balance on both sides of the membrane.
osmosis: movement of water molecules through a semi-permeable membrane (eg, the peritoneum) from a solution where there is more water (eg, blood) to a solution where there is less (eg, the dialysate), until a balance is reached. The water crosses from a less concentrated medium to a more concentrated medium.
The dialysate is a sterile solution containing sugar (eg, glucose, dextrose), mineral salts (eg, sodium, calcium, magnesium, chlorine) and a buffer solution containing lactate, bicarbonate or lactate-bicarbonate) at an acidic (5.5) or neutral (or physiological) pH (7.4).
It is the large sugar molecules in the dialysate that draw excess water into the bloodstream by osmosis. The concentration of sugar in the dialysate varies according to the amount of water to be removed. The higher the sugar concentration, the more water molecules in the blood are drawn into the dialysate. On the contrary, the lower the sugar concentration, the less water molecules in the blood pass through into the dialysate.
This process is called ultrafiltration (UF). It is also referred to as the “balance” which represents the difference between the dialysate entering the abdomen and the fluid leaving it.
At the end of a dialysis session, a positive balance refers to the dialysate retained by the child. For example, a 500 ml infusion with a 400 ml drainage corresponds to a positive balance of + 100 ml. The child retained 100 ml of the 500 ml administered. A negative balance refers to the dialysate and excess fluid removed from the child. For example, a 500 ml infusion with a 700 ml drainage corresponds to a negative balance of – 200 ml. The child has therefore eliminated 200 ml more than the amount of dialysate infused.
The sugar concentration of the dialysate is indicated by the color of the pull ring on the bag:
white: 0.5%
yellow: 1.36% or 1.5%
green: 2.27% or 2.5%
orange: 3.86% or 4.25%
The bag with the purple pull ring contains 7.5% icodextrin which is glucose polymer.
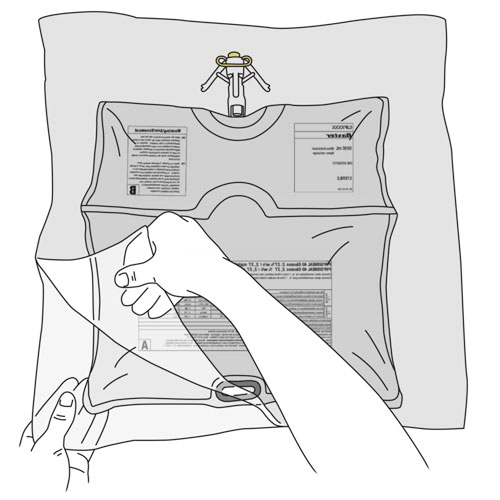
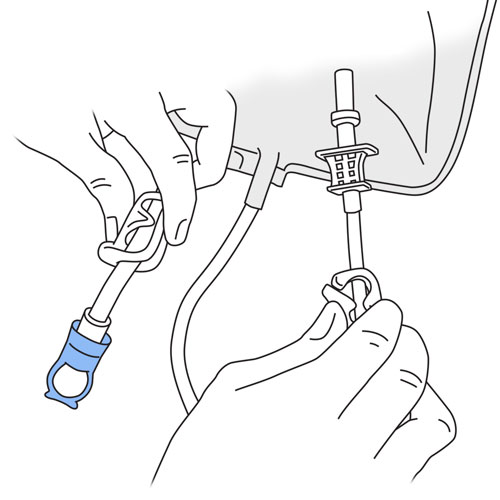
Each dialysate bag has:
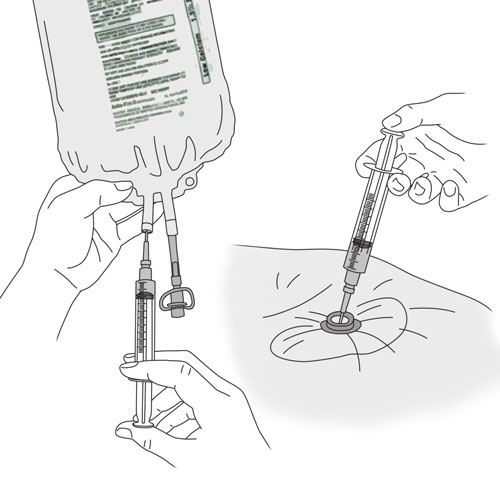
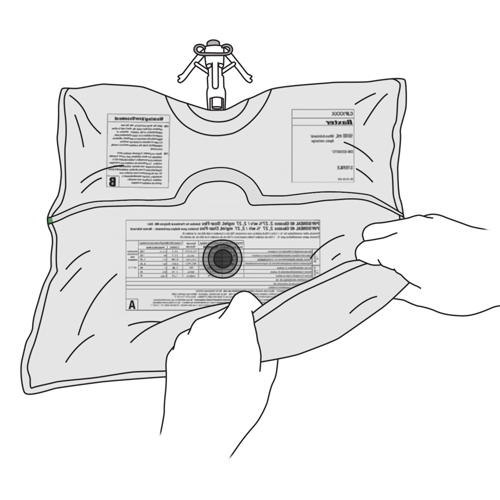
an injection port: allows you to add medication to the solution,
a hanger hole: to hang the bag,
a connector: to connect the bag to a tubing for treatment,
a cannula (or cone) in the stem of the connector: breaking the cannula allows the solution to flow out,
a pull ring: to protect the end of the connector; its shape facilitates its removal to connect the connector to a line (or tubing) for treatment.
There are several types of dialysate, with varying concentrations and sizes. Here are the ones that are most often used for children at home:
SORT OF DIALYSATES
(Source: Baxter International Inc.)
Physioneal™
Contains glucose/dextrose in concentrations of 1.36%, 2.27% or 3.86%, sodium, calcium, magnesium, chloride, lactate and bicarbonate.
Available in 2.5 and 5 liter bags.
Has a neutral pH (7.4).
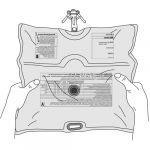
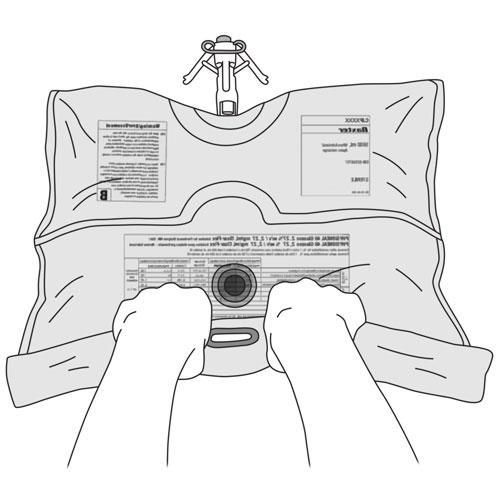
Has two chambers (or compartments) containing different solutions.
Specifics for the 2.5 liter format:
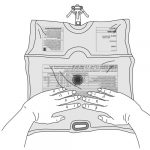
Has a cannula between the two chambers, to be broken to mix the solutions.
Specifics for the 5 liter format:
Has a small and a large chamber.
The injection port is located at the back of the large chamber.
Has two seals:
a long seal separates the two chambers; the opening of the long seal allows mixing of solutions.
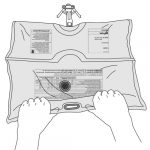
a short seal separates the small chamber from the connector; the opening of the short seal will allow the solution to flow into the connector.
The connector has wings: closing the wings advances the connector cannula to puncture the bag and allow the solution to flow into the tubing for treatment.
Dianeal™
Contains glucose in concentrations of 0.5%, 1.5%, 2.5% or 4.25%, sodium, calcium, magnesium, chloride and lactate.
Available in 2, 3 or 5 liter bags.
Has an acidic pH (5.5).
Extraneal™
Contains icodextrin (a molecule larger than glucose) in a concentration of 7.5% as well as sodium, calcium and magnesium, chloride and lactate.
Available in 2.5 liter bags only.
Has an acidic pH (5.5).
Used once a day for a long dwell time.
The amount of waste and water removed during a dialysis session depends on the type and concentration of the solution, the duration of the dwell phase and the filtration capacity (permeability) of the peritoneal membrane. Sometimes the healthcare team will recommend a change in the type of dialysate during the course of treatment because of certain signs of dehydration or fluid overload present in the the child (eg, rapid weight change, blood pressure too high or too low, presence or absence of swelling, etc.). Do not hesitate to discuss this with your child’s healthcare team.
Peritoneal dialysis requires the installation of a small flexible tube, the peritoneal catheter, to allow the dialysate to enter and exit the peritoneal cavity. This catheter is installed surgically in the abdomen, on the right or left side. Different types of catheters can be used.
The catheter has an external and an internal part. The catheter has one or two dacron cuffs in the internal part, allowing it to be stabilized under the skin and inside the peritoneal cavity. These cuffs are not visible from the outside.
The catheter insertion site (or entry site or catheter site) is the skin around the catheter. The bump or line you feel under the skin a few inches from the catheter insertion site is the beginning of the inner part and is called a “tunnel”. The tunnel is the path of the catheter under the skin, from the insertion site to the peritoneal cavity.
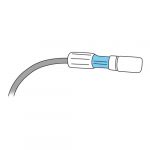
The child keeps the catheter in place as long as he or she requires peritoneal dialysis, for weeks, months or years. The catheter is connected to a titanium adapter, which in turn is connected to an extension (or transfer line). This extension is protected by a MiniCap disconnect cap between dialysis sessions. The catheter insertion site is covered with a dressing.
There are two methods of peritoneal dialysis. Each has its advantages and disadvantages. With your help, your healthcare team will identify the one that best suits your child’s needs.
METHODS OF PERITONEAL DIALYSIS (PD)
Automated PD (APD)
Automated method using a device (cycler) with constant or no presence of dialysate in the peritoneal cavity.
It consists of approximately four to ten short exchanges at night, according to a pre-established program in the cycler. Daytime exchanges may also be added, depending on the child’s needs.
The dialysate is injected and drained from the peritoneal cavity automatically by the cycler.
This type of peritoneal dialysis is the most frequently used at home for children.
Several types of programming are possible. The most frequently used are:
Continuous cyclic PD (CCPD): In addition to the nighttime exchanges, a longer exchange during the day is added. The cycler is disconnected in the morning upon awakening; dialysate remains in the peritoneal cavity during the day. In the evening, at bedtime, the effluent is drained after connection to the cycler for the night.
Intermittent PD (IPD): Drainage is performed in the morning. The peritoneal cavity remains empty during the day.
Continuous Ambulatory PD (CAPD) or Manual PD
Manual method with constant presence of dialysate in the peritoneal cavity.
Usually consists of four exchanges per day, at regular intervals: morning, noon, late afternoon and at bedtime. The dwell phase is longer at night.
The dialysate enters and leaves the peritoneal cavity by gravity.
This type of dialysis is not very common at home in children. It is mainly used in emergencies when the cycler is not working.
The equipment required for automated peritoneal dialysis includes several accessories:
AUTOMATED PERITONEAL DIALYSIS (PD) EQUIPMENT
(Source: Baxter International Inc.)
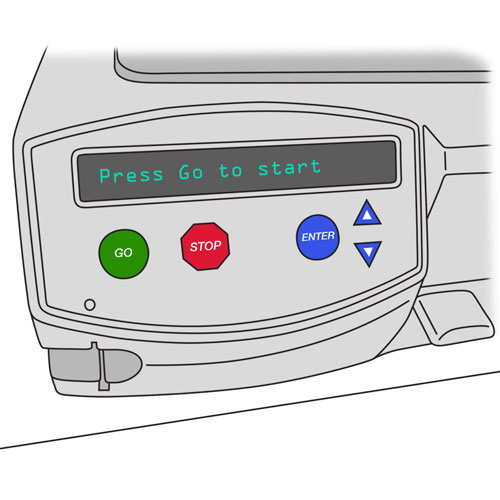
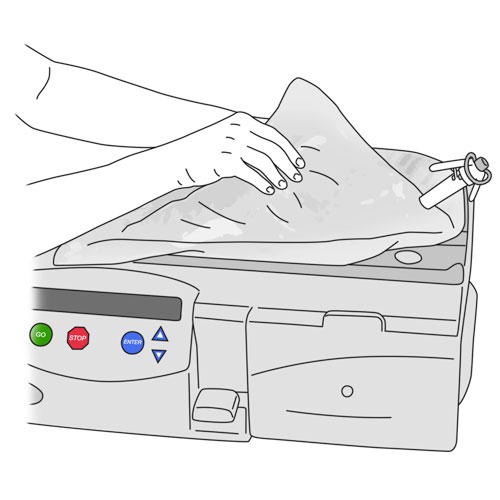
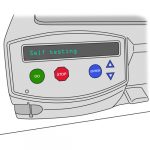
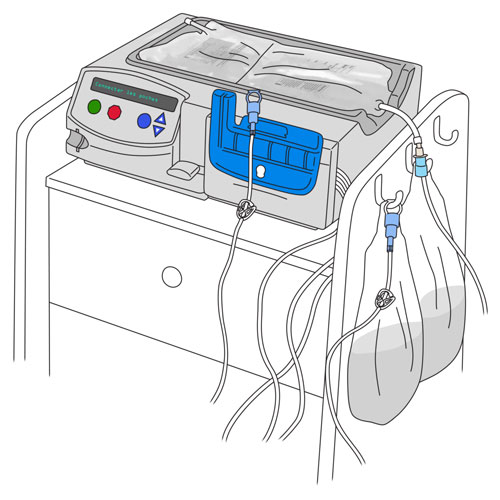
Cycler
There are different models of cyclers (eg, HomeChoice, HomeChoice Pro MC).
Some models allow the use of a memory card to record data.
The handle of the cycler locks/unlocks the compartment where the APD cassette is installed.
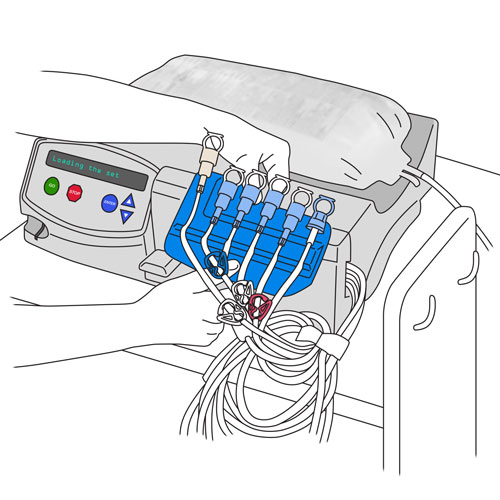
Cycler set with cassette or APD set
Contains several parts:
Cassette: has two separate compartments; one is used to measure the amount of dialysate infused and the other the amount of effluent drained.
Organizer: allows the grouping of tubing in a specific order for use.
Lines (or Tubings):
specimen line: is Y-shaped with the drain line; is used to connect the specimen bag if needed; has a white clamp.
drain line: installed at the far right of the organizer; used to connect the drain bag; does not have a clamp.
heater line: used to connect the bag placed on the heater (empty or full bag); has a red clamp.
bag lines (orsupply lines): are used to connect the dialysate bags for the duration of the treatment, if needed; have white clamps.
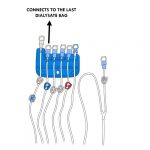
last fill line: is used to connect the last dialysate bag for daytime use if the type of solution is different from the solutions used at night; can also be used as an additional bag line if the same dialysate is used for the entire treatment; has a blue clamp.
patient line: installed on the far left side of the organizer; connects the child with the catheter extension for treatment; has a white clamp.
(Click to see larger image)
The end of each line is protected by a protective cap.
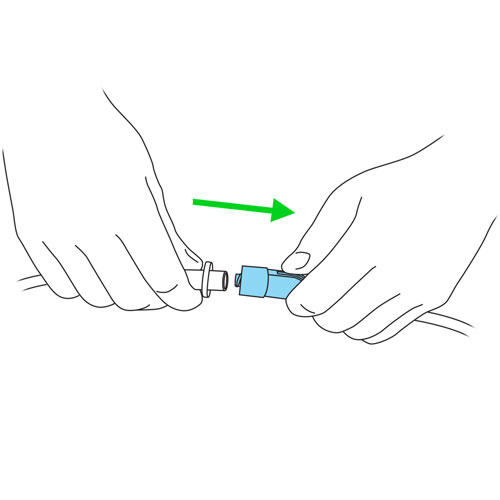
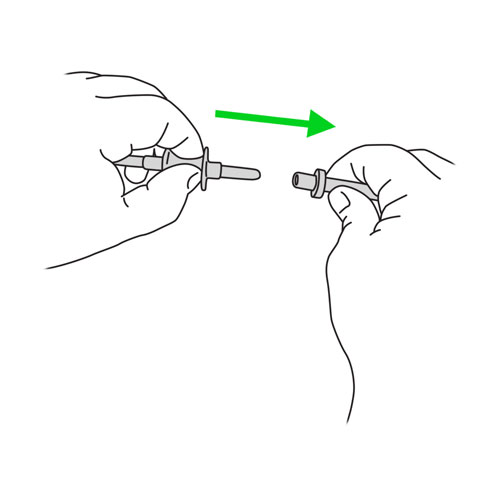
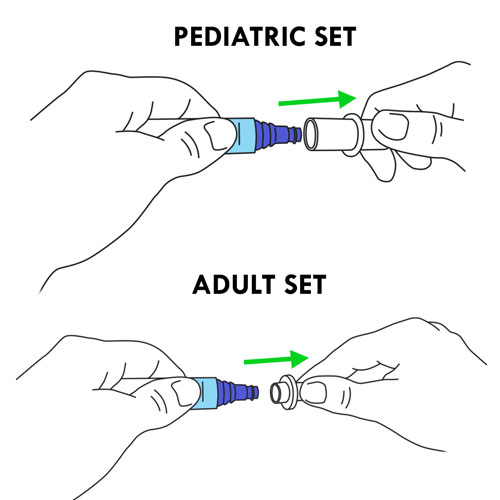
The set model used for peritoneal dialysis is specific to children. However, when the volume of dialysate to be injected is ≥ 1000 ml, your healthcare team may suggest that you use the adult model.
The patient line tip is different between the two models:
the patient line tip of the pediatric (child) set fully covers the catheter extension tip when connected;
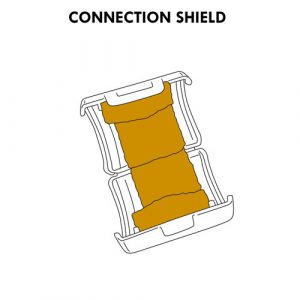
the patient line tip of the adult set only partially covers the end of the catheter extension when connected; some healthcare teams recommend installing a connection shield with povidone-iodine to protect the exposed portion of the extension.
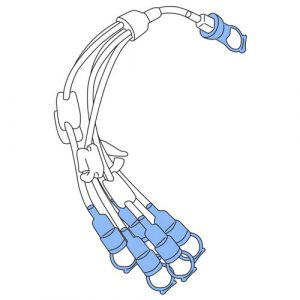
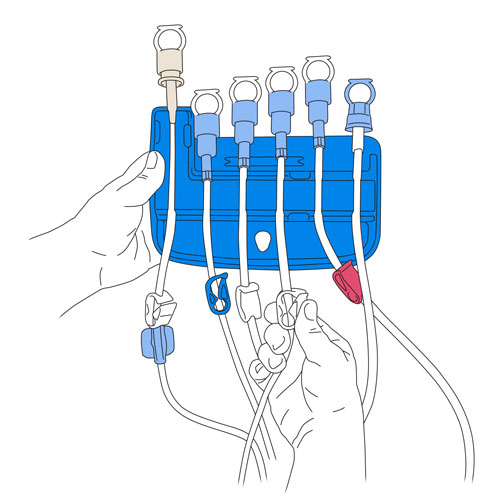
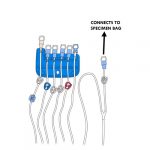
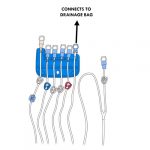
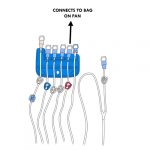
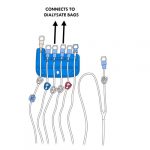
5-Prong manifold set
Allows connection of additional dialysate bags if the 2 bag lines are not sufficient.
Each line has a clamp and its end is protected by a protective cap.
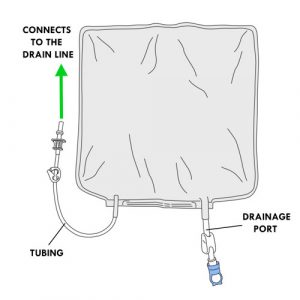
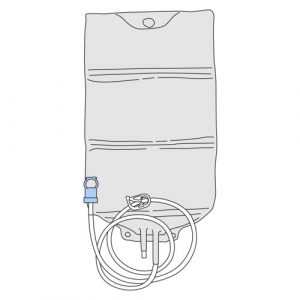
Drainage bag
Collects effluent.
Has a tubing with a perforator protected by a protective cap.
This tubing connects to the drain line of the cycler set with cassette.
Has a drainage port to empty the effluent; its is protected by a protective cap.
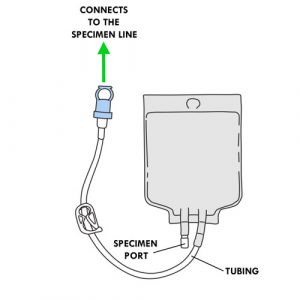
Specimen bag
Collects the effluent specimen.
Has a tubing protected by a protective cap.
This tubing connects to the specimen line of the cycler set with cassette.
Has a specimen port for removing effluent with a syringe.
Empty bag
Installed on the heater as needed.
Is used when the child needs a mixture of dialysates with different concentrations and small volumes infused per cycle.
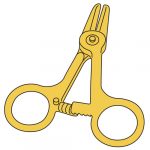
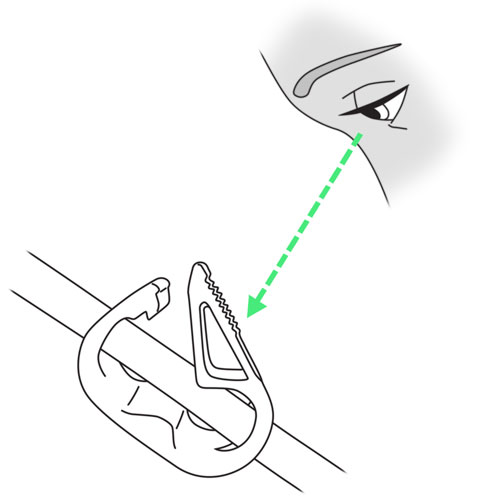
Dialysis clamp
Allows you to clamp the catheter in case of emergency, disconnection or breakage of the catheter.
Depending on the recommendations of your healthcare team, can also be used to:
secure the closure of the drainage bag tubing through which the effluent is drained;
clamp multi-line extension and bag lines not connected to a dialysate bag during treatment.
Refer to your healthcare team for:
the type of dialysis solutions to use,
the frequency of exchanges to be performed,
the operation of the cycler, if applicable.
Unfortunately, peritoneal dialysis cannot replace everything that healthy kidneys do. The child must therefore follow a specific diet and take vitamins and medication as recommended by the healthcare team.
Your healthcare team is available to supervise the care provided to your child, ensure the proper functioning of equipment and make recommendations to you as needed.
Refer to your healthcare team if the equipment used for your child at home is different from what is described in this section or in the methods of care.
FAQ – Peritoneal dialysis
When to consult your healthcare team
General state of healthcondition
When your child has any of the following symptoms:
Fever (≥ 38oC rectal or ≥ 37.5oC oral or ≥ 37.5oC armpit)
General irritability, poor appetite, fatigue or wanting to sleep more than usual (lethargy)
Signs and/or symptoms of dehydration:
Rapid weight loss compared to child’s dry weight
Dizziness
Less saliva, dry lips
Low blood pressure (Hypotension)
Orthostatic low blood pressure
Increased heart rate
Muscle cramps, especially in the legs
Weakness
Symptoms of fluid overload:
Rapid increase in weight compared to child’s dry weight
Swelling of the hands, ankles and feet
Swelling around the eyes and/or face
High blood pressure (Hypertension)
Difficulty breathing
Shortness of breath
Low urine output
Difficulty controlling blood pressure
More frequent and/or larger volume of stools (diarrhea)
Discharge, redness, heat, swelling, bad odor and/or pain around the catheter insertion site
Bump or red line near the catheter insertion site (on the skin covering the catheter tunnel) with redness, swelling, pain or tenderness and/or discharge
Leakage at the catheter insertion site
Catheter breakage
Visible external catheter cuff (displacement of the catheter)
Equipment for peritoneal dialysis
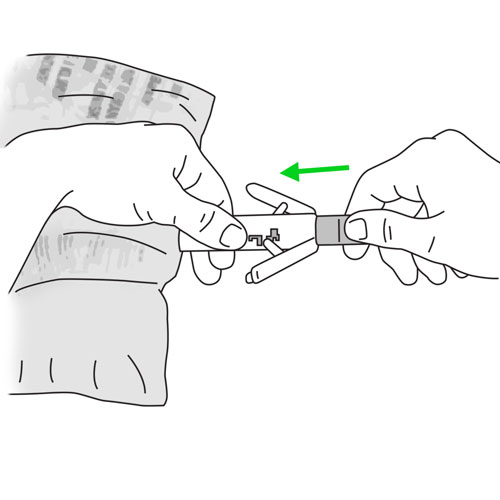
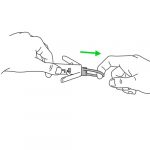
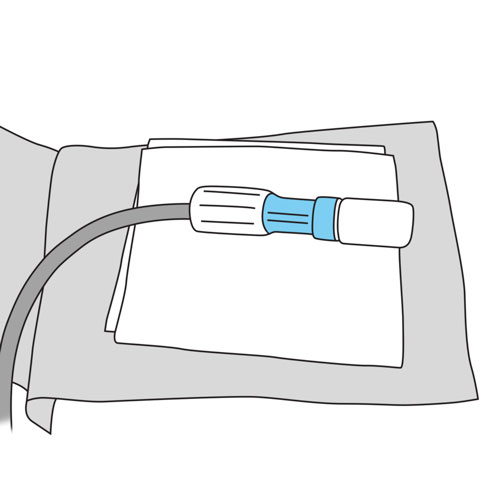
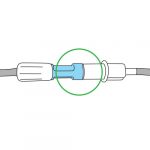
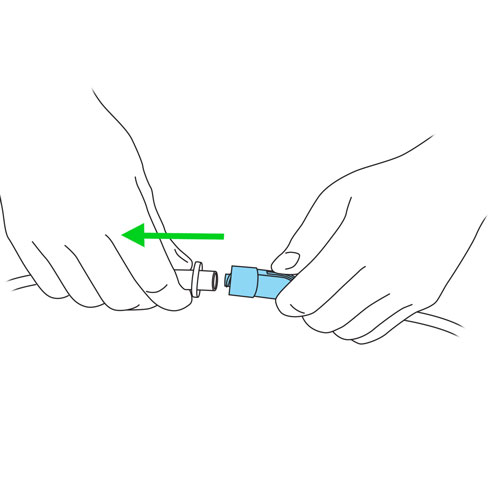
Partial or complete disconnection between the extension and the catheter
Partial or complete disconnection between patient line and extension tubing during dialysis
Disconnection between MiniCap disconnect cap and extension tubing
Contamination of extension tip during dialysis preparation
Suspected contamination (eg, during connection, disconnection, medication preparation, etc.)
Problem with the cycler alarm that you are unable to resolve
Leaking out of the bag during the dialysis session
Peritoneal dialysis sessions
Pink or red effluent
White filaments or small pieces in the effluent
Cloudy effluent
Decrease in ultrafiltration/decreased effluent
Frequent cycler alarms during dialysis treatment
Increase or decrease in weight relative to child’s dry weight, as determined by your healthcare team
Your child’s healthcare team will take the opportunity during your child’s follow-up appointments to review your child’s care and equipment. Adjustments will be made as required.
Do not hesitate to refer to your child’s healthcare team for any questions or for specific advice related to your child’s condition.
WARNING: The information in this section is meant as a general guide for parents and caregivers of children with certain problems related to peritoneal dialysis. It is not intended to replace the recommendations of your child’s healthcare team.
Discuss your child’s unique needs with the healthcare team, including WHO and WHEN to contact when problems arise.
Fever with or without general malaise: ≥ 38⁰C rectal or ≥ 37.5⁰C buccal or ≥ 37.5⁰C armpit
Possible cause(s)
Urinary Tract Infection
Peritonistis
Infection PD catheter
Other infection
What to do?
Contact your healthcare team quickly.
General irritability, poor appetite, fatigue or wanting to sleep more than usual (lethargy)
Possible cause(s)
Change in baseline health of the child may indicate new infection or other problem
What to do?
Note any other changes or symptoms that your child may have.
Contact your healthcare team quickly.
One and/or the other of these symptoms: rapid weight loss compared to your child's dry weight - dizziness - less saliva, dry lips - low blood pressure - orthostatic low blood pressure (low blood pressure and increased pulse) when your child moves from a lying to a sitting position) - increased pulse rate - muscle cramps, especially in the legs - weakness
Possible cause(s)
Dehydrationcaused by:
use of the wrong concentration of dialysate,
insufficient fluid intake,
nausea,
diarrhea,
vomiting,
excessive urination,
acute illness
What to do?
Have your child sit or lie down if feeling dizzy or weak.
Contact your healthcare team quickly.
While waiting to reach your healthcare team:
Discontinue dialysis session, if in progress.
Weigh your child.
Take your child’s blood pressure lying down and then sitting up (orthostatic blood pressure) unless your child unable to sit independently.
Give your child more fluids to drink, especially salty fluids (eg, chicken broth).
Use less concentrated dialysis solutions, as recommended by your healthcare team.
If your child has cramps or dizziness:
Give him a salty liquid (eg, broth) or saltine crackers.
Apply a warm compress or towel to cramped muscles.
Massage the muscles.
One and/or the other of these symptoms: rapid increase in weight compared to your child's dry weight - swelling of the hands, ankles, feet, around the eyes and/or face - hypertension (high blood pressure) - difficulty breathing - shortness of breath - low urine output
Possible cause(s)
Fluid overloadcaused by:
too much fluid or sodium intake,
use of the wrong dialysate,
inadequate ultrafiltration,
incorrect weight reading,
insufficient or inadequate dialysis,
catheter malfunction,
decrease in urine production
What to do?
Contact your healthcare team quickly.
While waiting to reach your healthcare team:
Continue with your dialysis session.
Limit fluids and salty foods.
Use more concentrated dialysis solutions, as recommended by your healthcare team.
Problems related to the material
Discharge, redness, heat, swelling, bad odor and/or pain around the catheter insertion site with/without fever (≥ 38⁰C rectal or ≥ 37.5⁰C oral or ≥ 37.5⁰C armpit)
Possible cause(s):
Infection or inflammationcaused by:
poor or insufficient care at the catheter insertion site,
insufficiently frequent dressing changes,
poor fixation of the catheter
Chronic skin irritation
Trauma to the site
What to do?
Contact your healthcare team quickly.
While waiting to reach your healthcare team:
Take a specimen of the flow at the insertion site, as taught.
If possible, take a picture of the site.
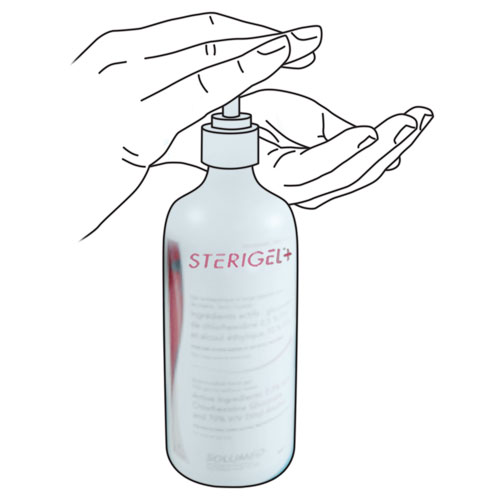
If you need to leave to get your smartphone or camera, cover the site with a sterile compress. After taking the photo, rewash your hands using an alcohol-based antiseptic gel (eg, Stérigel®) to the entire surface of your hands and rub until they are dry (20 to 30 seconds).
Keep the skin clean and dry around the catheter insertion site.
Bump or red line near the catheter insertion site with redness, swelling, pain or tenderness and/or discharge with/without fever (≥ 38⁰C rectal or ≥ 37.5⁰C oral or ≥ 37.5⁰C armpit)
Possible cause(s)
Tunnel infection (catheter pathway under the skin, from the insertion site to the peritoneal cavity) caused by:
an infection at the catheter insertion site,
an abscess,
inadequate healing of the site
What to do?
Contact your healthcare team immediately.
While waiting to reach your healthcare team:
Take a specimen of the flow at the insertion site, as taught.
If possible, take a picture of the site.
If you need to leave to get your smartphone or camera, cover the site with a sterile compress. After taking the photo, rewash your hands using an alcohol-based antiseptic gel (eg, Stérigel®) to the entire surface of your hands and rub until they are dry (20 to 30 seconds).
Keep the skin clean and dry around the catheter insertion site.
Get ready to go to the hospital.
Wet dressing
Possible cause(s)
Poor protection of the dressing while showering or swimming
Leakage from the catheter insertion site
Catheter breakage
Disconnection of the extension
Infection
Urinary incontinence or diaper overflow
What to do?
If the dressing was improperly protected, clean the site and change the dressing.
If not, try to identify the cause of the discharge.
Clamp the catheter with a dialysis clamp.
Contact your healthcare team immediately.
While waiting to reach your healthcare team:
Remove the wet dressing.
Take a specimen of the flow at the insertion site, as taught.
If possible, take a picture of the site.
If you need to leave to get your smartphone or camera, cover the site with a sterile compress. After taking the photo, rewash your hands using an alcohol-based antiseptic gel (eg, Stérigel®) to the entire surface of your hands and rub until they are dry (20 to 30 seconds).
Keep the skin clean and dry around the catheter insertion site.
Change the dressing frequently.
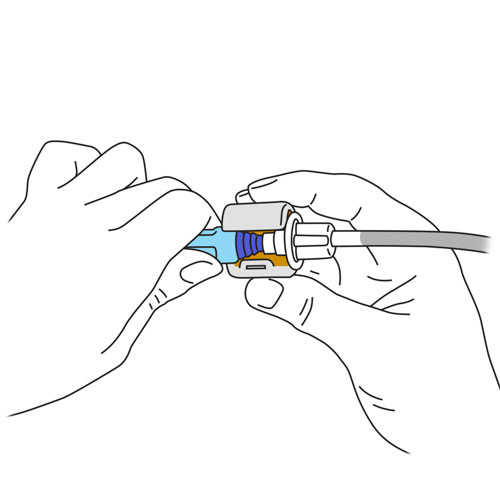
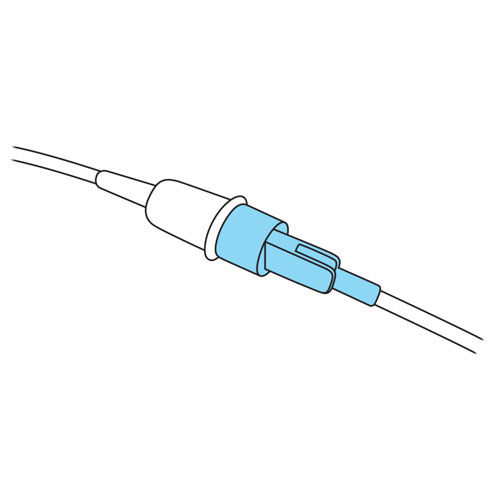
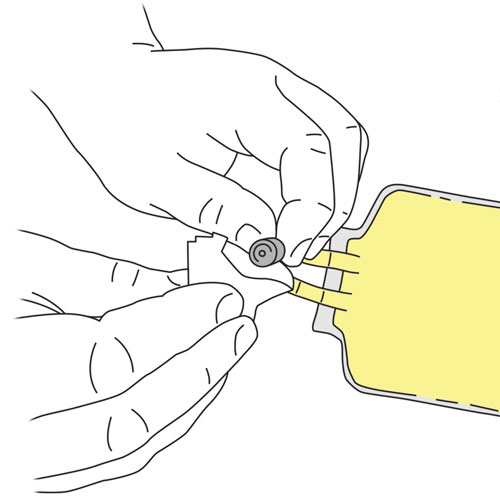
Disconnection between patient line and extension during dialysis
Possible cause(s)
Accident
Incorrect connection technique
What to do?
Discontinue the dialysis session.
If complete disconnection:
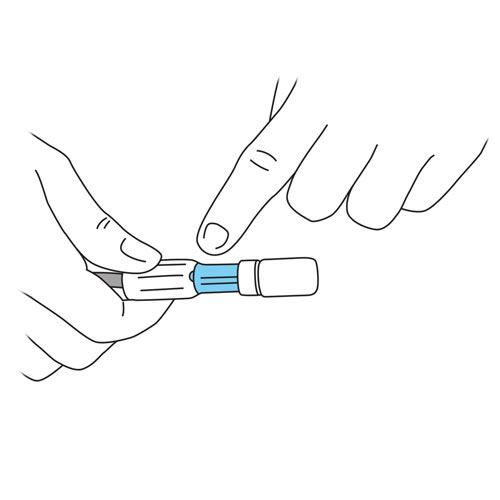
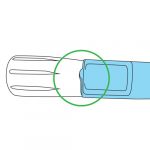
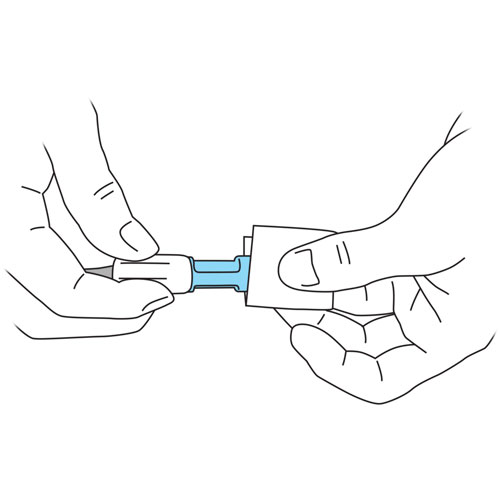
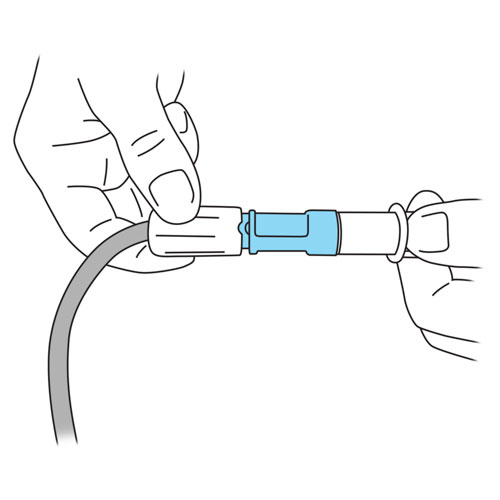
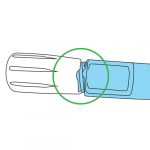
Close the extension: the two half-moons of the white part and the light blue part must be well aligned and nested in each other.
Put on a MiniCap disconnect cap.
Contact your healthcare team immediately.
If partial disconnection:
Close the extension: the two half-moons of the white part and the light blue part must be well aligned and nested in each other.
Contact your healthcare team immediately.
Disconnection between MiniCap disconnecting cap and extension tubing
Possible cause(s)
Accident
Incorrect connection technique
What to do?
Stay calm.
Make sure the extension is closed.
If the MiniCap disconnect cap is loose, screw it on completely.
If the MiniCap has fallen off, install a new one.
Contact your healthcare team immediately.
Prepare to go to the hospital.
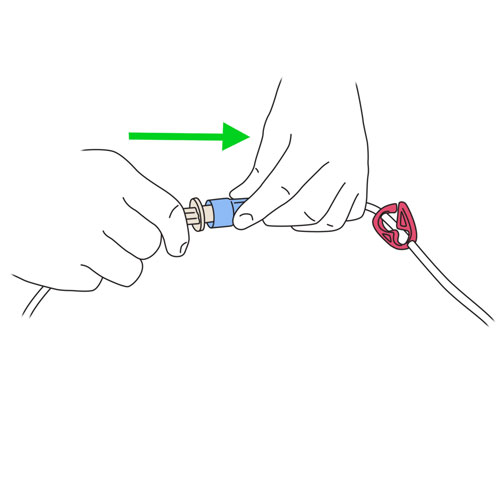
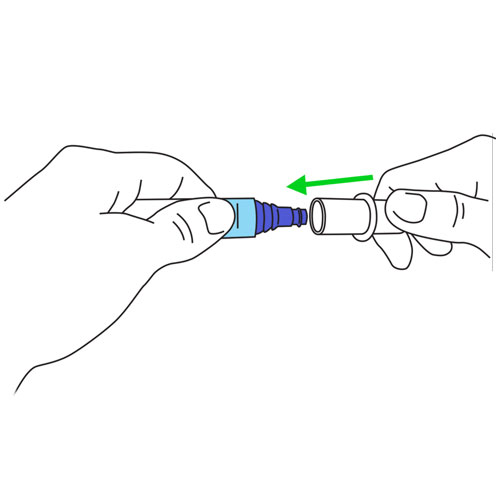
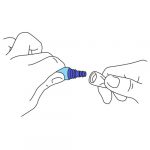
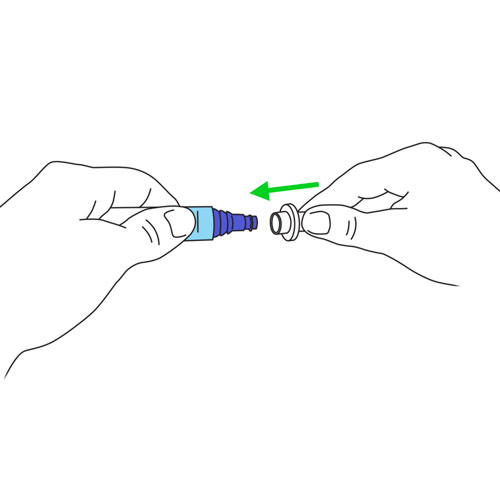
Disconnection between the extension and the catheter
Possible cause(s)
Accident
Damaged catheter
What to do?
Stay calm.
Immediately clamp the catheter with a dialysis clamp.
If complete disconnection:
Wrap the catheter in sterile compress.
Contact your healthcare team immediately.
If partial disconnection:
Tighten the extension.
Wrap it with a sterile compress.
Contact your healthcare team immediately.
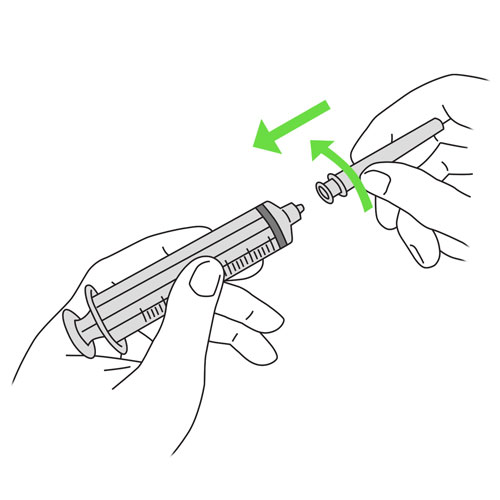
Contamination of the extension tip during dialysis connection
Possible cause(s)
Failure to follow aseptic measures
Accident
What to do?
Put on a MiniCap disconnecting cap.
Contact your healthcare team immediately.
Catheter breakage
Possible cause(s)
Accident
Catheter wear
What to do?
Stay calm.
Immediately clamp the catheter with a dialysis clamp between the catheter insertion site and the site of the broken catheter.
Discontinue dialysis session, if in progress.
Put on a MiniCap disconnect cap.
Contact your healthcare team immediately.
Go to the hospital immediately.
Drainage from the bag during the dialysis session
Possible cause(s)
Incorrect cannula breakage technique during bag preparation
Bag manufacturing defect
Perforation of the bag during the injection of the medication through the injection port
What to do?
Stop the dialysis session.
Contact your healthcare team immediately.
Cycler alarms
Possible cause(s)
Various
What to do?
Look at the message on the screen.
Take appropriate action.
If necessary, refer to the instructions in the cycler’s manual or in the alarm book available to you.
If you are still unable to resolve the problem, contact your healthcare team or the manufacturer’s technical support (eg, Baxter) whose number is displayed on the cycler.
Catheter cuff visible outside the insertion site
Possible cause(s)
Catheter displacement
What to do?
Stay calm.
Contact your healthcare team immediately.
Problems related to the peritoneal dialysis session or the child's general condition
Cloudy effluent (as if milk had been added) with any of these symptoms: Constant pain in the belly - Chills - Fever (≥ 38⁰C rectal or ≥ 37.5⁰C oral or ≥ 37.5⁰C axilla) - Nausea - Vomiting - Decreased effluent drainage - Headache - Loss of appetite - Fatigue - Abdominal muscle cramps or spasms (stiffness, pain)
Possible cause(s)
Peritonitis (infection of the peritoneum) caused by:
failure to follow aseptic measures during treatment
incorrect dialysis technique
catheter site infection
weak immune system of the child
untreated contamination
Inflammatory reaction
Appendicitis
Invasive technique
Movement of bacteria from the intestines to the peritoneal cavity
What to do?
Contact your healthcare team immediately.
While waiting to reach your healthcare team:
Discontinue dialysis session, if in progress.
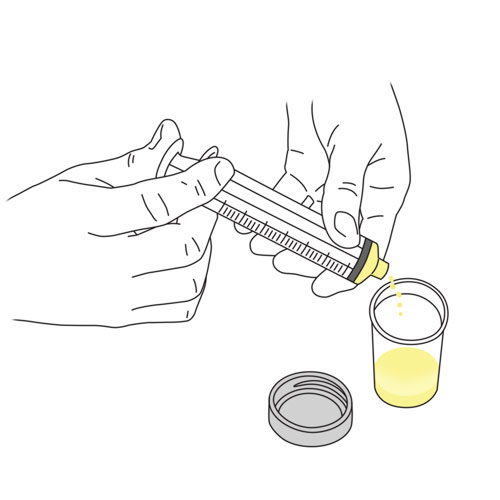
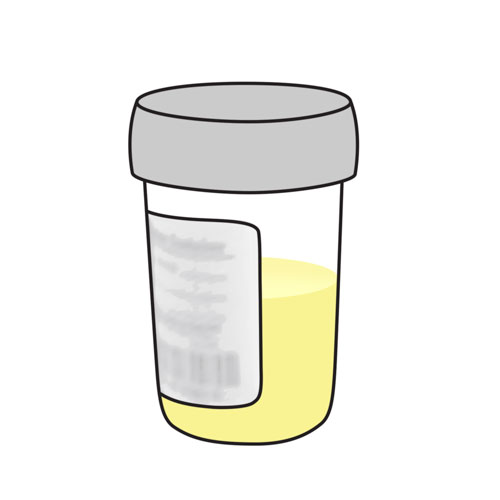
Add a specimen bag and then take a specimen of the dialysate after it has been in the peritoneal cavity for 60-90 minutes in the dwell phase.
Take your child’s temperature, blood pressure and pulse.
Filaments (threads) or small white pieces in the effluent
Possible cause(s)
Presence of fibrin (looks like partially cooked egg white) caused by:
normal body reaction to the presence of a foreign body, the catheter, in the peritoneal cavity,
infection, inflammation,
installation of a new catheter,
condition of the child
What to do?
Contact your healthcare team quickly.
While waiting to reach your healthcare team:
Continue the current dialysis session unless there are too many strands.
Make sure you have the heparin vial available while you wait for your healthcare team’s advice.
To prevent catheter blockage by fibrin build-up:
Check for it in the drainage bags at the beginning and end of treatment.
If present, notify your healthcare team.
Pink or red effluent
Possible cause(s)
Rupture of small blood vessels in the peritoneum often caused by physical exertion
Abdominal injury or fall during a sport activity
Menstruation or ovulation in adolescents
Forceful manipulation of the catheter
What to do?
If your child is unwell, contact your healthcare team immediately.
If your child is table, don’t worry; it’s often not serious and is usually temporary.
However, contact your healthcare team immediately and they will make the necessary assessment.
While waiting to reach your healthcare team:
Make a 2nd exchange and compare the color with the previous cycle.
Take your child’s blood pressure and pulse.
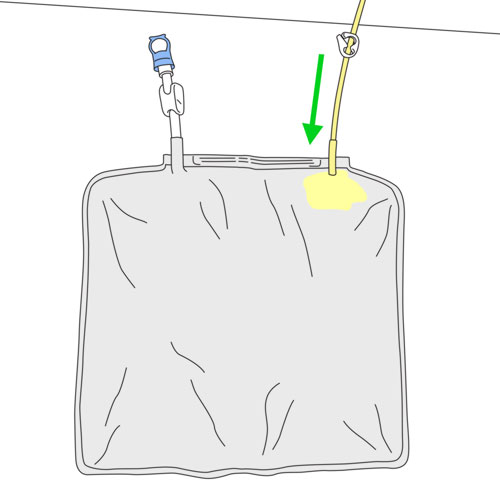
Insufficient, incomplete, prolonged or blocked drainage
Possible cause(s)
Obstruction of the catheter due to the presence of fibrin (normal reaction of the body to the presence of the catheter in the peritoneal cavity)
Mechanical obstruction caused by constipation, your child’s position, overfilled bladder and/or bowels
Displacement of the catheter
Closing of the clamps
Drainage bag too high
What to do?
Make sure all clamps are open.
Alternate your child’s position: left and right side.
Assess whether your child may be constipated.
Make sure the bladder is empty.
Keep the drainage bag as low as possible (lower than the cycler and your child’s belly).
If the problem persists, contact your healthcare team quickly.
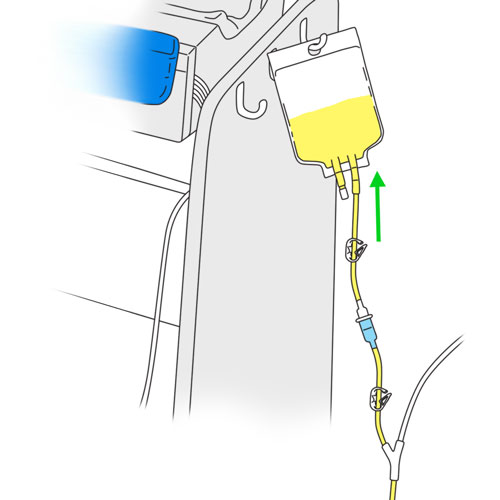
Slow or blocked infusion of the dialysate
Possible cause(s)
Clamp closure
Improperly prepared dialysate bags
Catheter obstruction caused by the presence of fibrin (normal reaction of the body to the presence of the catheter in the peritoneal cavity)
Internal mechanical obstruction of the catheter
Catheter displacement
What to do?
Make sure all clamps are open.
Make sure the dialysate bag cannulas are broken and the seals are open.
If the problem persists, contact your healthcare team quickly.
Decrease in ultrafiltration/decreased effluent
Possible cause(s)
Constipation
Peritonitis
Presence of fibrin
Change in the state of the peritoneal membrane
What to do?
Contact your healthcare team.
Abdominal cramps during drainage
Possible cause(s)
Dialysate temperature too cold
Effluent drainage too fast
Peritonitis
Catheter displacement
What to do?
Ensure that the temperature setting on the cycler is appropriate for the dialysate bag.
Give pain medication if recommended by your healthcare team.
If the problem persists, contact your healthcare team quickly.
Constipation
Possible cause(s)
Pressure of the dialysate on the intestines
Certain medications (eg, antacids, calcium carbonate, iron)
Diet low in fiber
Decreased physical activity
Inadequate hydration
What to do?
Give laxative medications, if recommended by your healthcare team.
Increase fluids, if your child’s diet allows it.
Increase fiber-rich foods, as recommended by your healthcare team.
Increase the amount of physical activity, if possible.
If the problem persists, contact your healthcare team.
One and/or the other of these symptoms: fatigue - muscle weakness - decreased energy - increased sleep
Possible cause(s)
Anemia
Hypotension (low blood pressure)
Dehydration
Inadequate nutrition (eg, lack of protein)
Lack of physical activity
What to do?
Make sure your child is eating and hydrating well, as recommended by your healthcare team.
Increase physical activity.
Be sure to follow the prescription for oral and subcutaneous medications.
If the problem persists, inform your healthcare team at your next visit.
Shoulder pain
Possible cause(s)
Irritation of the diaphragm caused by air in the peritoneal cavity
What to do?
Not dangerous but uncomfortable.
If it is only a small amount of air, it will be quickly absorbed by your child’s body.
If you see a lot of air in the patient line, drain the peritoneal cavity, as taught by your healthcare team.
Lay your child on his or her back.
Put pillows under his or her hips to support them.
If the pain persists, contact your healthcare team quickly.
Itching
Possible cause(s)
Dry skin
Electrolyte imbalance (eg, high phosphorus level)
What to do?
Apply a moisturizing cream or lotion to your child’s skin as recommended by your healthcare team.
Wash your child with a soap for dry or sensitive skin.
Use an unscented laundry soap formulated for sensitive skin.
Contact your healthcare team for other recommendations, depending on your child’s condition.
Diarrhea
Possible cause(s)
Viral infection
Peritonitis (infection of the peritoneum)
Too many laxatives
What to do?
Contact your healthcare team quickly.
While waiting to reach your healthcare team:
Increase fluid intake (small amounts given often) and salty foods, if recommended by your healthcare team.
Note the frequency and consistency of bowel movements and whether blood is present.
Take your child’s blood pressure and pulse and weigh your child.
Restless legs (need to move the legs at night or while lying down)
Possible cause(s)
Excessive or insufficient dialysis sessions
Lack of physical activity
What to do?
Contact your healthcare team.
Increase your child’s physical activity.
Do not hesitate to refer to your child’s healthcare team for any questions or for specific advice related to your child’s condition.
Everyday tips
Clothing
Cover the catheter with clothing.
Do not put the catheter in the diaper.
Do not attach the tip of the catheter near the gastrostomy or jejunostomy (if present) as there is a risk of contamination if there is discharge from the stoma.
Bathing and swimming
Bathing at the sink (or sponge bath):
Allowed at all times.
It is important to protect the dressing from splashing.
Shower:
Before the catheter site is healed (up to 6 weeks after catheter insertion) AND your healthcare team has given permission OR at any time if the skin is not intact (red, broken, etc.): no showering allowed, unless otherwise directed by your healthcare team.
When the site is well healed (approximately 6 weeks or more after catheter insertion) AND your healthcare team has given authorization: showering allowed once a day OR a minimum of three times a week with the catheter dressing covered with a second waterproof protective dressing (eg, transparent adhesive film such as Opsite® or Tegaderm®) OR with the catheter site exposed to the air.
AVOID except for infants only when the site is well healed (approximately 6 weeks or more after catheter insertion) AND your healthcare team has given permission: bathing then allowed daily OR minimum three times a week with the catheter dressing covered with a second waterproof protective dressing (eg, transparent adhesive film such as Opsite® or Tegaderm®).
The water level in the bathtub should NEVER touch the dressing; it is important to protect it from splashing.
If the catheter dressing below the protective dressing gets wet during the bath, change it immediately.
Swimming:
Follow your healthcare team’s instructions for swimming; they may be different depending on the child’s condition.
Your child can swim in a private pool or in salt water (sea, ocean).
It is not recommended that your child swim in a public pool, lake or river because there is a risk of infection at the catheter site and the possibility of peritonitis (infection inside the abdomen).
Wrap the catheter with a 4″ by 4″ sterilecompress and cover the catheter dressing with a second protective waterproof dressing (eg, Opsite® or Tegaderm® type clear adhesive film).
Your child cannot swim if the skin around the catheter insertion site is not intact (is red, broken, etc.).
Maintain a regular sleep routine, appropriate to the age of your child.
Nutrition and hydration
Refer to your healthcare team’s recommendations for your child’s diet. Adequate nutrition is essential to maintain your child’s health.
Your child’s diet may require modification depending on kidney function, medications changes or other changes in your child’s health.
Follow your healthcare team’s recommendations for food and/or fluid restriction (eg, foods with high fluid content, high salt, potassium and phosphorus).
Discuss your child’s expected urination and stooling frequency (bowel movements) with your healthcare team.
Kidney disease can make it hard for the kidneys to properly balance fluids in the body. Your healthcare team will help you learn how to evaluate your child’s hydration (fluid balance) and to identify if your child has: tow much fluid in the body (fluid overload), too little fluid (dehydration) or the right amount (in balance). Follow your healthcare team’s recommendation to assess hydration by:
knowing your child’s dry weight,
weighing your child at the agreed upon frequency,
taking your child’s blood pressure and hearth rate as requested,
It is important that your child returns to his or her regular activities as soon as possible.
Healing of the catheter insertion site takes several weeks (approximately 6 to 12). Some activities are not allowed during this time (eg, strenuous activity). Follow the recommendations of your healthcare team.
When the site has healed and the care team allows it, your child should continue to avoid:
contact sports that may cause the catheter to move accidentally,
handling weights,
gymnastics,
parachute jumping and bungee jumping,
use of scissors near the catheter,
contact of pets with the equipment and the cycler,
swimming in a public pool, lake or river.
Your child may return to school if he or she is well enough to do so. Notify school staff of your child’s treatment and care if necessary. Discuss your child’s return to school with your healthcare team.
Travel and transportation
If your child requires treatment while away from home, always bring with you the necessary equipment for dialysis sessions and medication administration, including a “recovery kit” in case of complications (eg, accidental disconnection of the catheter extension). This equipment minimally contains:
dialysate bags,
the medications,
a cycler set with cassette,
drainage bags,
MiniCap disconnection caps,
a specimen bag in case of emergency,
the cycler in a carrying case, if necessary,
4% chlorhexidine soap solution for hands,
alcohol-based antiseptic hand gel (eg, Stérigel®),
alcohol swabs or disinfectant wipes (eg, Sani-Cloth®Plus),
masks,
syringes and needles, if necessary,
disinfectant swabs (2% chlorhexidine and 70% alcohol or 70% alcohol only, as directed by your healthcare team),
Always have an up-to-date list of materials and equipment needed for travel so that you can replace missing items, if necessary.
Have a resource list available with the names and phone numbers of the hospital, your doctor, other members of your healthcare team and your equipment and materials suppliers. Also know how to reach them after hours and during vacations.
Before you leave on your trip:
contact your healthcare team to plan ahead for equipment needs during the trip;
check to see if the appropriate voltage for the cycler is available at your destination, if necessary;
always check with your insurance company to see if out-of-country healthcare needs are covered;
make sure you have a document from your healthcare team describing your child’s medical condition and peritoneal dialysis needs, as well as a list of your child’s medications;
have the specifics of your child’s cycler and equipment available;
in collaboration with your healthcare team, find out what resources may be required during the trip or at the destination, if you run out of equipment, if there is an equipment breakdown or a special health need;
plan what to do in case of an emergency.
For travel by airplane:
discuss with your healthcare team the need to move the cycler or the possibility of having one at your destination;
discuss with the airline what equipment is allowed in the cargo hold and in the cabin of the plane;
keep medications and documentation from your healthcare team with you in the cabin.
Others
Monitoring the catheter site:
It is important to keep the catheter securely in place with minimal movement to avoid injury around the insertion site and to prevent infection.
Check the skin around the catheter site carefully. Detecting a problem as soon as it occurs can prevent the need to change the catheter. Notify your healthcare team immediately if you notice any of these symptoms: redness, swelling, discharge and/or pain.
Monitoring weight:
Dry weight (or ideal “healthy weight” for the child) is the weight on the scale when your child has the right amount of water in his or her body, has normal blood pressure, no swelling, no difficulty breathing and is feeling well. Your healthcare team will help you determine your child’s dry weight at each appointment.
Weigh your child at the same time each day, morning and night. If he or she is receiving treatment by cycler, weigh your child each night before treatment and each morning after treatment, with comparable clothing.
Use a scale, specific to the nearest 0.2 kg if possible (more accurate). Record these measurements in a logbook and compare them with your child’s dry weight.
Rapid weight gain or loss can mean that your child has too much or too little fluid in his or her body. The healthcare team will use the results of the logbook to adjust treatment as needed. Contact your healthcare team if there is a change in weight between appointments.
Follow your healthcare team’s instructions if your child’s weight changes. They may recommend using more or less concentrated glucose solutions, adjusting hydration or salt intake.
If recommended by your your child’s healthcare team, use dialysis solutions based on a weight scale developed for your child.
Blood pressure monitoring:
Take your child’s blood pressure and pulse rate as instructed by your healthcare team: after the dialysis session in the morning upon waking up, three minutes afterwards in a sitting position (unless your child is an infant) and at night before the session.
Use the machine recommended by your healthcare team. If you are unsure of the results and if you have been taught, take a manual blood pressure. An increase in blood pressure may mean that your child has fluid overload. A decrease in blood pressure may mean that your child is dehydrated. In these circumstances, contact your healthcare team.
Take the blood pressure at the same time you take the weight.
Ultrafiltration:
Note the ultrafiltration result on the cycler screen in the register in the morning, at the end of each treatment.
Storage of dialysate bags:
The dialysate bag, when removed from its packaging and mixed, should be used within 24 hours. Discard any unused solution after the dialysis session.
Store boxes of dialysate bags anywhere in the house, in the same clean location, at a temperature between 15⁰C and 25⁰C; do not store them in an unheated area (eg, garage). Rotate; use the old ones before the new ones.
Storage of equipment:
Keep materials in a desk, drawers, or cabinet free of dust and dirt.
Frequency of equipment replacement: Follow your healthcare team’s recommendations on how often to change the equipment used. Here are some general recommendations:
Dialysate bag: discard after use;
Cycler set with cassette, drainage bag and specimen bag: discard after use;
Extension: replaced by your healthcare team every six months or more often if needed (eg, contamination, peritonitis);
MiniCap disconnect cap: put a new one on every morning after treatment;
Syringes and needles: discard after use.
Cycler care: Clean the outside of the cycler as needed with a disinfectant wipe (eg, Sani-Cloth® Plus) or a damp cloth. Do not use aerosol sprays.
Waste Management: Most waste generated in the home can be safely disposed of with the regular garbage.
Empty any fluid remaining in the tubing and dialysis bags into the sink, toilet or bathtub drain.
Empty the contents of the drainage bags into the toilet.
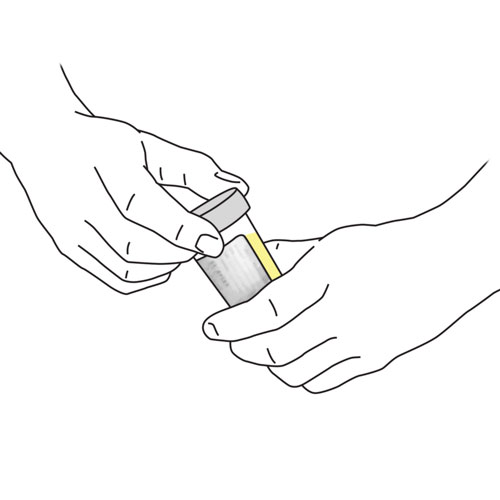
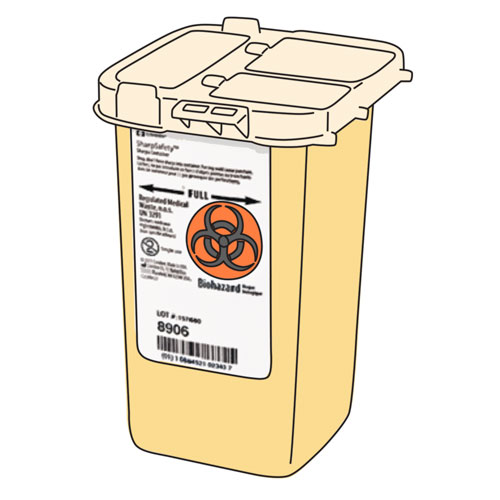
Unscrew the capped needles from the syringes. Dispose of syringe needles in a sharps container. Refer to your healthcare team for instructions on how to dispose of the container when full.
Place all non-recyclable materials (eg, dialysate bags, tubing, other waste) in a waste bag and seal it tightly before putting it in the trash.
The dialysate boxes can be recycled.
Medications:
All medications should be given to your child as directed by your healthcare team. This is especially important since his or her kidneys are no longer functioning properly.
Different medications may be recommended for your child:
phosphorus binder: prevents phosphorus from building up in the blood. Usually, healthy kidneys remove excess phosphorus in the urine. When the kidneys are not working well, phosphorus builds up in the blood. High levels of phosphorus in the blood can lead to a decrease in calcium, which can cause brittle and weak bones. Phosphorus binders bind (“stick to”) the phosphorus in food so that it is eliminated in the stool.
erythropoietin: helps make red blood cells. Healthy kidneys make this hormone that stimulates the bone marrow to make red blood cells. When the kidneys don’t work properly, your child doesn’t have enough red blood cells and can become anemic, which causes fatigue and lack of energy.
other medications: vitamin D, calcitriol (active vitamin D), laxative, iron, heparin, antihypertensive, etc.
Your healthcare team will recommend the type and dose of medication your child needs.
Some medications may be added to the dialysate bags.
Be sure to follow the medication schedule.
Never give your child over-the-counter medications without discussing first with your healthcare team.
Emergency situations:
Make sure you always have a MiniCap disconnect cap, dialysis catheter clamp available in case of accidental disconnection of the catheter extension.
Always have a phone on hand to respond to an emergency. Make sure your cell phone is charged at all times.
If the power goes out for more than two hours, contact your healthcare team to discuss alternative scenarios to the usual treatment.
Have a copy of your child’s medication list available and keep extra supplies on hand.
Make sure you have dialysis supplies (eg, dialysate bags, all equipment for the cycler) for at least seven days of treatment.
Have a resource list available with the names and phone numbers of the hospital, your doctor, other members of your healthcare team, and your equipment and materials suppliers. Also know how to reach these resources after hours and during vacations.
In any other emergency situation, contact your healthcare team.
Infection prevention:
A healthy child has a better resistance to infections. Healthy lifestyle habits (eg, good nutrition, physical activity, rest, etc.) help your child fight infections.
A child on peritoneal dialysis must take great care because kidney disease reduces the child’s resistance to infection.
The presence of a catheter in the belly can allow bacteria to enter the abdomen and cause infections, like peritonitis. It is important to keep the catheter insertion site clean and dry.
You can minimize infections by following aseptic measures which decrease the number of microbes (bacteria) on surfaces. These measures are:
Cleanliness: Personal hygiene and environmental cleanliness are the first ways you can reduce microbes (eg, wearing clean clothes, washing your hands with soapy water for at least 20 seconds, cleaning the work table, keeping the dialysis room clean, etc.). Many microbes are eliminated by cleanliness, but not all.
Disinfection: This action removes even more microbes. Before each dialysis treatment, you should disinfect work surfaces (eg, clean the top of the work table with an alcohol solution or a disinfectant wipe and wash your hands).
Sterilization: This action kills all microbes. Some items or solutions used in dialysis are packaged to ensure sterility. You do not have to sterilize anything, but you must remember that some parts of the equipment must remain sterile after you remove them from the package. You cannot touch them with your fingers, even if they are disinfected, because you will contaminate them. For example, never touch the sterile end of the catheter extension with your fingers or anything that comes in contact with the dialysis solutions (eg, syringe needle for injecting medication).
Specific routines, related to these aseptic measures, must be performed before each care, to minimize the risk of infection in your child. These are basic procedures to be performed, as taught by your healthcare team:
Close doors and windows or the ventilation system during treatment to avoid drafts.
Wash your work surfaces with alcohol or a disinfectant wipe (eg, Sani-Cloth® Plus).
Let the table dry.
Gather and inspect materials.
Put on a mask.
Remove jewelry.
Wash your hands with a 4% chlorhexidine soap solution for 2 minutes.
Dry your hands well with a clean paper or towel.
Close the tap with the paper or towel.
Do not touch anything after washing your hands with the chlorhexidine soap solution, except for the care equipment. If you touch something by mistake other than the dialysis equipment, apply an alcohol-based antiseptic gel (eg, Stérigel®) to the entire surface of your hands and rub until your hands are dry (20 to 30 seconds).
If you think you have contaminated a sterile part, don’t take a chance. Most of the equipment you use is disposable. Throw away any item that is or may have been contaminated and start over. It is safer for your child and cheaper to throw away equipment than to treat an infection.
If the catheter is broken or if there is contamination of the extension, contact your healthcare team immediately.
Keep all dialysis equipment in a clean place.
Do not provide care near an air conditioner and stay away from drafts.
Do not allow pets in the room during treatment.
Clean the catheter insertion site daily or at least three times a week to prevent infection.
Your child will need to take antibiotics before certain procedures (eg, dental work, cystoscopy, colonoscopy, etc.). These procedures can cause bleeding and give bacteria access to the bloodstream. Bacteria can contaminate the catheter and cause an infection. Notify your healthcare team of any dental appointments or invasive tests or exams.
Protect the venous access of your child’s non-dominant arm; this will facilitate hemodialysis treatments should he or she ever need them.
Daycare and school:
Your child’s healthcare team will evaluate your child’s needs and will support you in the planning of integration to daycare or to school.
Advise school staff of the treatment and care that your child requires.
Additional information and tips can be found on the following sites:
https://www.agir.ca(Association générale des insuffisants rénaux): in French only
Methods of care
Methods of care : Care of the catheter insertion site
Indications
A catheter is placed in your child’s peritoneal cavity in order to receive peritoneal dialysis treatments.
This catheter requires special care so that it functions properly and to prevent infection.
We suggest a procedure that you can use as a guide; discuss with your healthcare team the specific equipment used for your child.
Considerations:
This care must be given with strict adherence to the aseptic measures taught by your care team, including basic procedures to be performed before starting.
Up to 6 weeks after catheter insertion OR at any time if the skin is not intact (red, broken, etc.): always perform the method of care in a sterile
From 6 weeks after catheter insertion (when the insertion site is completely healed): the method can be performed in a non-sterile manner, unless otherwise advised by your healthcare team.
The catheter insertion site should not change in appearance and the dressing should remain clean and dry at all times.
Never use alcohol to clean the catheter as this solution can damage it.
Use your child’s usual bathing/shower time to care for the catheter site.
The skin around the catheter insertion site is cleaned at the time of each dressing change.
Up to 6 weeks after catheter insertion: change the dressing once a week to promote healing of the site and prevent catheter displacement unless the dressing is soiled (change more often if soiled).
From 6 weeks after catheter insertion: change the dressing at least three times a week; it is possible to change it every day after bathing/showering.
Change the dressing more often if soiled. Notify your healthcare team if this is the case.
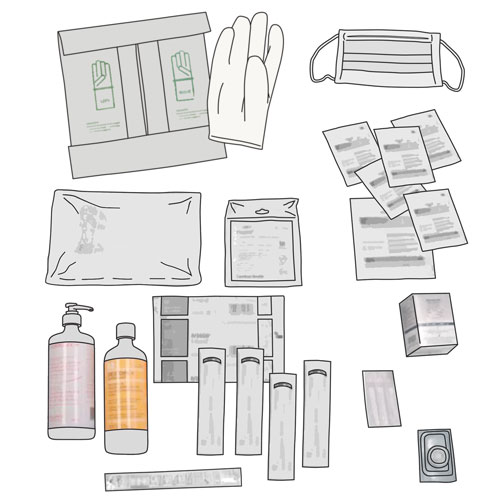
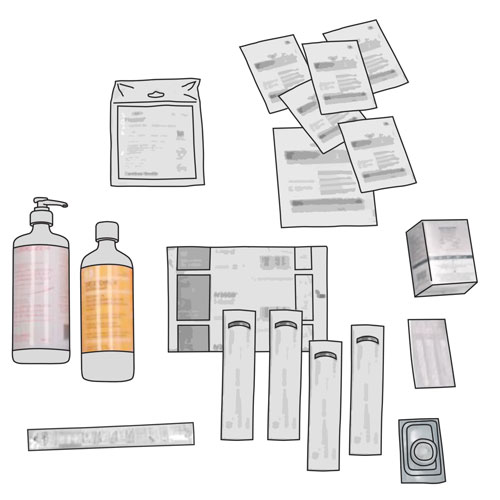
Required materials
Small table, desk top or sideboard with a washable surface: to place materials
Hand soap
Clean paper or towel
Alcohol or disinfectant wipe (eg, Sani-Cloth® Plus): for surfaces
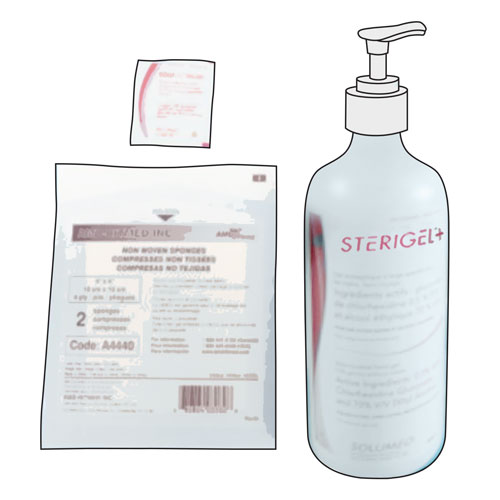
4% chlorhexidine soap solution: for hands
Alcohol-based antiseptic hand gel (eg, Stérigel®)
Three packets of swabsticks soaked in 2% chlorhexidine gluconate (alcohol-free)
Collaborate and form a team with your child. When you invest the time to form a strong team, children feel more comfortable and less anxious – this will help you complete the care with less stress – for you and your child.
Use these tips, from the start, to set the stage for a positive care procedure:
Create the right moment: integrate the care in a routine.
Alert your child to the needed care and communicate together.
Form a team with your child: Encourage autonomy by offering realistic choices such as the method of distraction. Stay tuned to your child. Manage pain and anxiety, using distraction and positioning for comfort.
Prepare the environment: Identify a routine place for care. Close windows, doors and fans. Wash and dry the work surface and gather the needed materials for the care and to distract your child.
Prepare your child: Get help if needed. Position your child for comfort to receive the care and start to use the selected distraction method.
Prepare yourself: Find the right time when you are ready to provide the care safely. Review the list of care steps. Wash your hands.
Now that you are ready to start the care procedure, take the opportunity to encourage and praise your child.
Safety: Carefully follow the care practice steps as you have been taught.
Flexibility: Be ready to adjust according to your child’s reactions during the procedure. As needed, reposition or select an alternative distraction strategy. Follow your child’s pace and rhythm.
Collaboration: Reassure your child, verbally and non-verbally. Acknowledge your child’s emotions and reactions. Help your child differentiate between the different sensations during a procedure.
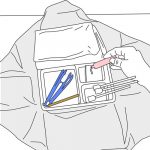
Step 4: Prepare the materials
Make sure the necessary materials are on the well-cleaned work surface.
Open the dressing tray in a sterile manner.
Open the packets of swabsticks and place the swabsticks in one of the compartments of the tray without touching the ends of the swabsticks.
Open the sterile compresses package and drop it into the tray without touching it.
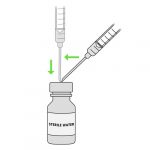
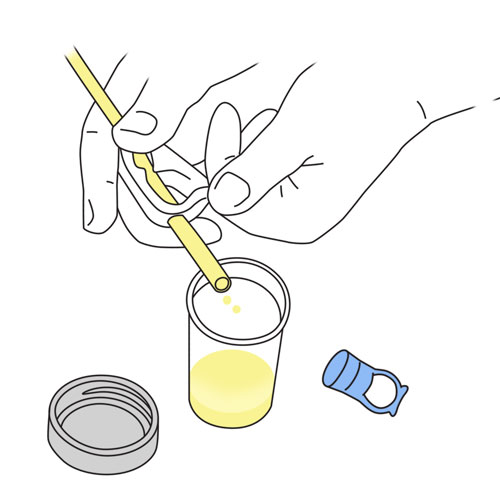
If you know there is crusted skin (scabs) around the site: Open the bottle or remove the cap on the saline syringe and pour the solution into a compartment in the tray.
Why ?
This step allows you to have all the materials safely at hand for the rest of the procedure.
Step 5: Disinfect your hands
Wash your hands again with the alcohol-based antiseptic gel.
Apply a generous amount to cover the entire surface of your hands.
Rub until your hands are dry (20-30 seconds).
Why ?
This hand disinfection prevents contamination for the rest of the procedure.
Step 6: Remove the dressing
Gently remove the dressing
Be careful not to pull on the catheter or irritate the skin.
If you see scabs around the site and have not already done so: Open the bottle or remove the cap on the saline syringe and pour the solution into a compartment in the tray.
Why ?
This step allows a good view of the skin around the catheter insertion site.
Step 7: Check the catheter insertion site
The catheter insertion site should not change in appearance.
Check the site for redness, warmth, swelling, tenderness, or discharge.
If so, take a small specimen from the catheter insertion site with the swabstick, as instructed by your healthcare team; take a picture as well if possible.
Why ?
This step allows detection of any skin irritation or infection and allows for the analysis of the specimen if necessary.
Step 8: Check the catheter tunnel
Check the skin along the tunnel path for redness, swelling, tenderness or hardness.
Why ?
This step allows detection of possible irritation or infection of the catheter tunnel.
Step 9: Soften scabs, if present
Put on sterile gloves.
Soak a compress with saline solution.
Soften the scabs by applying the wet compress.
Do not pull on the scabs to avoid breaking the skin.
Why ?
This step facilitates the removal of scabs to promote healing of the site.
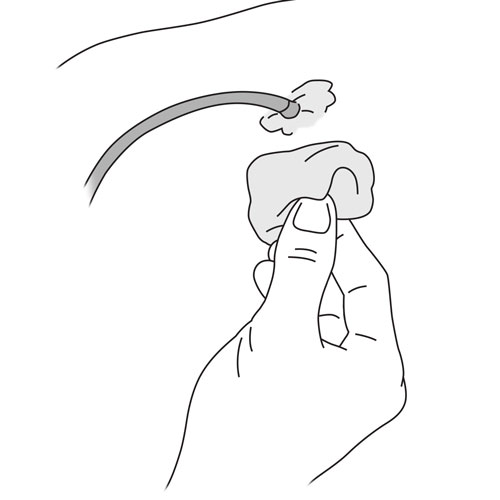
Step 10: Clean the catheter insertion site
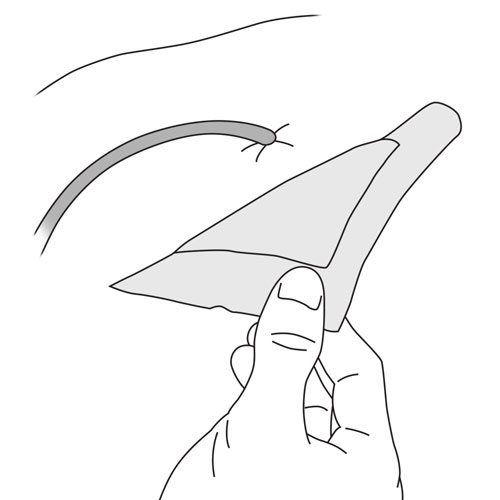
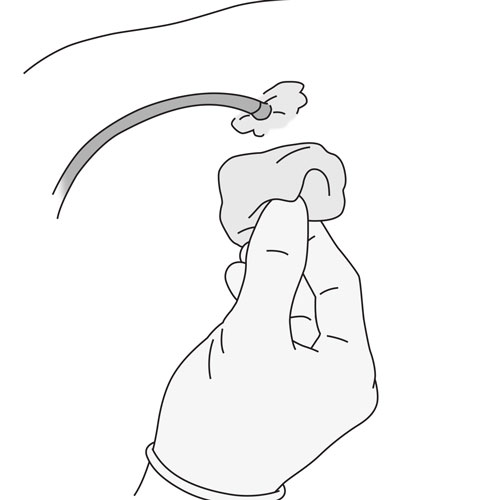
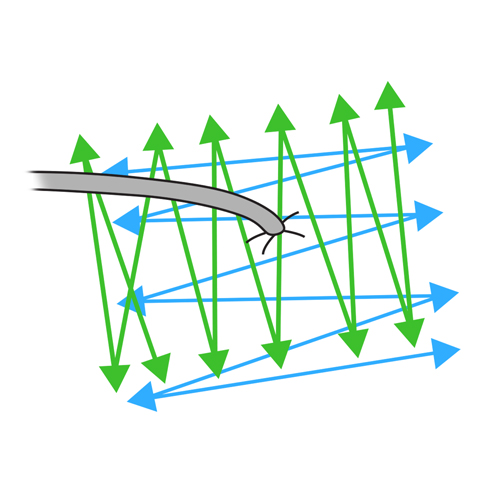
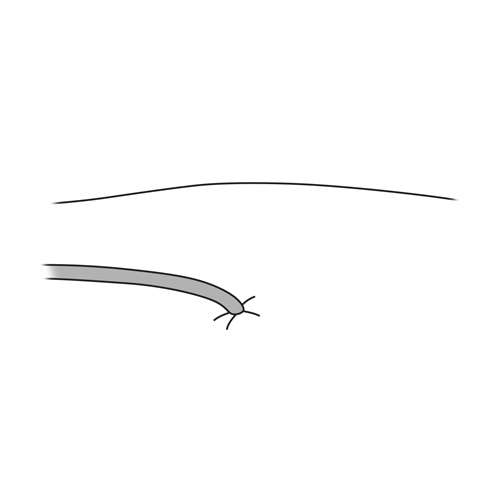
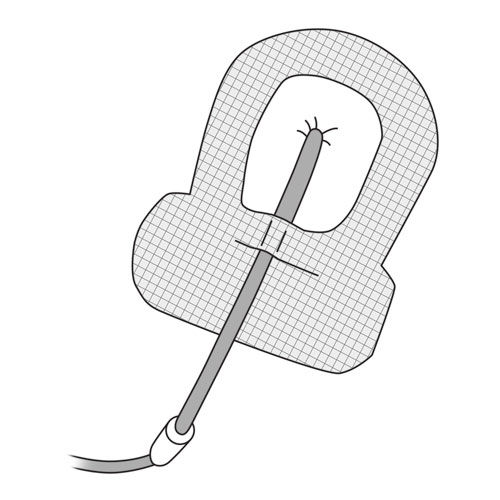
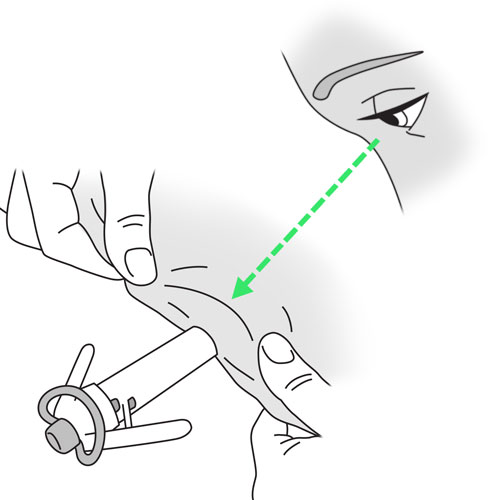
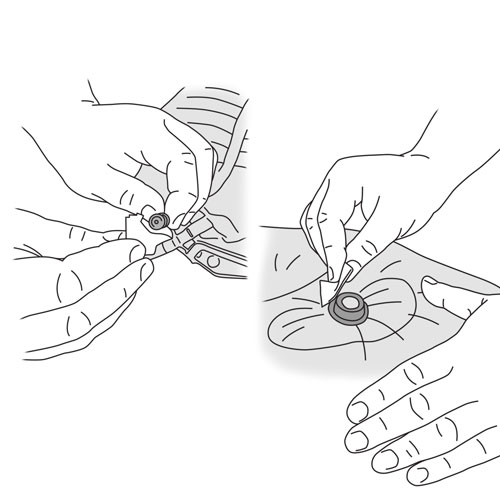
With one hand, stabilize the catheter by holding it with a sterile compress.
With the other hand, use a first swabstick to clean the skin surrounding the catheter insertion site.
Unless otherwise instructed by your healthcare team, move back and forth repeatedly for at least 30 seconds as shown in the illustration.
Apply gentle pressure to the skin as you move the swabstick.
Make sure the skin is clean when finished this step.
Why ?
Stabilizing the catheter while cleaning the site prevents it from moving and irritating the skin and also prevents accidental dislodgement of the catheter.
This cleaning reduces the amount of microbes on the skin around the catheter insertion site and prevents infections.
Applying light pressure on the skin allows the swabstick solution to penetrate and clean the skin well.
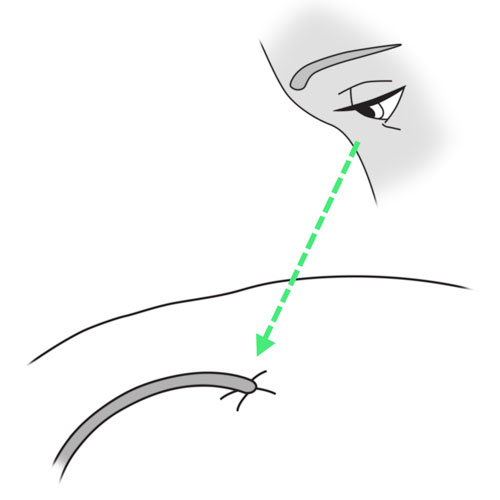
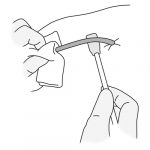
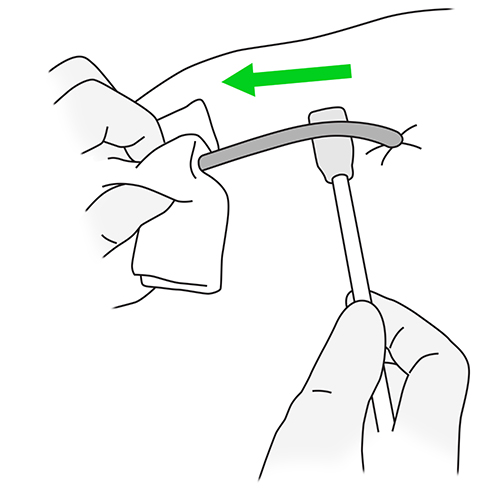
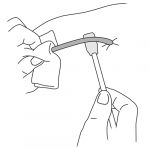
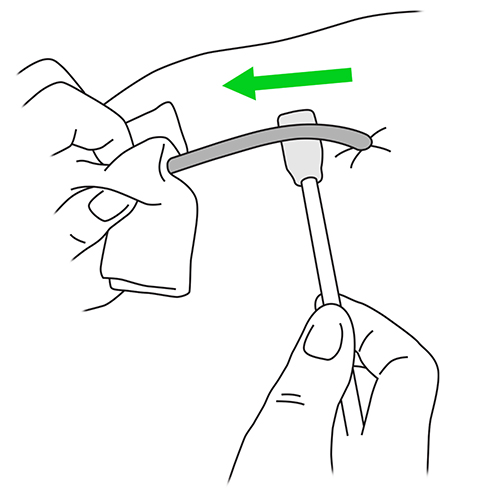
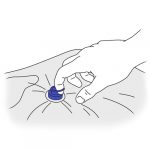
Step 11: Clean the catheter
Continue to stabilize the catheter with one hand.
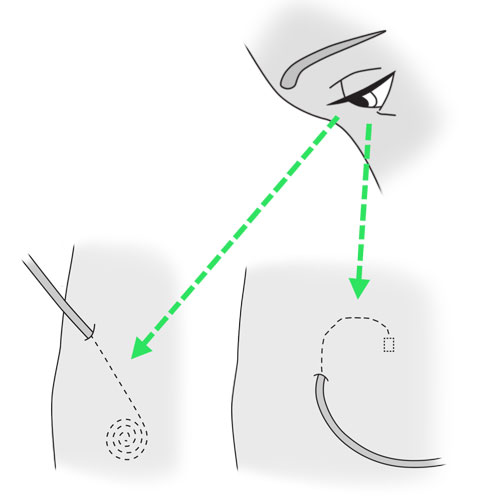
With the other hand, use a second swabstick to clean under the catheter, starting near the insertion site and moving away from it.
Use the third swabstick to clean overthe catheter in the same manner.
Do not clean the catheter using a back and forth motion; only move the swabstick once, starting near the insertion site and moving away from it.
Why ?
Stabilizing the catheter while cleaning the site prevents it from moving and irritating the skin and also prevents accidental dislodgement of the catheter.
This step helps prevent infections by reducing the number of microbes on the catheter that could contaminate the catheter insertion site.
Step 12: Dry the catheter insertion site
Allow the site to air dry completely for two minutes.
Why ?
This step prevents the skin from remaining wet under the dressing, which can cause irritation or infection.
Step 13: Protect the skin around the catheter insertion site
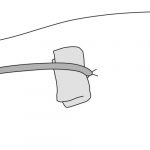
Make sure the catheter is in a straight line with the insertion site.
Fold a dry compress in half.
Place it under the catheter.
Then cover the catheter insertion site with another compress.
If desired, apply the skin protector to the skin, which will be covered by a adhesive dressing.
Why ?
Proper catheter alignment and protection prevents injury to the insertion site.
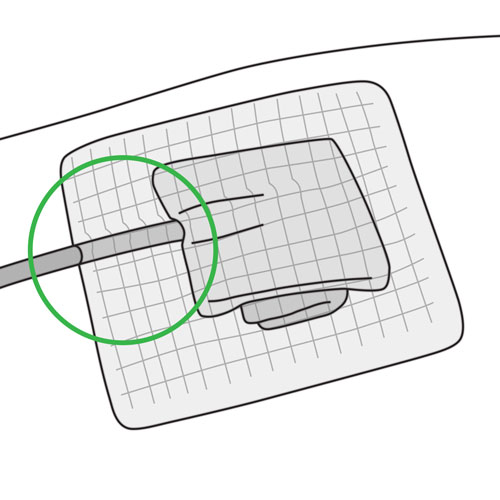
Step 14: Place the dressing over the catheter insertion site
Remove the clear film from the adhesive dressing.
Apply the dressing to the catheter site as instructed by your healthcare team.
Make sure the dressing covers the catheter for at least 2.5 cm.
Why ?
The placement of this dressing immobilizes and protects the catheter and prevents it from moving.
The catheter is more stable if the dressing covers it for at least 2.5 cm.
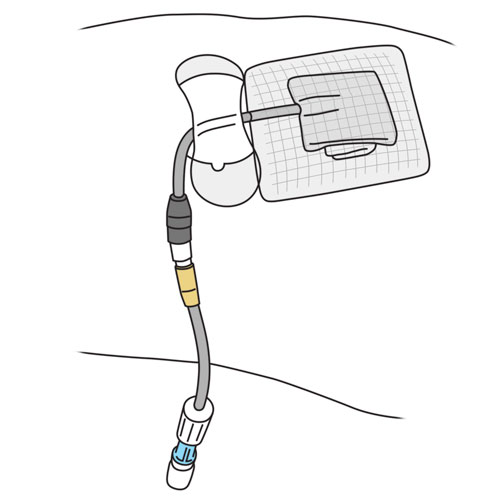
Step 15: Secure and immobilize the catheter
Secure and immobilize the catheter on the abdomen with the device or tape recommended by your healthcare team.
Do not put the device or tape over the connections.
If necessary, apply a mesh bandage over the dressing.
Fold the catheter under the mesh or sweater as needed.
Why ?
A properly immobilized catheter keeps the insertion site healthy.
This step prevents the catheter from moving and irritating the insertion site.
Be prepared to recognize the challenges faced and to provide positive feedback. Help your child recognize his/her strengths. Acknowledge the collaborative teamwork.
Listen to what your child says about the parts of the procedure that were difficult or painful.
Comfort your child and recognize your child’s collaboration with positive feedback.
Highlight your child’s specific strengths that helped make the procedure positive.
Discuss with your child what might be done the same or differently the next time the care is needed.
Keep your promises if you have promised a reward, follow through.
Collaborate and form a team with your child. When you invest the time to form a strong team, children feel more comfortable and less anxious – this will help you complete the care with less stress – for you and your child.
Use these tips, from the start, to set the stage for a positive care procedure:
Create the right moment: integrate the care in a routine.
Alert your child to the needed care and communicate together.
Form a team with your child: Encourage autonomy by offering realistic choices such as the method of distraction. Stay tuned to your child. Manage pain and anxiety, using distraction and positioning for comfort.
Prepare the environment: Identify a routine place for care. Close windows, doors and fans. Wash and dry the work surface and gather the needed materials for the care and to distract your child.
Prepare your child: Get help if needed. Position your child for comfort to receive the care and start to use the selected distraction method.
Prepare yourself: Find the right time when you are ready to provide the care safely. Review the list of care steps. Wash your hands.
Now that you are ready to start the care procedure, take the opportunity to encourage and praise your child.
Safety: Carefully follow the care practice steps as you have been taught.
Flexibility: Be ready to adjust according to your child’s reactions during the procedure. As needed, reposition or select an alternative distraction strategy. Follow your child’s pace and rhythm.
Collaboration: Reassure your child, verbally and non-verbally. Acknowledge your child’s emotions and reactions. Help your child differentiate between the different sensations during a procedure.
Step 4: Prepare the materials
Make sure the necessary materials are on the well-cleaned work surface.
Open the packets of swabsticks and leave the swabsticks in the packets.
Open the sterile compresses package and leave the compresses in the opened package.
If you know there is crusted skin (scabs) around the site: Open the bottle or remove the cap on the saline syringe and pour some solution on the compress.
Why ?
This step allows you to have all the materials safely at hand for the rest of the procedure.
Step 5: Disinfect your hands
Wash your hands again with the alcohol-based antiseptic gel.
Apply a generous amount to cover the entire surface of your hands.
Rub until your hands are dry (20-30 seconds).
Why ?
This hand disinfection prevents contamination for the rest of the procedure.
Step 6: Remove the dressing
Gentle remove the dressing
Be careful not to pull on the catheter or irritate the skin.
If you see scabs around the site and have not already done so: Open the bottle or remove the cap on the saline syringe and pour some solution on the compresses.
Why ?
This step allows a good view of the skin around the catheter insertion site.
Step 7: Check the catheter insertion site
The catheter insertion site should not change in appearance.
Check the site for redness, warmth, swelling, tenderness, or discharge.
If so, take a small specimen from the catheter insertion site with the swabstick, as instructed by your healthcare team; take a picture as well if possible.
Why ?
This step allows detection of any skin irritation or infection and to allows for the analysis of the specimen if necessary.
Step 8: Check the catheter tunnel
Check the skin along the tunnel path for redness, swelling, tenderness or hardness.
Why ?
This step allows detection of possible irritation or infection of the tissue where the catheter lies.
Step 9: Soften scabs, if present
Soak a compress with saline solution.
Soften the scabs by applying the wet compress.
Do not pull on the scabs to avoid breaking the skin.
Why ?
This step facilitates the removal of scabs to promote healing of the site.
Step 10: Clean the catheter insertion site
With one hand, stabilize the catheter by holding it with a sterile compress.
With the other hand, use a first swabstick to clean the skin surrounding the catheter insertion site.
Unless otherwise instructed by your healthcare team, move back and forth repeatedly for at least 30 seconds as shown in the illustration.
Apply gentle pressure to the skin as you move the swabstick.
Make sure the skin is clean when finished this step.
Why ?
Stabilizing the catheter while cleaning the site prevents it from moving and irritating the skin and also prevents accidental dislodgement of the catheter.
This cleaning reduces the amount of microbes on the skin around the catheter insertion site and prevents infections.
Applying light pressure on the skin allows the swabstick solution to penetrate and clean the skin well.
Step 11: Clean the catheter
Continue to stabilize the catheter with one hand.
With the other hand, use a second swabstick to clean under the catheter, starting near the insertion site and moving away from it.
Use the third swabstick to clean overthe catheter in the same manner.
Do not clean the catheter using a back and forth motion; only move the swabstick once, starting near the insertion site and moving away from it.
Why ?
Stabilizing the catheter while cleaning the site prevents it from moving and irritating the skin and also prevents accidental dislodgement of the catheter.
This step helps prevent infections by reducing the number of microbes on the catheter that could contaminate the catheter insertion site.
Step 12: Dry the catheter insertion site
Allow the site to air dry completely for two minutes.
Why ?
This step prevents the skin from remaining wet under the dressing, which can cause irritation or infection.
Step 13: Protect the skin around the catheter insertion site
If you are applying a Tegaderm advanced® adhesive dressing as agreed with your healthcare team, go directly to step 15.
Make sure the catheter is in a straight line with the insertion site.
Fold a dry compress in half.
Place it under the catheter.
Then cover the catheter insertion site with another compress.
If desired, apply the skin protector to the skin, which will be covered by an adhesive dressing.
Why ?
Proper catheter alignment and protection prevents injury to the insertion site.
Step 14: Place the dressing over the catheter insertion site
Remove the clear film from the adhesive dressing.
Apply the dressing to the catheter site as instructed by your healthcare team.
Make sure the dressing covers the catheter for at least 2,5 cm.
Go to step 16.
Why ?
The installation of this dressing immobilizes and protects the catheter and prevents it from moving.
The catheter is more stable if the dressing covers it for at least 2.5 cm.
Step 15: Apply a Tegaderm advanced® dressing to the catheter insertion site
Ensure that the catheter is is in a straight line with the insertion site.
Peel back the dressing liner to expose the adhesive surface of the adhesive dressing.
Place the transparent film so that the catheter insertion site is placed in the center of the dressing (Part 1).
Remove the remaining protective paper and attach the catheter by crossing the white wings under it.
Apply light pressure with your fingers all around the bandage so that it sticks to the skin without creating an opening.
Remove the remaining protective paper from around the bandage.
Take the strip with the U-shaped opening (Part 2) and stick it under the catheter so that it covers the cross of the wings with the slit facing up.
Take the strip (Part 3) and stick it over the catheter at the U-slot to avoid gaps; make sure to secure the strip.
Why ?
The installation of this dressing immobilizes and protects the catheter and prevents it from moving.
Step 16: Secure and immobilize the catheter
Secure and immobilize the catheter on the abdomen with the device or tape recommended by your healthcare team.
Do not put the device or tape over the connections.
If necessary, apply a mesh bandage over the dressing.
Fold the catheter under the mesh or sweater as needed.
Why ?
A properly immobilized catheter keeps the insertion site healthy.
This step prevents the catheter from moving and irritating the insertion site.
Be prepared to recognize the challenges faced and to provide positive feedback. Help your child recognize his/her strengths. Acknowledge the collaborative teamwork.
Listen to what your child says about the parts of the procedure that were difficult or painful.
Comfort your child and recognize your child’s collaboration with positive feedback.
Highlight your child’s specific strengths that helped make the procedure positive.
Discuss with your child what might be done the same or differently the next time the care is needed.
Keep your promises if you have promised a reward, follow through.
Reward yourself too.
Methods of care : Assembly of the cycler
Indications
The cycler must be prepared, the cycler set with cassette installed, and the bags connected to the appropriate lines before connecting the child to the cycler for the automated peritoneal dialysis treatment.
We suggest a procedure that you can use as a guide; discuss with your healthcare team the specific equipment used for your child.
Considerations:
This care must be given with strict adherence to the aseptic measures taught by your care team, including basic procedures to be performed before starting.
Dialysate bags should be prepared no more than 4 hours before each dialysis treatment.
Validate with your healthcare team the order in which you should use and connect the different types or concentrations of dialysate during treatments.
If you are using an adult cycler with cassette, make sure that the cycler is set to standard mode and not pediatric mode.
Frequency
Before each automated peritoneal dialysis session, according to the treatment frequency agreed upon with your heathcare team.
Required materials
Cycler
Table, nightstand or cart: to deposit the cycler
Small table, desk top or sideboard with a washable surface: to place the materials
Hand soap
Clean paper or towel
Mask
Alcohol or disinfectant wipe (eg, Sani-Cloth® Plus): for surfaces
4% chlorhexidine soap solution: for hands
Alcohol-based antiseptic hand gel (eg, Stérigel®)
Dialysate bags
Cycler set with cassette (pediatric or adult, as indicated by your healthcare team)
15 liter drainage bag
2″ x 2″ sterile compresses
Dialysis clamps
If needed:
5-prong manifold set: if more than one dialysate bag is needed
3 liter empty bag for heater
Specimen bag
Connection shield with povidone-iodine (if adult cycler set used)
Wash two work surfaces (eg, table) with alcohol or a disinfectant wipe (eg, Sani-Cloth® Plus).
Let the tables dry.
Gather and inspect materials: put materials on a work surface; pay particular attention to bags (correct names, correct concentrations, correct volumes, expiration dates not exceeded) and medications (correct names, correct concentrations, correct doses, expiration dates).
Put on a mask.
Remove jewelry.
Wash your hands with a 4% chlorhexidine solution for 2 minutes.
Safety: Carefully follow the care practice steps as you have been taught.
Flexibility: Be ready to adjust according to your child’s reactions during the procedure. As needed, reposition or select an alternative distraction strategy. Follow your child’s pace and rhythm.
Collaboration: Reassure your child, verbally and non-verbally. Acknowledge your child’s emotions and reactions. Help your child differentiate between the different sensations during a procedure.
Step 4: Turn on the cycler
Press the ON/OFF button on the back of the unit.
The message “Press Go to start” appears on the screen.
Why ?
This step opens the cycler and resets the internal functions.
Step 5: Check the dialysate bags
Remove all bags from their packaging.
Place them on the second well-cleaned work surface.
Place the 5L Physioneal bags so that the injection ports are on top and the connectors are pointing up.
Each bag should be in good condition, clean and dry.
Make sure that:
the solution in the bag or each bag chamber is clear (not discolored or cloudy and without small particles),
there are no leaks when you lightly squeeze the bag or the large bag chamber,
the seals are intact, if any,
the pull ring is in place,
the fins are in the correct position, if any,
the injection port protective cap is in place.
Why ?
This step ensures that the bags are in good condition for the safety of the rest of the procedure.
Step 6: Add medication to the bags, if necessary
Proceed to the next step if you do not have any medication to add.
It is necessary to add the medication to the bags before mixing the solution.
Step 7: Prepare dialysate bags
If you are using only Dianeal or Extraneal bags, go directly to step 11.
If you are using 5 liter bags of Physioneal, go to the next step.
If you are using 2.5 liter bags of Physioneal:
Break the cannula between the two chambers of the 2.5 liter Physioneal bag.
Hang the bags on a hook or rolling pole to allow the dialysate to mix well.
Wait until the top solution is completely drained into the bottom chamber. It may take a few minutes to mix the solutions.
Be careful that the bag connector does not touch the roller pole.
Go to step 11.
Why ?
The break of the cannula between the two chambers of the 2.5 liter Physioneal bags allows the solutions to mix.
Step 8: Prepare the 5 liter Physioneal bags - Open the long seal
Go to step 11 if you are not using 5 liter Physioneal bags.
Hold each side of the large chamber firmly with your hands facing out.
Push the solution toward the center of the long seal.
Finish opening the long seal in either of these ways:
apply pressure to the large chamber from the corner, or
press down on the large chamber with both hands.
Make sure that the solution in the large chamber is completely emptied into the small chamber.
Gently mix the solution by pressing both hands against the walls of the large chamber.
Why ?
The opening of the long seal between the two chambers allows the mixing of the solutions.
Step 9: Prepare the 5 liter Physioneal bags - Open the short seal
Lift the large chamber by holding the bag firmly with both hands.
Roll the bag toward the connector.
Apply pressure by leaning over the bag.
This pushes the solution towards the short seal to open it.
Why ?
Breaking the short seal between the small chamber and the connector allows the solution to flow into the connector.
Step 10: Prepare the 5 liter Physioneal bags - Check the contour of the bag
Look carefully all around the bag for leaks.
Pay particular attention to the connector area.
Why ?
This check ensures that the bag is watertight after handling.
Step 11: Place the bag on the heater
Place the appropriate bag on the cycler heater as directed by your healthcare team.
If your child is receiving dialysate of the same concentration throughout the session: place one bag on the warmer.
If your child is receiving dialysate of more than one concentration and large volumes per cycle: place the bag with the highest concentration on the heater, as directed by your healthcare team.
If your child is receiving a mixture of dialysates of different concentrations and small volumes per cycle: place the empty bag on the heater. Make sure the bag clamp is securely closed.
Why ?
Placing the appropriate bag on the heater to start the treatment allows it to be warmed up beforehand.
The dialysate should be administered at the temperature determined in the cycler programming for your child’s comfort.
Step 12: Prepare the cycler set with cassette
Open the packages of the remaining materials.
Place the materials on the second well-cleaned work surface.
Close the six tubing clamps.
Close the clamps of the 5-prong manifold set, if used.
Why ?
This step secures the set with cassette and the rest of the materials, if used.
Step 13: Prepare the drainage bag and specimen bag (if needed)
Close both clamps on the drainage bag (the tubing and the drainage port clamp).
If recommended by your healthcare team, add another clamp on the drainage port tubing.
If you need the specimen bag, make sure the clamp on its tubing is closed.
Why ?
Closing the clamps prevents the flow of effluent through the tubing of these bags during treatment.
Step 14: Start the cycler
Start the cycler by pressing the green GO button on the front of the unit.
The message “Load the set” appears on the screen.
Why ?
This is the first step in setting up the cycler.
Step 15: Open the cycler door
Push the handle on the front of the cycler up; the door will open.
Never force the door open.
Why ?
Pulling the handle unlocks and opens the cycler door so that the cassette set can be installed.
Step 16: Install the cassette of the cycler set
Install the cassette in the only way possible: horizontally, with the lines pointing to the right of the unit.
Press the lower portion of the cassette in before pressing the upper portion.
Hold the specimen bag tubing in your hand as it is not attached to the organizer.
Why ?
The installation of the cassette in the cycler allows the dialysis treatment to be performed.
Step 17: Close the cycler door
Close the door and push the handle down.
Make sure the cassette tubing is not bent or compressed where it exits the device.
Why ?
This step locks the door and secures the cassette in the cycler.
Step 18: Install the organizer of the cycler set
Always hold the specimen bag tubing in your hand.
Install the organizer on the front of the door by attaching the top then the bottom sections.
Place the specimen bag tubing on the hook on the side of the cycler table.
Why ?
This step secures the organizer on the cycler.
Step 19: Disinfect your hands
Disinfect your hands with an antiseptic gel.
Apply a generous amount to cover the entire surface of your hands.
Rub until your hands are dry (20-30 seconds).
Now touch only the dialysis equipment.
Why ?
This hand disinfection prevents contamination for the rest of the procedure.
Step 20: Connect the specimen bag (if needed)
Remove the protective cap from the specimen line and the tubing from the specimen bag.
Connect the specimen line to the tubing of the specimen bag.
Hang the specimen bag on the hook on the side of the cart or place it on the table.
Leave the tubing clamp closed until the specimen bag is used.
Why ?
This step allows the bag to be connected securely.
Step 21: Connect the drainage bag
Remove the rightmost clampless line from the organizer (drain line) and remove its protective cap.
Remove the protective cap from the drainage bag tubing.
Connect the drain line to this tubing.
Open the drain line clamp.
Be careful not to touch the ends of the lines and connectors while connecting.
Place the drainage bag on the table at the back of the cycler or on another clean surface. Do not place the bag on the floor until all connections are complete.
Why ?
This step allows the bag to be connected securely.
Step 22: Prepare the connection of the bags
Press the green GO button on the front of the unit.
The message “Self testing” appears on the screen.
When the automatic test of the cycler is completed, “Connect bags” appears on the screen.
Why ?
This step allows you to perform the automatic test of the cycler before connecting the bags to check the correct operation of the cassette.
Step 23: Disinfect your hands
Disinfect your hands with an antiseptic gel.
Apply a generous amount to cover the entire surface of your hands.
Rub until your hands are dry (20-30 seconds).
Now touch only the dialysis equipment.
Why ?
This hand disinfection prevents contamination for the rest of the procedure.
Step 24: Connect the bag to the heater
Connect the bags to the other lines on the organizer, following the sequence from right to left.
Remove the line with the red clamp from the organizer (heater line) and remove its protective cap.
If the bag on the heater is a 5 liter Physioneal bag: go to the next step.
If the bag on the heater is empty:
Remove the protective cap from the empty bag tubing.
Connect the heater line to the empty bag tubing.
Open the clamp on the heater line and empty bag tubing.
Go to step 24.
If the bag on the heater is a Physioneal 2.5 liter or Dianeal bag:
Remove the pull ring from the bag.
Connect the heater line to the bag connector.
Open the clamp on the heater line.
Break off the cannula in the bag connector.
Go to step 24.
Be careful not to touch the ends of the line and the connector or tubing during connection.
Make sure the connector or tubing on the bag is secure.
Why ?
This step allows the bag to be connected securely and ensures that the dialysate can flow through the system.
Removing the pull ring allows the bag to be connected to the heater line.
Step 25: Connect the Physioneal 5 liter bag to the heater
If you are not using a 5 liter Physioneal bag, go to the next step.
Hold the connector with one hand and pull the pull ring with the other to remove it.
Connect the heater line to the bag connector by turning until you feel resistance.
Open the red clamp on the heater line.
Close the wings of the bag connector with one hand; you will hear a “click”.
Never put one hand on the connector and the other on the wings to close them.
Make sure the wings are tightly closed.
Be careful not to touch the ends of the line and connector while connecting.
Make sure the bag connector is secure.
Why ?
This step allows the bag to be connected securely and ensures that the dialysate can flow through the system.
Removing the pull ring allows the bag to be connected to the heater line.
Closing the bag wings advances the connector cannula to puncture the bag and allow solution to flow into the tubing for treatment.
Step 26: Connect the dialysate bags
The Extraneal bag must always be connected to the line with the blue clamp (see next step).
Remove the line with a white clamp from the rightmost organizer (bag line) and remove its protective protective cap.
Remove the pull ring from the bag.
Connect the bag line to the bag connector.
Open the bag line clamp.
For the 5 liter Physioneal bag: Close the bag connector wings with one hand.
For all other dialysate bags: Break the cannula in the bag connector.
Repeat with the other bag line with a white clamp to connect a second bag.
If you run out of lines, add the 5-prongs manifold set to this other bag line and connect the necessary bags.
Be careful not to touch the ends of the line and connector while connecting.
Make sure the bag connector is secure.
Why ?
This step allows the bag to be connected securely and ensures that the dialysate can flow through the system.
Removing the pull ring allows the bag to be connected to the bag line.
Closing the wings on the Physioneal 5 liter bag advances the connector cannula to puncture the bag and allow solution to flow into the tubing for treatment.
Step 27: Connect the last injection bag, if needed
If you are not using a different concentration of dialysate for the last injection, go to the next step.
The Extraneal bag must always be connected to the line with the blue clamp.
The tubing with the blue clamp can also be used to connect an additional dialysate bag if you use the same solutions for the entire dialysis session.
Remove the line with the blue clamp from the organizer (last fill line) and remove its protective cap.
Remove the pull ring from the bag.
Connect the last fill line to the bag connector.
Open the last fill line clamp.
For Physioneal 5 liter bag: Close the bag connector wings with one hand.
For all other dialysate bags: Break the cannula in the bag connector.
Be careful not to touch the ends of the line and connector while connecting.
Make sure the bag connector is secure.
Why ?
This step allows the bag to be connected securely and ensures that the dialysate can flow through the system.
Step 28: Check the connections
Make sure that only the clamps on lines connected to a dialysate bag are open and that the others are closed.
If recommended by your healthcare team, clamp the extension branches and unused bag lines with a dialysis clamp.
If a specimen bag is connected, make sure its tubing clamp and the specimen line clamp remain closed until the specimen is collected.
Check that the connections between tubing and bags are tight (not leaking).
Why ?
This step verifies that all connections are secure.
Step 29: Place the bags
Hang the bags on the side of the cycler or leave them on the work surface.
Place the drainage bag under the cycle table or on the floor on a pad.
Why ?
This step allows the bags to be placed in the most appropriate location during treatment and ensures that the dialysate flows well.
Step 30: Priming the lines
Put a compress left in its package on the end of the patient line, if recommended by your healthcare team.
Open the patient line clamp.
Press the green GO button on the front of the unit.
The message “Priming…” appears on the screen.
When the vacuum is complete (takes about 10 minutes), the message “Connect yourself” appears on the screen alternating with “Check patient line”.
Disinfect your hands with an antiseptic gel (eg, Stérigel®) and rub until your hands are dry (20-30 seconds).
Close the patient line clamp.
Why ?
The compress protects the end of the patient line.
The opening of the clamp allows the air to be removed from the lines (“priming” the lines).
Step 31: Check the dialysate level in the patient line
If the patient line is not primed properly (if there is still air in the patient line):
Make sure the patient line clamp is open properly.
Make sure the patient line is properly positioned on the set.
Press the STOP button on the front of the cycler.
Press the down arrow on the front of the cycler until “Reprime patient line” appears on the screen.
Press the ENTER button on the front of the cycler.
Press the ENTER button again. The cycler will ask you if you want to reprime the patient line.
Repeat this step until the line is primed.
Close the patient line clamp.
Why ?
This step allows to check if the air vacuum is well done in the patient line (if the line is well “primed”).
Step 32: Connect your child to the cycler, if desired
After assembling the cycler, connect the system to your child within four hours.
Why ?
Connecting the system to your child allows the peritoneal dialysis treatment to begin.
Be prepared to recognize the challenges faced and to provide positive feedback. Help your child recognize his/her strengths. Acknowledge the collaborative teamwork.
Listen to what your child says about the parts of the procedure that were difficult or painful.
Comfort your child and recognize your child’s collaboration with positive feedback.
Highlight your child’s specific strengths that helped make the procedure positive.
Discuss with your child what might be done the same or differently the next time the care is needed.
Keep your promises if you have promised a reward, follow through.
Reward yourself too.
Methods of care : Addition of medication to the dialysate
Indications
In addition to peritoneal dialysis treatments, your child may need medications (eg, heparin, antibiotic) to treat possible complications of dialysis.
Medications should be added to all dialysate bags during the assembly of the cycler, prior to connecting the child for the automated peritoneal dialysis treatment.
We suggest a procedure that you can use as a guide; discuss with your healthcare team the specific equipment used for your child.
Considerations:
This care must be given with strict adherence to the aseptic measures taught by your care team, including basic procedures to be performed before starting.
Be sure to add the medications in the correct sequence of steps for assembling the cycler.
Refer to your healthcare team for directions about reconstituting the medication in liquid form if it is a powder.
Make sure that the equipment for preparing the medications is in good condition.
Ensure that medications have:
the right name,
the right concentration.
Make sure the expiration date has not passed.
Why ?
This step ensures security for the rest of the procedure.
Step 2: Disinfect your hands
Apply an antiseptic gel to the entire surface of your hands.
Rub until your hands are dry (20-30 seconds).
Now touch only the dialysis equipment.
Why ?
This step removes most of the microbes on your hands to prevent contamination for the rest of the procedure.
Step 3: Prepare the syringes
Without touching the tip of the syringe, screw the needle into it by turning clockwise about ¼ turn.
Prepare the required number of syringes in this way.
Leave the protective caps on the needles in place.
Why ?
This step safely prepares the syringes for use.
Step 4: Disinfect the septum of the vial
Remove the cap from the medication vial.
Vigorously rub the septum (rubber top) of the vial with a disinfectant pad for 15 seconds.
Allow to dry completely.
Make sure nothing touches the septum to avoid contamination.
Repeat for each vial of medication and for all vials of sterile water, if necessary.
Change the disinfectant pad between each vial.
Why ?
Disinfection is necessary to prevent bacteria or particles on the septum from entering the vial when the needle is inserted.
Step 5: Dilute the powdered medication, if applicable
If the medication is already in liquid form, proceed to the next step.
Using the directions for reconstituting the medication, pull back on the plunger to draw the same amount of air into the syringe as the amount of sterile water to be removed from the vial.
Remove the protective cap on the syringe needle.
Hold the syringe like a pencil with one hand and the vial of sterile water on the work surface with the other.
Pierce the rubber septum of the vial with the syringe needle at a 45⁰ angle with the bevel of the needle (slanted part at the end of the needle) facing up.
Quickly straighten the syringe to 90⁰.
Invert the vial of sterile water with the needle and syringe.
Keeping the tip of the needle submerged in the liquid, slowly withdraw the water into the syringe by pulling on the plunger.
Push the air into the vial and withdraw the water into the syringe until you have the desired amount.
Remove the needle and syringe from the water vial and pierce the septum of the medication vial as previously described.
Invert the medication vial with the needle and syringe.
Gently inject the water into the medication vial by pushing out some of the liquid and allowing the syringe to fill with air.
Inject at the neck of the vial so that the water flows down the side.
Once the correct amount of water has been injected into the medication vial, remove the empty syringe from the vial and replace the protective cap on the needle securely OR dispose of it in the sharps container without replacing the cap on the syringe.
Gently shake the medication vial in a circular motion on the work table or roll the vial between your hands. Do not shake the vial vigorously.
Repeat for each vial of medication to be diluted, as needed.
Why ?
Diluting the powdered medication allows it to be injected in liquid form into the dialysate bag.
This method prevents particles of rubber from the septum from entering the solution.
Shaking the vial of reconstituted medication ensures that the contents are properly diluted.
Step 6: Remove the medication from the vial
Disinfect the septum of the vial again with a new disinfectant pad for 15 seconds and allow to dry completely.
Pull back the plunger to draw the same amount of air into the syringe as the amount of solution to be removed from the vial.
Remove the protective cap from the syringe needle.
Puncture the septum of the medication vial as previously described.
Invert the medication vial with the needle and syringe.
Keeping the tip of the needle submerged in the liquid, slowly withdraw the solution into the syringe by pulling on the plunger.
Push the air into the vial and withdraw the solution into the syringe until you have the required amount.
If not: Replace the protective cap on the needle safely.
Repeat for each medication to be withdrawn from a vial, as needed.
Why ?
This step prepares medication for safe injection into the dialysate bag.
Step 7: Disinfect bag injection port
For a Physioneal 5 liter bag: Remove the blue pull ring from the injection port.
Rub the injection port of the bag vigorously with a disinfectant pad for 15 seconds.
Allow to dry completely.
Make sure nothing touches the injection port to avoid contaminating it.
Repeat for each bag of dialysate needed.
Why ?
Disinfection is necessary to prevent bacteria or particles on the injection port from entering the bag when the needle is inserted to inject the medication.
Step 8: Inject the medication into the bag
Remove the protective cap from the syringe needle.
Insert the entire needle into the center of the injection port on the bag.
Be careful not to touch the injection port with your fingers.
Be careful not to pierce the bag with the angle of the needle.
Inject the medication by pushing on the plunger of the syringe.
Remove the needle from the injection port.
Dispose of the syringe and needle in the sharps container.
Shake the bag.
Repeat for each drug to be injected into a dialysate bag.
Why ?
This step allows the medication to be added to the dialysate bag.
The addition of the medications is a step in the assembly of the cycler.
Methods of care : Connection to the cycler
Indications
Your child must be connected to the cycler to receive the automated peritoneal dialysis treatment.
We suggest a procedure that you can use as a guide; discuss with your healthcare team the specific equipment used for your child.
Considerations:
This care must be given with strict adherence to the aseptic measures taught by your care team, including basic procedures to be performed before starting.
Depending on your child’s needs and programming, the cycler will start the treatment with the empty bag or the dialysate bag on the heater. If it is an empty bag, the cycler starts by filling it with the dialysate types connected to the bag lines. Otherwise, the cycler assumes that there is a full bag of dialysate on the heater to begin treatment.
It is important to administer the volume of dialysate recommended by your healthcare team.
If you are using a pediatric cycler set with cassette, the end of the patient line completely covers the end of the catheter extension when connected. If you are using an adult cycler set with cassette, the end of the patient line only partially covers the end of the catheter extension when connected, so it is recommended that you install a connection shield with povidone-iodine to protect the exposed portion of the extension.
Use each bag and all dialysis equipment only once; discard any unused dialysate remaining in the bags.
Within a maximum of 4 hours after assembly of the cycler, depending on the frequency of automated peritoneal dialysis treatment agreed upon with your healthcare team.
Required materials
Small table, desk top or sideboard with a washable surface: for depositing materials
Hand soap
Clean paper or towel
Alcohol or disinfectant wipe (eg, Sani-Cloth® Plus): for surfaces
Mask
4% chlorhexidine soap solution: for hands
Alcohol-based antiseptic hand gel (eg, Stérigel®)
Disinfectant pads (2% chlorhexidine and 70% alcohol or 70% alcohol only, as directed by your healthcare team): for the MiniCap disconnect cap junction
Patient line of the cycler with cassette
If needed:
4″ by 4″ sterile compresses
Connection shield with povidone-iodine (if adult cycler set with cassette used)
Protective pad (blue): to protect the connection if your child is in diapers or has a gastrostomy/jejunostomy.
Refer to your healthcare team if the materials used or the sequence of steps taught is different from what is described in the method of care.
Depending on your child’s age and condition, always encourage your child’s autonomy in carrying out the method of care.
Step 1: Anticipation
You and your child are a team. Encourage autonomy by making realistic choices about what they can do to help you.
Make the care part of a routine.
Step 2: Preparation
Prepare the environment: Identify a place to perform the treatment.
Prepare your child:
Get help if needed.
Position your child to safely assess the catheter insertion site in one of the positions discussed with your healthcare team, based on your child’s comfort, age and ability to cooperate.
Wash your working surface (eg., table) with alcohol or a disinfectant wipe (eg, Sani-Cloth® Plus).
Let the table dry.
Gather and inspect materials.
Put on a mask.
Remove jewelry.
Wash your hands with a 4% chlorhexidine soap solutionfor 2 minutes.
Dry your hands well with a clean paper or towel.
Close the tap with the paper or towel.
Now touch only the dialysis equipment.
Now that you are ready to begin the treatment, take the opportunity to congratulate your child and offer encouragement during the rest of the procedure.
Safety: Carefully follow the care practice steps as you have been taught.
Flexibility: Be ready to adjust according to your child’s reactions during the procedure. As needed, reposition or select an alternative distraction strategy. Follow your child’s pace and rhythm.
Collaboration: Reassure your child, verbally and non-verbally. Acknowledge your child’s emotions and reactions. Help your child differentiate between the different sensations during a procedure.
Step 4: Check the closure of the catheter extension
Make sure that the cycler and cassette assembly is complete and that there is no air in the patient line.
Make sure that the catheter extension is properly closed: the two half-moons of the white part and the light blue part must be well aligned and nested in each other.
Why ?
This step prevents contamination with air and fluid in the patient line.
Step 5: Disinfect the junction of the extension with the MiniCap
Open the sterile compresses package.
Open the disinfectant pad package.
Take the white part of the extension with one hand.
With the other hand, wipe the outside of the extension at the MiniCap junction with the disinfectant pad for 15 seconds.
Let dry.
Do not remove the MiniCap to clean underneath (the dark blue end of the extension).
Why ?
Disinfection removes most bacteria from this area before making the connection to the patient line.
Step 6: Protect the extension
Place the extension on a compress or keep it in your hands.
Why ?
This step avoids contamination of the extension.
Step 7: Connect the patient line (with pediatric set)
If your child has an adult set, move on to the next step.
Remove the protective cap from the patient line without touching the end of the line.
Remove the MiniCap by unscrewing it without touching the dark blue end of the extension.
Insert the ends into each other and screw firmly.
Check that the connection between the extension and the patient line is secure.
Go to step 10.
Why ?
This step connects the patient line to the catheter extension to enable treatment.
Step 8: Connect the patient line (with adult set)
Open the connection shield package, if used.
Remove the protective cap from the patient line without touching the end of the line.
Remove the MiniCap by unscrewing it without touching the dark blue end of the extension.
Insert the ends into each other and screw firmly.
Check that the connection between the extension and the patient line is secure.
Why ?
This step connects the patient line to the catheter extension to enable treatment.
Step 9: Put on the connection shield (if adult set)
Install a connection shield around the connection, if recommended by your healthcare team.
Why ?
The connection shield protects the exposed part of the catheter extension.
Step 10: Open the catheter extension
With one hand, turn the white part of the catheter extension counterclockwise.
With the other hand, turn the light blue part clockwise.
The two half-moons are no longer interlocked.
Why ?
This step allows the automated peritoneal dialysis to start.
Step 11: Check the system
Open the patient line clamp.
Make sure that the clamps on all bags are open.
Check for kinked, bent, or jammed tubing.
If your child is in diapers or has a gastrostomy/jejunostomy, wrap a protective pad around the connection.
Why ?
These checks ensure the proper flow of solutions through the system.
Installing a protective pad around the connection protects it from leaks.
Step 12: Start the treatment
Press the green GO button on the front of the unit.
The message “Initial drain” with the programmed volume appears on the screen.
If the drainage volume displayed is correct, press the GO button again.
If the drainage volume displayed is incorrect, modify according to the recommendation of your healthcare team
The message “Initial drain” appears on the screen and the treatment begins.
Why ?
This step begins the automated peritoneal dialysis treatment with the initial drainage of your child’s peritoneal cavity.
Be prepared to recognize the challenges faced and to provide positive feedback. Help your child recognize his/her strengths. Acknowledge the collaborative teamwork.
Listen to what your child says about the parts of the procedure that were difficult or painful.
Comfort your child and recognize your child’s collaboration with positive feedback.
Highlight your child’s specific strengths that helped make the procedure positive.
Discuss with your child what might be done the same or differently the next time the care is needed.
Keep your promises if you have promised a reward, follow through.
Reward yourself too.
Methods of care : Disconnection of the cycler
Indications
Your child is disconnected from the cycler at the end of the automated peritoneal dialysis treatment.
We suggest a procedure that you can use as a guide; discuss with your healthcare team the specific equipment used for your child.
Considerations:
This care must be given with strict adherence to the aseptic measures taught by your care team, including basic procedures to be performed before starting.
Use each bag and all dialysis equipment only once; discard any unused dialysate remaining in the bags.
At the end of the automated peritoneal dialysis treatment.
Required materials
Small table, desk top or sideboard with a washable surface: for depositing materials
Hand soap
Clean paper or towel
Alcohol or disinfectant wipe (eg, Sani-Cloth® Plus): for surfaces
Mask
4% chlorhexidine soap solution: for hands
Alcohol-based antiseptic hand gel (eg, Stérigel®)
MiniCap disconnect cap
Disinfectant pads (2% chlorhexidine and 70% alcohol or 70% alcohol only, as directed by your healthcare team): for the patient line end of the pediatric cycler set
If needed:
4″ by 4″ sterile compresses
Protective pad (blue): to protect the connection if your child is in diapers or has a gastrostomy/jejunostomy
Refer to your healthcare team if the materials used or the sequence of steps taught is different from what is described in the method of care.
Depending on your child’s age and condition, always encourage your child’s autonomyin carrying out the method of care.
Step 1: Anticipation
You and your child are a team. Encourage autonomy by making realistic choices about what they can do to help you.
Make the care part of a routine.
Step 2: Preparation
Prepare the environment: Identify a place to perform the treatment.
Prepare your child:
Get help if needed.
Position your child to safely assess the catheter insertion site in one of the positions discussed with your healthcare team, based on your child’s comfort, age and ability to cooperate.
Wash your working surface (eg, table) with alcohol or a disinfectant wipe (eg, Sani-Cloth® Plus).
Let the table dry.
Gather and inspect materials.
Put on a mask.
Remove jewelry.
Wash your hands with a 4% chlorhexidine soap solution for 2 minutes.
Dry your hands well with a clean paper or towel.
Close the tap with the paper or towel.
Now touch only the dialysis equipment.
Now that you are ready to begin the treatment, take the opportunity to congratulate your child and offer encouragement during the rest of the procedure.
Safety: Carefully follow the care practice steps as you have been taught.
Flexibility: Be ready to adjust according to your child’s reactions during the procedure. As needed, reposition or select an alternative distraction strategy. Follow your child’s pace and rhythm.
Collaboration: Reassure your child, verbally and non-verbally. Acknowledge your child’s emotions and reactions. Help your child differentiate between the different sensations during a procedure.
Step 4: Check the closure of the catheter extension
Make sure that the catheter extension is properly closed: the two half-moons of the white part and the light blue part must be well aligned and nested in each other.
Close the clamp on the patient line of the cycler.
Why ?
This step prevents contamination with air and fluid in the patient line.
Step 5: Prepare the MiniCap
Open the sterile compresses package, if used.
Open the MiniCap package.
Leave the MiniCap resting inside sterile package.
Be careful not to touch the MiniCap.
Why ?
This step prepares the MiniCap for use and avoid contamination.
Step 6: Disinfect your hands
Apply an antiseptic gel to the entire surface of your hands.
Rub until your hands are dry (20-30 seconds).
Now touch only the dialysis equipment.
Why ?
This step removes most of the microbes on your hands to prevent contamination for the rest of the procedure.
Step 7: Disinfect the junction of the extension with the patient line
Open the sterile compresses package, if used.
Open the disinfectant pad package.
Take the white part of the extension or patient line with one hand.
If your child has a pediatric set: With the other hand, wipe the outside of the extension where it is connected to the patient line with the disinfectant pad for 15 seconds and let it dry.
If your child has an adult set with a connection shield in place: there is nothing to disinfect.
Why ?
Disinfection at the junction between the extension and the patient line of the pediatric set avoids contamination of this area before disconnecting the patient line.
The connection shield put in place with the adult set already protects the exposed part of the catheter extension.
Step 8: Protect the extension
Place the extension on a sterile compress or keep it in your hands.
Why ?
This step avoids contamination of the extension.
Step 9: Disconnect the patient line
Remove the connection shield, if present.
Disconnect the patient line without touching the dark blue end of the catheter extension.
Immediately put the MiniCap on the extension tip.
Make sure the MiniCap is tight.
If your child is in diapers or has a gastrostomy/jejunostomy, wrap a protective pad around the MiniCap.
Why ?
This step disconnects the child from the system.
The MiniCap protects the end of the extension.
Installing a protective pad around the MiniCap helps prevent contamination from the diaper or a feeding tube.
Pulling the lever unlocks and opens the cycler door to access the cassette.
This step completes the procedure.
Step 10: Close the cycler
Press the green GO button on the front of the unit.
The message on the screen alternates between “Close all clamps” and “Disconnect yourself”.
Push the lever on the front of the cycler up to open the door.
Remove the cassette from the set.
Press the GO button again.
The message “Turn me off” appears on the screen.
Press the ON/OFF button on the back of the cycler to turn it off.
Discard the set with cassette and bags.
Why ?
Pulling the lever unlocks and opens the cycler door to access the cassette.
Be prepared to recognize the challenges faced and to provide positive feedback. Help your child recognize his/her strengths. Acknowledge the collaborative teamwork.
Listen to what your child says about the parts of the procedure that were difficult or painful.
Comfort your child and recognize your child’s collaboration with positive feedback.
Highlight your child’s specific strengths that helped make the procedure positive.
Discuss with your child what might be done the same or differently the next time the care is needed.
Keep your promises if you have promised a reward, follow through.
Reward yourself too.
.Reviser : NR.Version : 1.0
Methods of care : Effluent specimen collection
Indications
The collection of an effluent specimen is used to analyze the dialysis fluid to:
do a cell count (find out the number of red and white blood cells): to find out if there is an infection;
do a liquid culture: to find out if there is an infection and to identify the source (type of bacteria);
measuring creatinine clearance: to assess the effectiveness of dialysis by analyzing the amount of waste (urea and creatinine) removed by the treatment. Your child’s general condition should also be taken into consideration.
We suggest a procedure that you can use as a guide; discuss with your healthcare team the specific equipment used for your child.
Considerations:
This care must be given with strict adherence to the aseptic measures taught by your care team, including basic procedures to be performed before starting.
Specimen collection can be done “routinely” before appointments with your healthcare team or in an emergency situation at any time, at the request of your healthcare team.
The collection can be done with a specimen bag or from the drainage bag, depending on the nature of the analysis to be performed and the specifications of your healthcare team.
For “routine” cell count and culture:
Specimen collection is always performed during the last drainage of the peritoneal dialysis treatment, after allowing some effluent to drain into the bag, except in emergency situations or if otherwise directed by your healthcare team.
The specimen can be collected with a specimen bag or directly from the drainage bag, as specified by your healthcare team.
For “routine” creatinine clearance:
It is important to program the cycler so that the entire dialysis session is performed with identical solutions.
When assembling the cycler, when the priming (vacuum) of the lines is completed, the drainage bag must be emptied or changed.
Specimen collection is always performed at the end of the peritoneal dialysis treatment, directly from the drainage bag, as directed by your healthcare team.
In emergency situations, collection is done with a specimen bag or directly from the drainage bag, as specified by your healthcare team.
The amount of effluent to be collected depends on the analysis to be performed and is specified by your healthcare team. In general, here are the quantities required:
for a cell count: 10 ml,
for a culture: minimum 50 ml,
for a routine clearance: minimum 50 ml.
Frequency
For “routine” cell count and culture: specimen to be collected each month for appointment with your healthcare team.
For “routine” creatinine clearance: specimen to be collected monthly or quarterly, as requested by your healthcare team, prior to your appointment.
In emergency situations, (eg, if there is a possibility of infection): specimen to be collected immediately or after60 to 90 minutes of dwell, as requested by your healthcare team.
Required materials
Small table, desk top or sideboard with a washable surface: for depositing materials
Hand soap
Clean paper or towel
Alcohol or disinfectant wipe (eg, Sani-Cloth® Plus): for surfaces
Mask
4% chlorhexidine soap solution : for hands
Alcohol-based antiseptic hand gel (eg, Stérigel®)
Sterile containers: for all specimens (except for creatinine clearance where the container may not be sterile)
Method by specimen bag:
Specimen bag
Disinfectant pads (2% chlorhexidine and 70% alcohol or 70% alcohol only, as directed by your healthcare team): for the specimen bag
60 ml syringe
23G needles if your child is connected to the cycler or 18G needles if not connected to the cycler
Sharps container: for needles
Refer to your healthcare team if the materials used or the sequence of steps taught is different from what is described in the method of care.
Depending on your child’s age and condition, always encourage your child’s autonomy in carrying out the method of care.
Per specimen bag for cell count and culture
Step 1: Anticipation
You and your child are a team. Encourage autonomy by making realistic choices about what they can do to help you.
Step 2: Preparation
Prepare the environment: Identify a place to perform the treatment.
Prepare your child:
Get help if needed.
Position your child to safely assess the catheter insertion site in one of the positions discussed with your healthcare team, based on your child’s comfort, age and ability to cooperate.
Begin distraction strategies. Prepare yourself: Choose a time when you are ready to do the treatment. Review the method.
Perform basic procedures, as taught by your healthcare team:
Wash your work surface (eg, table) with alcohol or a disinfectant wipe (eg, Sani-Cloth® Plus).
Let the table dry.
Gather and inspect the materials.
Put on a mask.
Remove jewelry.
Wash your hands with a 4% chlorhexidine ssoap solution for 2 minutes.
Dry your hands well with a clean paper or towel.
Close the tap with the paper or towel.
Now touch only the dialysis equipment.
Now that you are ready to begin the treatment, take the opportunity to congratulate your child and offer encouragement during the rest of the procedure.
Safety: Carefully follow the care practice steps as you have been taught.
Flexibility: Be ready to adjust according to your child’s reactions during the procedure. As needed, reposition or select an alternative distraction strategy. Follow your child’s pace and rhythm.
Collaboration: Reassure your child, verbally and non-verbally. Acknowledge your child’s emotions and reactions. Help your child differentiate between the different sensations during a procedure.
Step 4: Check the connection of the specimen bag
Make sure that the tubing of the specimen bag is connected to the specimen line.
If the specimen bag is not already installed:
Open the specimen bag packaging.
Disinfect your hands with an antiseptic gel and rub until your hands are dry. Now touch only the dialysis equipment.
If the cycler has been assembled for more than one hour, disinfect the outside of the specimen line protective cap with a disinfectant pad.
Remove the cap from the specimen line and specimen bag tubing.
Connect the specimen line to the specimen bag tubing.
Install the specimen bag on the hook on the side of the cart.
Check that the tubing clamp is securely closed.
Why ?
The specimen bag is used to collect the effluent required for analysis.
Step 5: Let some effluent drain into the drainage bag
On the last drainage, let some effluent drain into the drainage bag:
20 ml if your child has a pediatric set,
40 ml if your child has an adult set.
Press the STOP button on the front of the cycler.
The message “Stopped: Drain” appears on the screen.
Close the clamp on the open drainage bag tubing.
Why ?
This step avoids collecting dialysate that remains in the patient line rather than effluent from the abdomen.
Collection of specimen for “routine” cell count and culture is always done at the beginning of the last drainage of the peritoneal dialysis treatment, unless there is an emergency or your healthcare team indicates otherwise.
Step 6: Fill the specimen bag
Open the clamp on the specimen bag tubing and the clamp on the specimen line.
Press the GO button on the front of the cycler.
The message “Drain x from y” appears on the screen.
Allow effluent to flow into the specimen bag until it is full (approximately 100 ml).
Press the STOP button again.
The message “Stopped: Drain” appears on the screen.
Close the clamp on the specimen bag tubing and the clamp on the specimen line.
Why ?
This step allows the effluent to collect in the specimen bag.
Step 7: Complete the drainage
Open the tubing clamp on the drainage bag.
Press the GO button on the front of the cycler again.
The message “Drain x of y” appears on the screen.
Make sure that the drainage continues.
Why ?
This step completes rest of the drainage.
Step 8: Continue treatment, if indicated
If the specimen was collected “routinely”: complete the dialysis treatment.
If the specimen was collected on an emergency basis: follow the instructions of your healthcare team (to continue or not to continue the treatment).
Why ?
This step completes the dialysis treatment if the specimen is collected “routinely”.
If the collection is done in an emergency situation, your healthcare team will give the appropriate instructions, depending on your child’s condition (whether to continue treatment or not).
Disconnect the specimen bag tubing from the specimen line.
Why ?
This step allows easy access to the collected specimen of effluent.
Step 10: Prepare the syringe
Without touching the tip of the syringe, screw the needle into it by turning clockwise, about ¼ turn.
Leave the protective cap in place on the needle.
Why ?
This step prepares the needle and syringe safely for the next step.
Step 11: Disinfect your hands
Disinfect your hands with an antiseptic gel.
Apply a generous amount to cover the entire surface of your hands.
Rub until your hands are dry (20-30 seconds).
Now touch only the dialysis equipment.
Why ?
This hand disinfection prevents contamination for the rest of the procedure.
Step 12: Disinfect the specimen bag port
Disinfect your hands with an antiseptic gel and rub until your hands are dry. Now touch only the dialysis equipment.
Scrub the specimen port vigorously with a disinfectant pad for 15 seconds.
Allow to dry completely.
Make sure nothing touches the specimen port to avoid contamination.
Why ?
Disinfection is necessary to prevent bacteria or particles on the specimen port from entering the bag when the needle is inserted.
Step 13: Collect the specimen in a syringe
Remove the protective cap from the syringe needle.
Insert the entire needle into the center of the injection port of the bag. Be careful of the angle of the needle so as not to puncture the bag.
Pull back the plunger and withdraw the required amount of effluent (60 ml).
Why ?
This step allows safe collection of the effluent specimen.
Step 14: Transfer the specimen to the containers
Remove the lids from the containers and place them upright on a clean surface.
Transfer the effluent to the containers, avoiding touching the rims, in the amount recommended by your healthcare team (10 ml for a cell count and 50 ml for a culture).
Why ?
Transferring the specimen to a sterile container prevents contamination before analysis.
Step 15: Close the containers
Put the lids back on the containers.
Make sure the lids are tightly screwed on.
Why ?
This step ensures that the containers are sealed and secure.
Step 16: Dispose of the material
Dispose of the remaining effluent in the toilet.
Dispose of the syringe with its needle in the sharps container.
Why ?
Effluent is a waste product that must be disposed of in a sanitary manner.
Needles must be disposed of safely.
Step 17: Identify the container
Label the 10 ml container that the specimen collected is for cell counting. The container can be stored at room temperature.
Label the 50 ml container that the specimen collected is for culture. The container should be kept cold (in the refrigerator or on an ice pack) if transport to the laboratory is not immediate.
Why ?
This step ensures that the correct volumes are saved for each type of analysis.
Be prepared to recognize the challenges faced and to provide positive feedback. Help your child recognize his/her strengths. Acknowledge the collaborative teamwork.
Listen to what your child says about the parts of the procedure that were difficult or painful.
Comfort your child and recognize your child’s collaboration with positive feedback.
Highlight your child’s specific strengths that helped make the procedure positive.
Discuss with your child what might be done the same or differently the next time the care is needed.
Keep your promises if you have promised a reward, follow through.
Reward yourself too.
Per drainage bag for creatinine clearance
Step 1: Anticipation
You and your child are a team. Encourage autonomy by making realistic choices about what they can do to help you.
Step 2: Preparation
Prepare the environment: Identify a place to perform the treatment.
Prepare your child:
Get help if needed.
Make sure your child is properly positioned to perform the treatment.
Prepare yourself: Choose a time when you are ready to do the treatment. Review the method.
Safety: Carefully follow the care practice steps as you have been taught.
Flexibility: Be ready to adjust according to your child’s reactions during the procedure. As needed, reposition or select an alternative distraction strategy. Follow your child’s pace and rhythm.
Collaboration: Reassure your child, verbally and non-verbally. Acknowledge your child’s emotions and reactions. Help your child differentiate between the different sensations during a procedure.
Step 4: Check the disconnection of the cycler
Make sure your child is disconnected from the cycler (that the patient line is disconnected from the catheter extension).
Why ?
“Routine” creatinine clearance specimen collection is always performed at the end of peritoneal dialysis treatment.
Step 5: Prepare the container
Remove the lid from the container and place it face up on a clean surface.
Why ?
The specimen will be poured into a clean container for analysis.
Step 6: Prepare the drainage bag
Shake the drainage bag.
Remove the protective cap from the end of the drainage port.
Why ?
Shaking the bag distributes the content of the effluent so that the specimen will be accurate.
Step 7: Collect the specimen
Open the drainage port clamp(s).
Allow the amount of effluent recommended by your healthcare team to drain (minimum 50 ml). Try to fill the container.
Close the drain port clamp(s).
Replace the protective cap on the end of the drainage port.
Why ?
Once the specimen is collected, it is ready to be analyzed.
Step 8: Close the container
Put the lid back on the container.
Make sure the lid is screwed on tightly.
Why ?
This step seals the container and secure the specimen.
Be prepared to recognize the challenges faced and to provide positive feedback. Help your child recognize his/her strengths. Acknowledge the collaborative teamwork.
Listen to what your child says about the parts of the procedure that were difficult or painful.
Comfort your child and recognize your child’s collaboration with positive feedback.
Highlight your child’s specific strengths that helped make the procedure positive.
Discuss with your child what might be done the same or differently the next time the care is needed.
Keep your promises if you have promised a reward, follow through.
Disclaimer of Liability: By using this site, you acknowledge that you have read this disclaimer
and agree to
all of its terms. Before making any decisions regarding your health or if you have any medical questions, you
should first consult a physician or qualified health care professional who can provide recommendations tailored
to your specific needs. The information published on this site does not constitute a recommendation for
treatment (preventive or curative), a prescription or a diagnosis and is not a substitute for the advice of a
physician or qualified health professional.
As medical and technical knowledge is constantly evolving, the content of this site is made available for
information purposes only. The contributors to this site, including clinical experts in pediatrics from across
Quebec, make every effort to ensure that the information made available on this site is as accurate and reliable
as possible, without guaranteeing the completeness or total absence of error of its content. The opinions
contained in this site are the sole responsibility of the author(s) and are not binding on the contributors to
this site. These opinions do not necessarily reflect the official viewpoint of the organizations mentioned, nor
that of their directors or representatives. The contributors to this site cannot and will not assume any
responsibility for the use of the published content or for the information otherwise accessible through any link
or reference source. Any quotation or reference to a source external to this site is for informational purposes
only and does not constitute an endorsement or claim, express or implied, regarding the content or validity of
the information obtained from that external source.
All rights reserved: The contents of this site may not be reproduced or disseminated, in whole
or in part, in any manner or by any means, electronic, mechanical, including photocopying, recording, or
otherwise, or stored in a retrieval system of any kind that is not limited to private use, without the prior
written permission of the copyright holder.
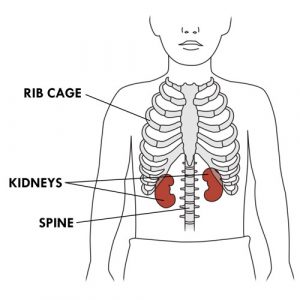
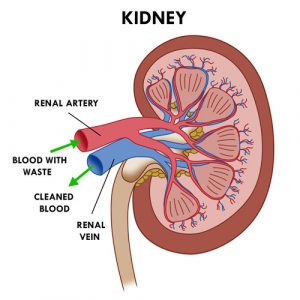
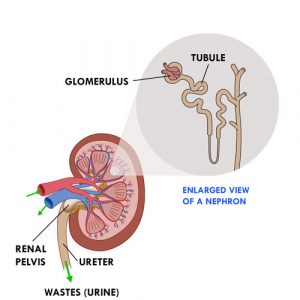
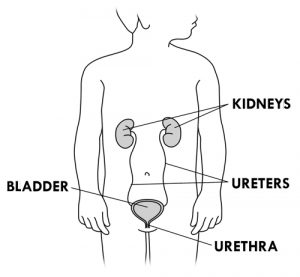

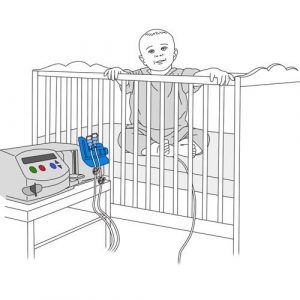
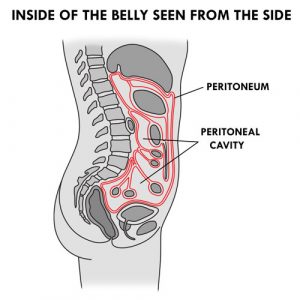
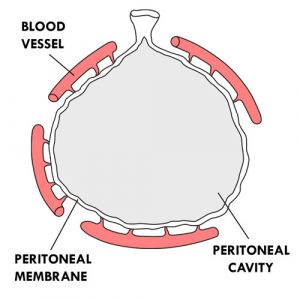
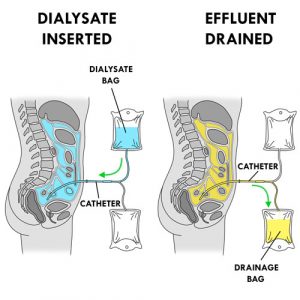
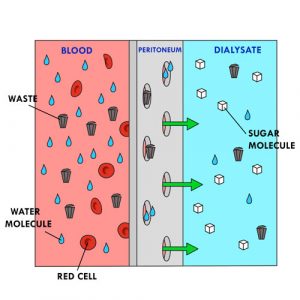
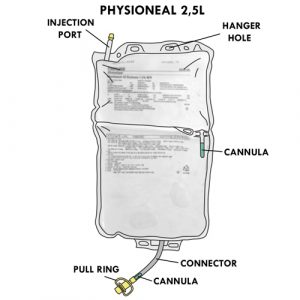
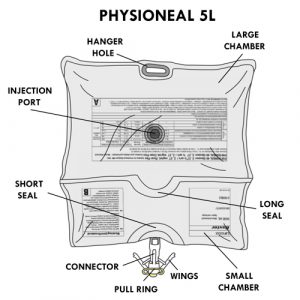
 Contains glucose in concentrations of 0.5%, 1.5%, 2.5% or 4.25%, sodium, calcium, magnesium, chloride and lactate.
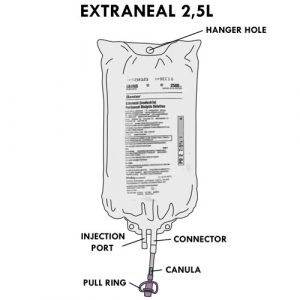
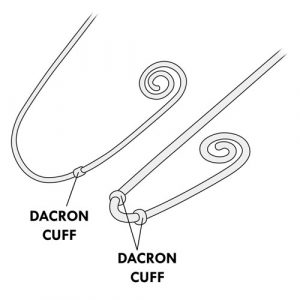

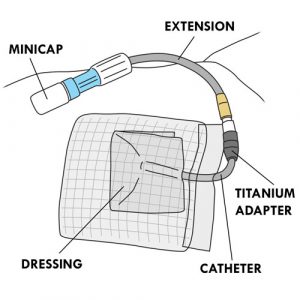
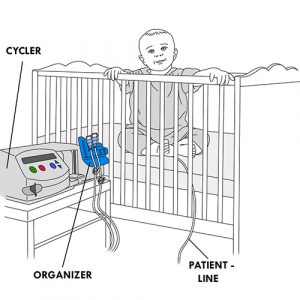
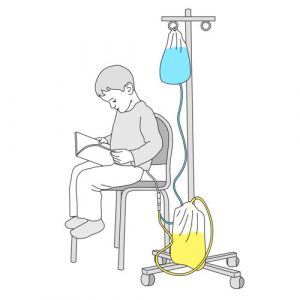
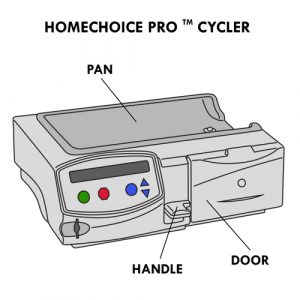
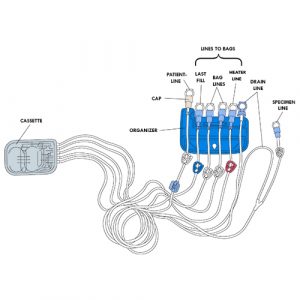 Cassette: has two separate compartments; one is used to measure the amount of dialysate infused and the other the amount of effluent drained.